


TFT Shield pour Arduino Nano - Démarrer
Composants et fournitures
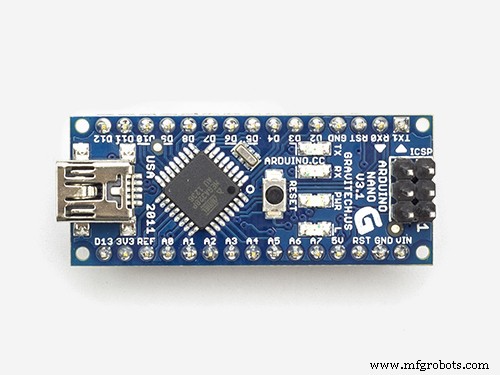 |
| × | 1 | |||
| × | 1 | ||||
| × | 1 |
À propos de ce projet
L'histoire
Il n'y a presque personne qui n'a pas vu et qui ne sache pas ce qu'est un écran couleur. Et, probablement, beaucoup ont fait (ou aimeraient faire) un projet sur Arduino en utilisant un écran couleur. De plus, de tels écrans sont aujourd'hui très répandus et abordables. Il existe de nombreux écrans qui diffèrent par leur résolution, leur taille d'écran et leur interface. Je voudrais m'attarder sur l'un de ces affichages. On s'intéressera à un affichage avec une interface de SPI, une résolution de 320x240 pixels et une diagonale d'écran de 2,8" (ainsi que 2,4" et 3,2"). L'interface SPI est très pratique pour se connecter à un microcontrôleur, puisque a un petit nombre de lignes de signal. Et la vitesse de SPI vous permet de mettre à jour rapidement le contenu de l'écran. En général, beaucoup d'avantages. Mais il y a des moments inconfortables. Par exemple, il est nécessaire de coordonner davantage les niveaux logiques dans le cas de la connexion de l'écran aux cartes Arduino avec une alimentation de 5 V. Pour une connexion rapide et facile de l'un de ces écrans (avec l'interface SPI) à Arduino Nano, nous utiliserons une somme modique - un blindage TFT.
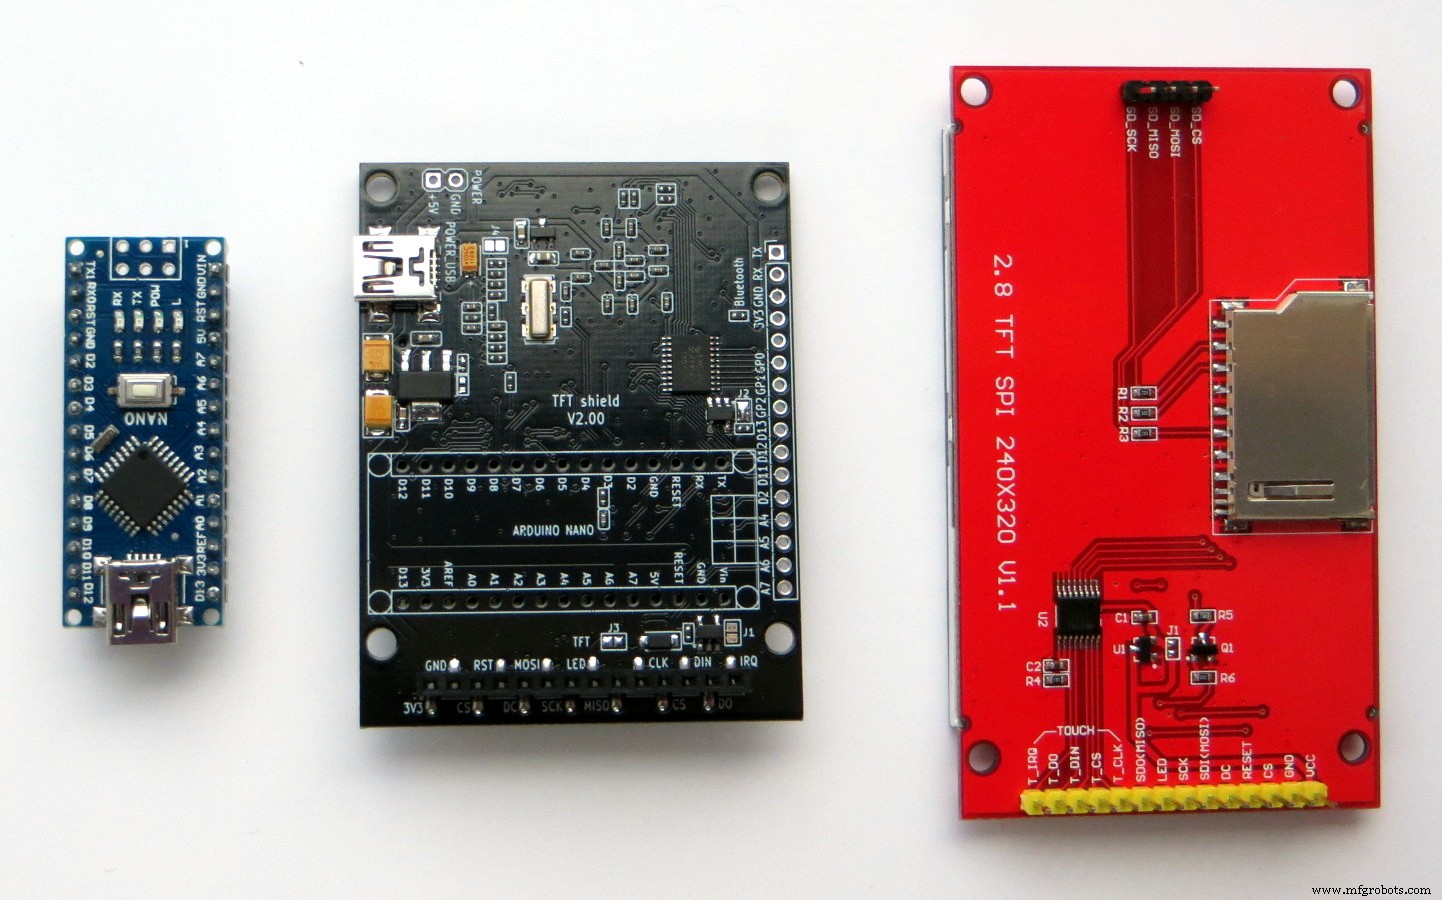
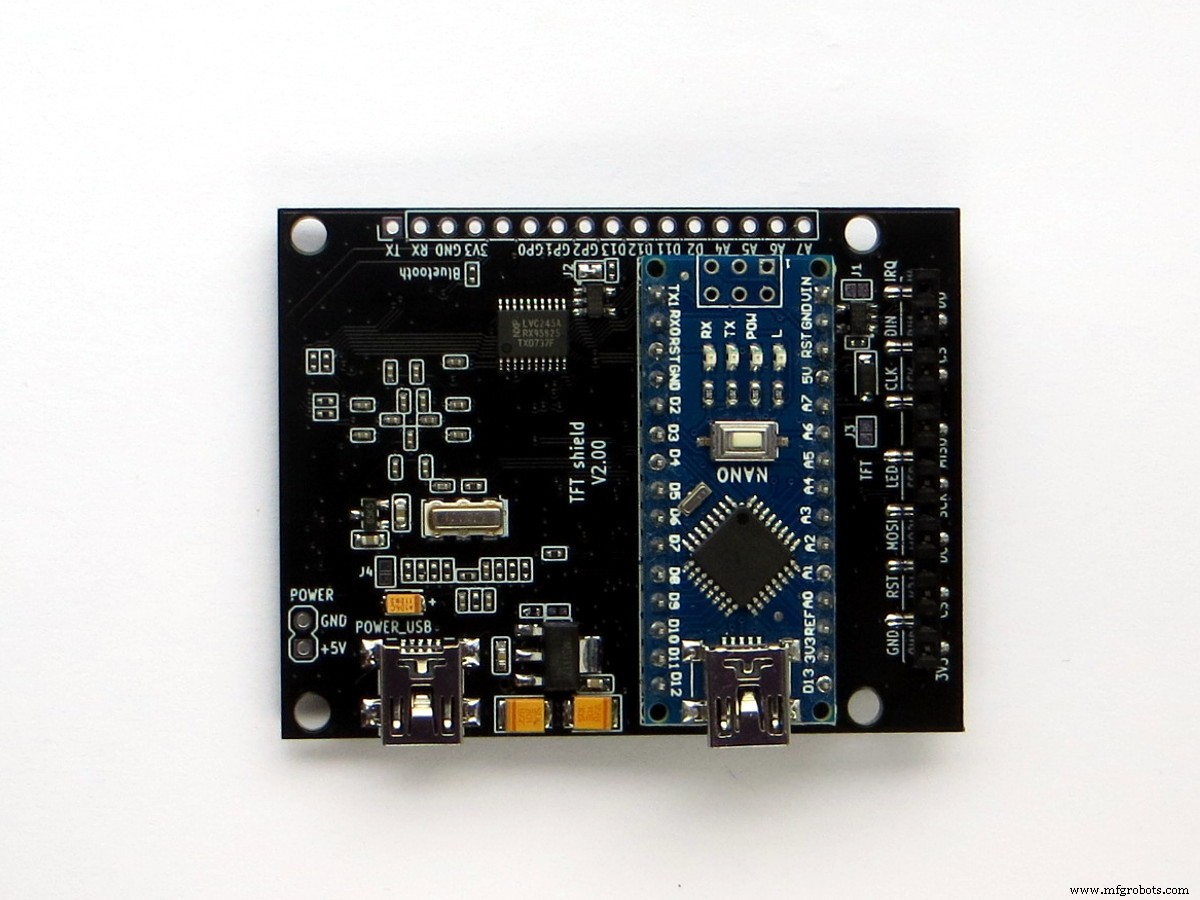
Ce shield est la deuxième version (légère, pour Arduino Nano) de TFT Shield pour Arduino Uno, que vous pouvez lire ici et ici et ici.
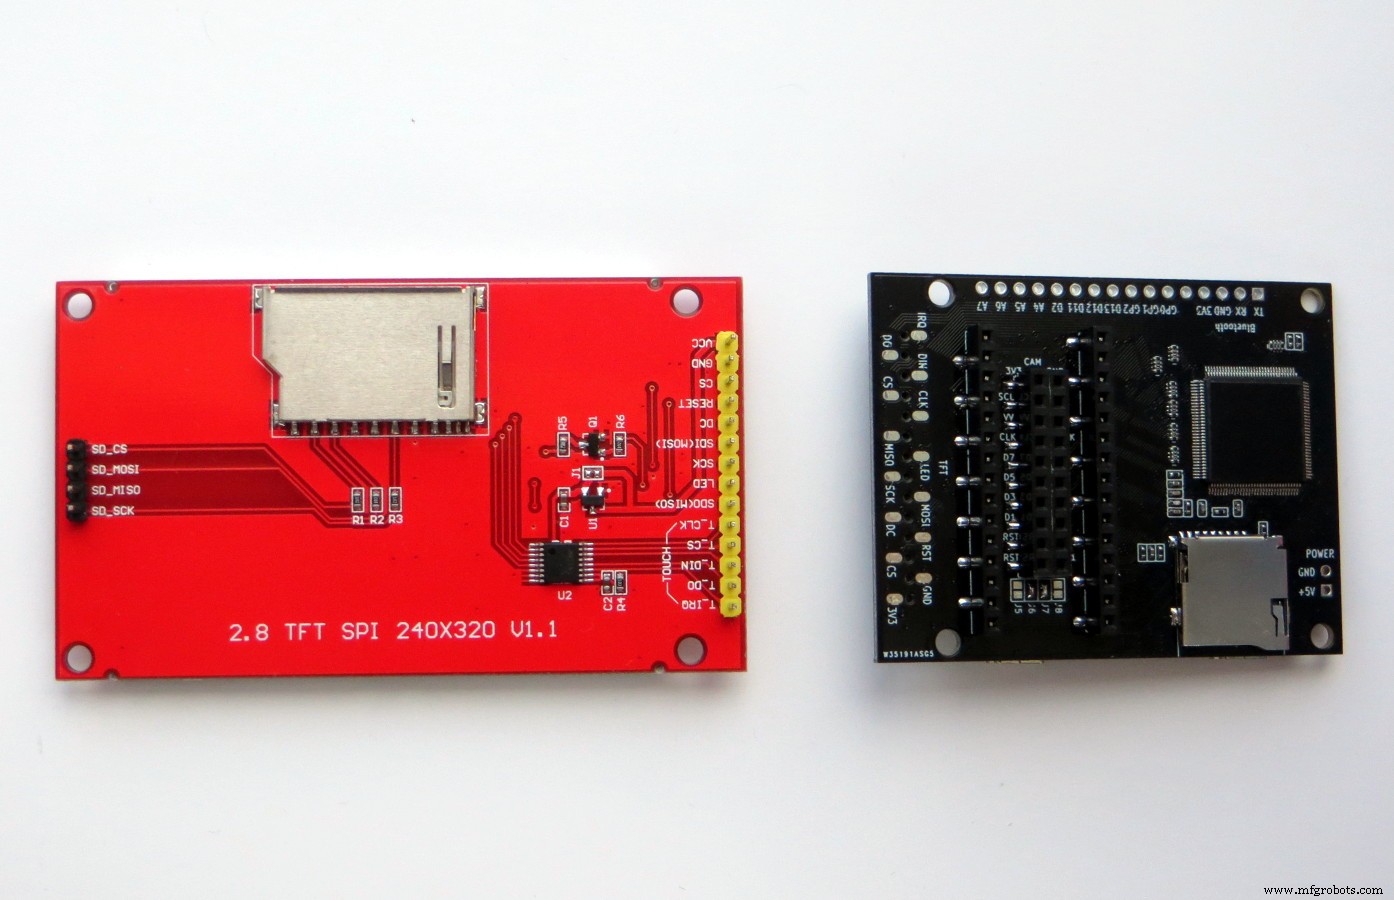
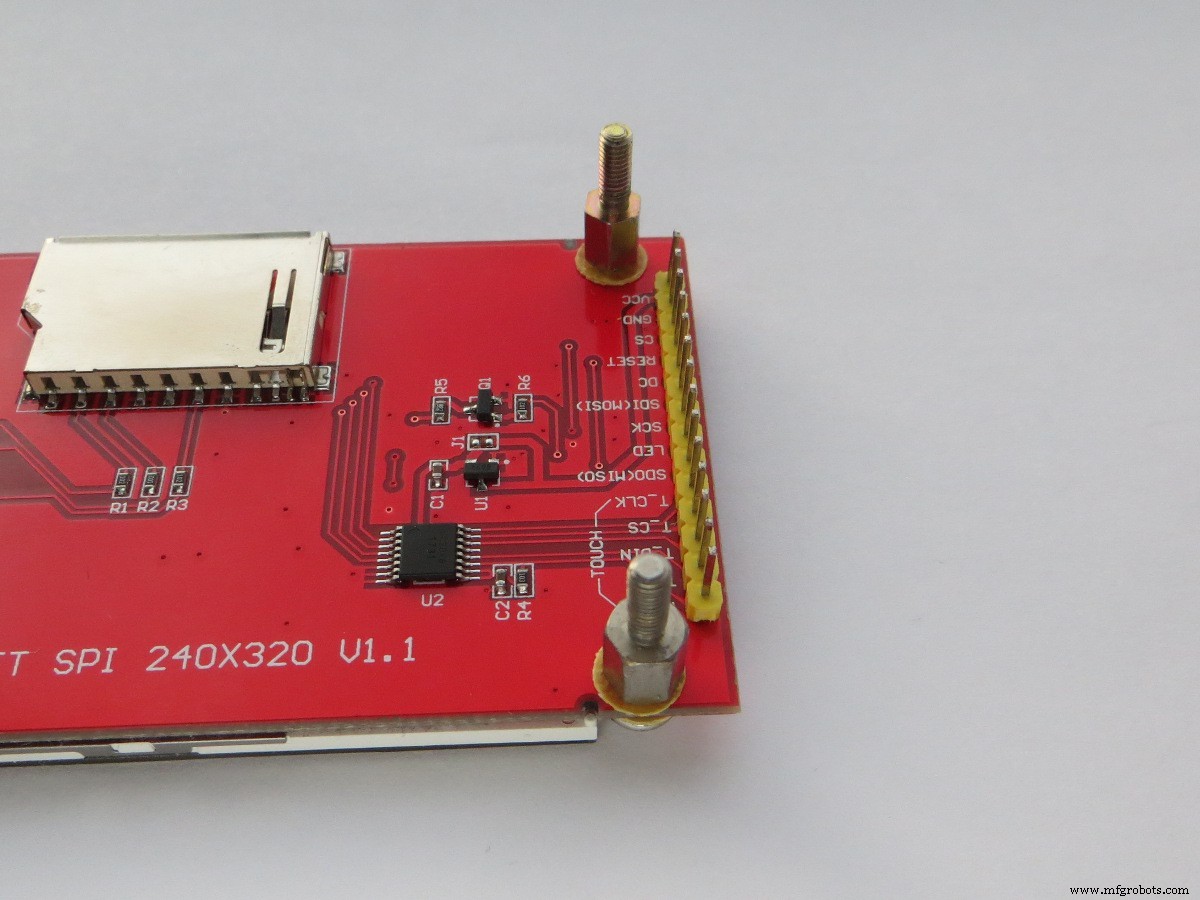
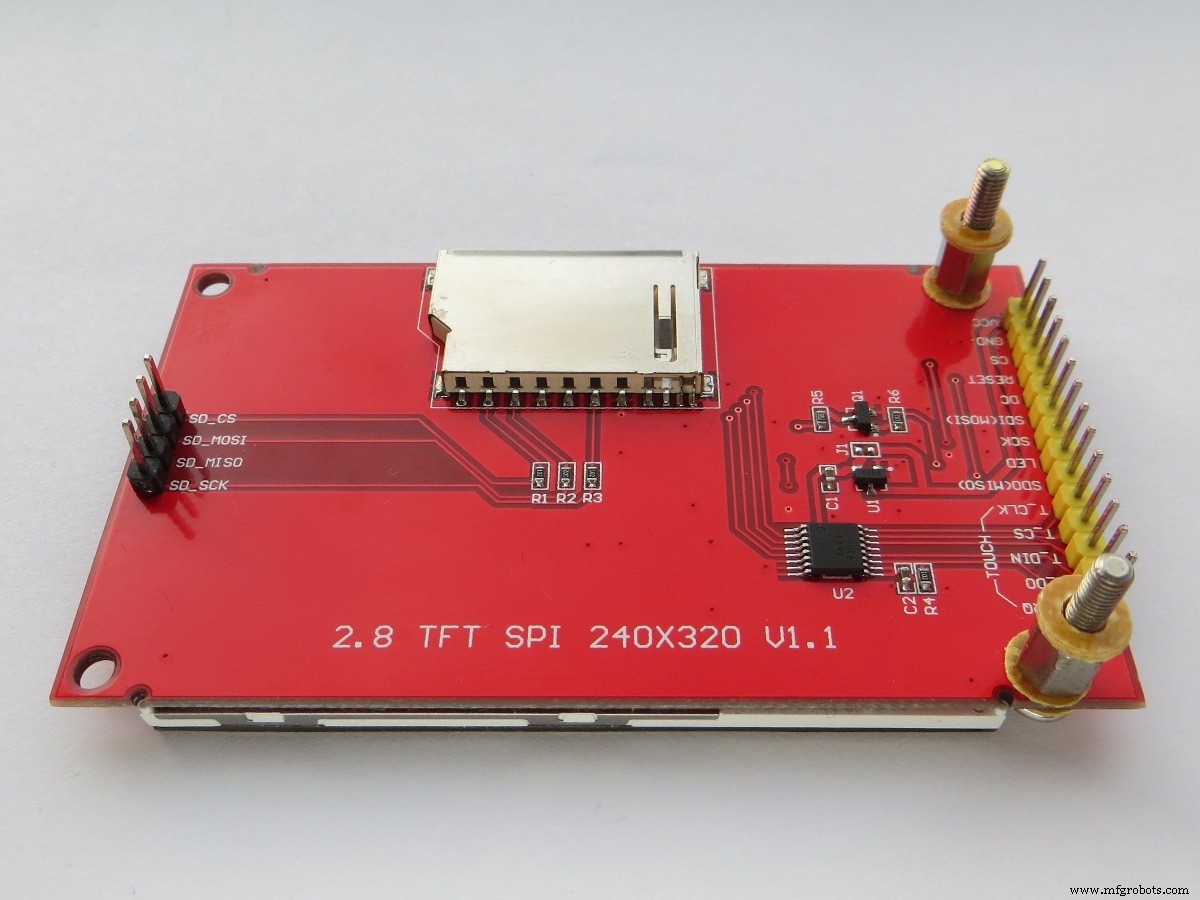
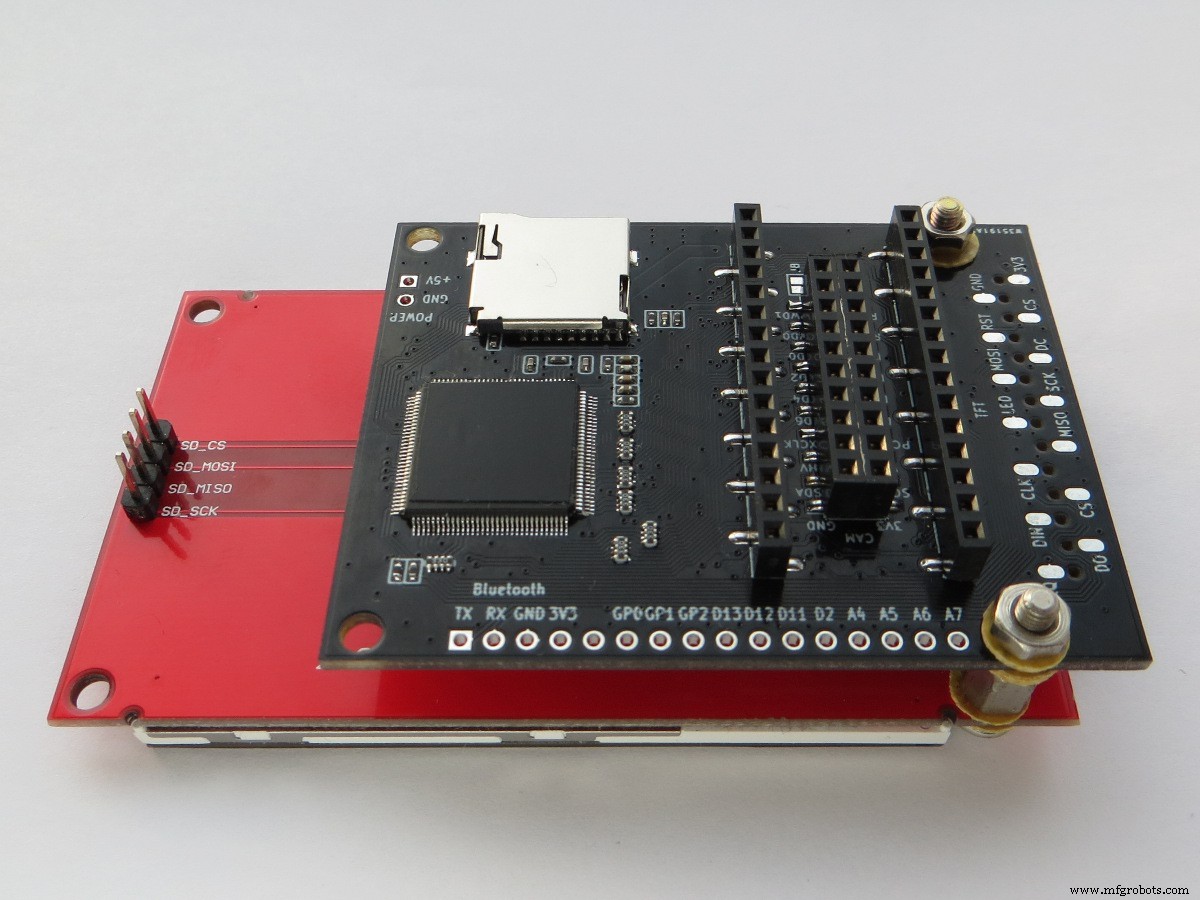
Brève description du bouclier TFT :
- La taille de la planche est de 64x49 mm,
- Connecteur à 30 broches pour connecter Arduino Nano,
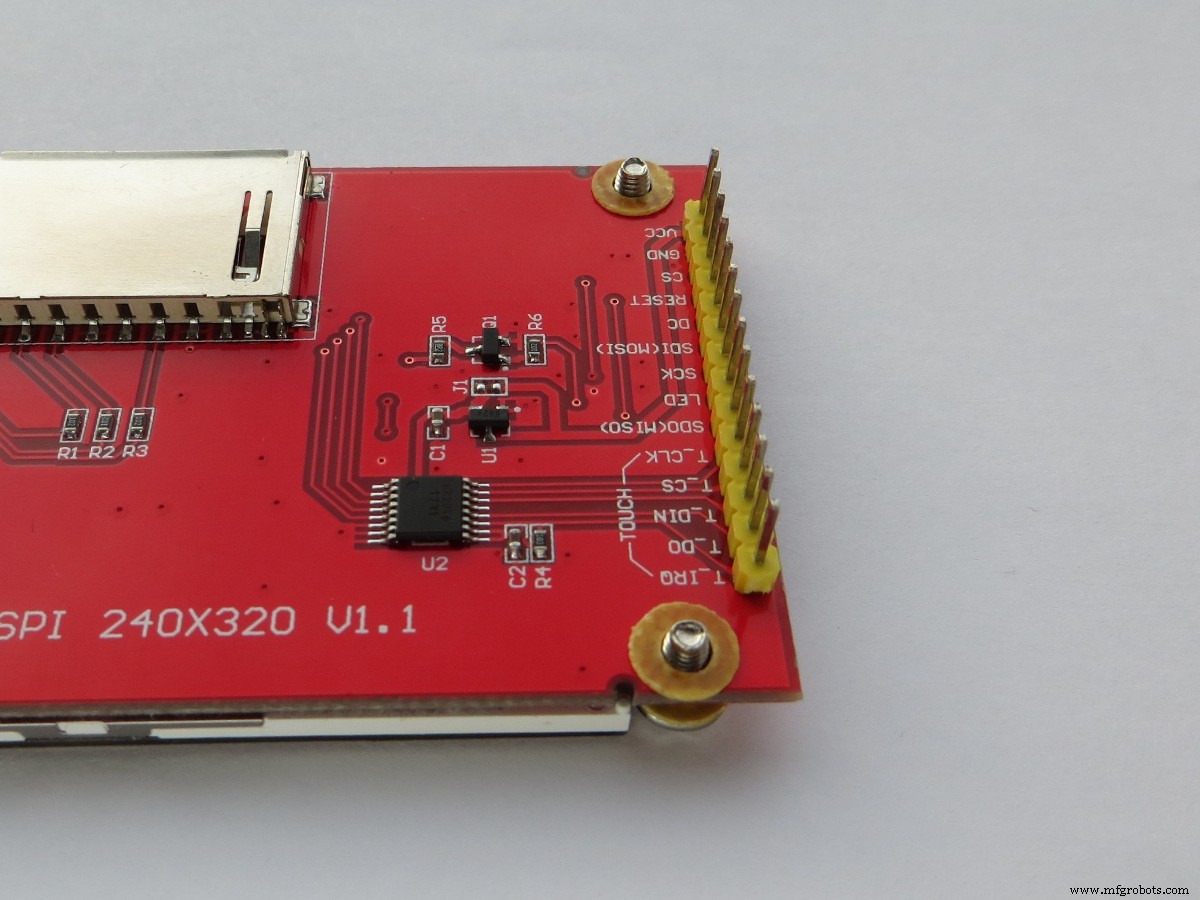
- Connecteur 14 broches pour connecter un écran TFT 320x240 avec une interface SPI (incluant un écran tactile),
- Connecteur pour carte microSD,
- Connecteur pour module Bluetooth (HC-06),
- Connecteur 20 broches pour caméra OV7670 (ainsi que d'autres),
- Connecteur mini USB, ainsi qu'un connecteur séparé à 2 broches pour l'alimentation 5 V.
Alors, commençons.
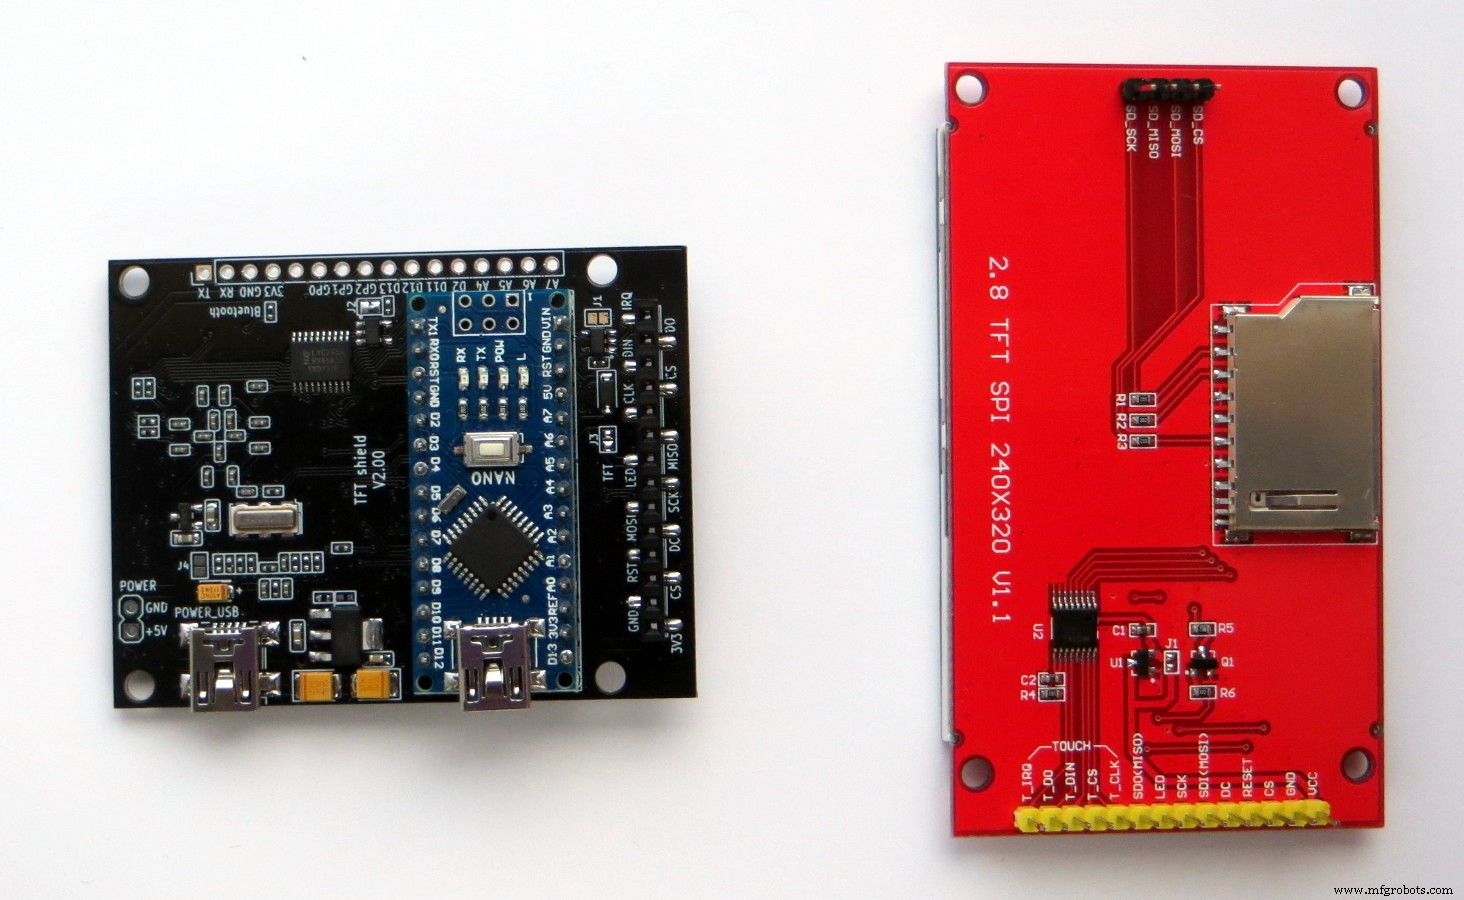
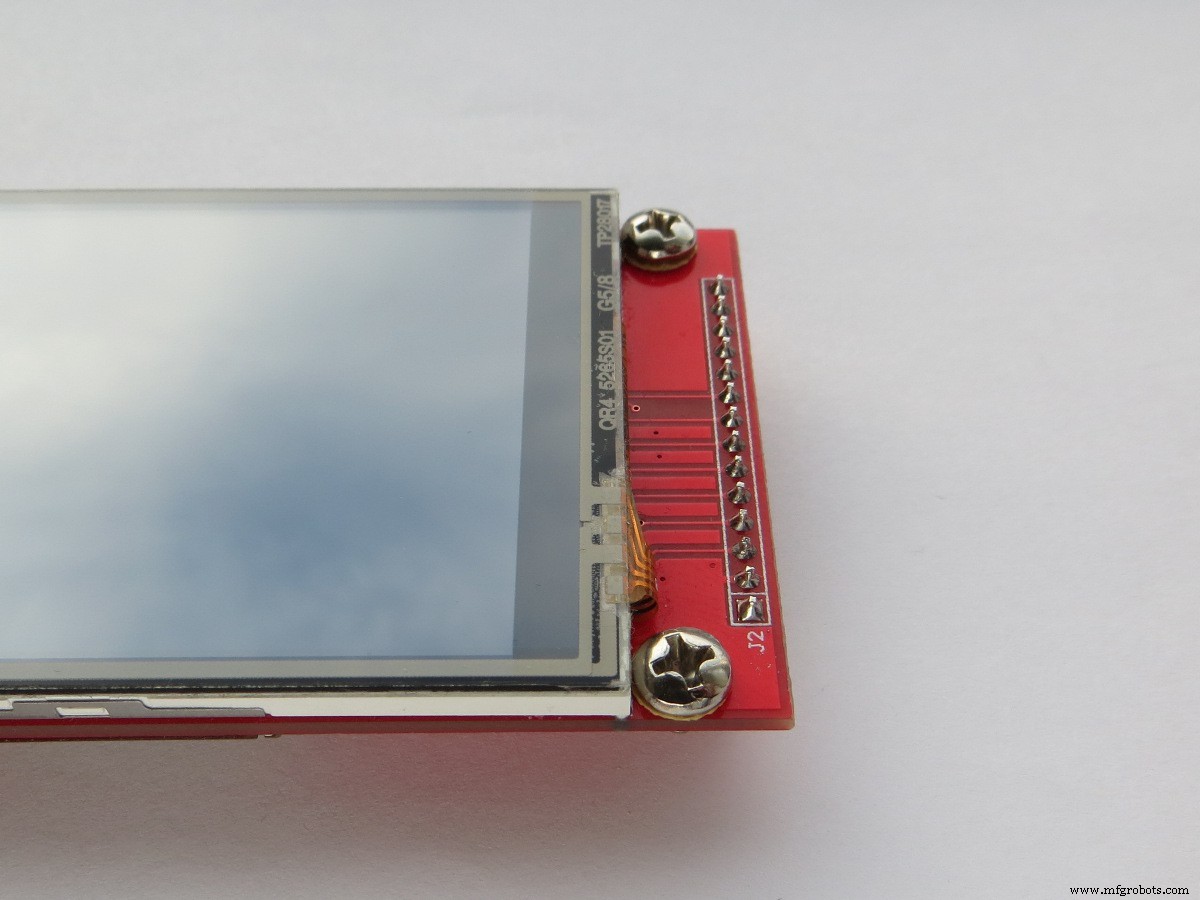
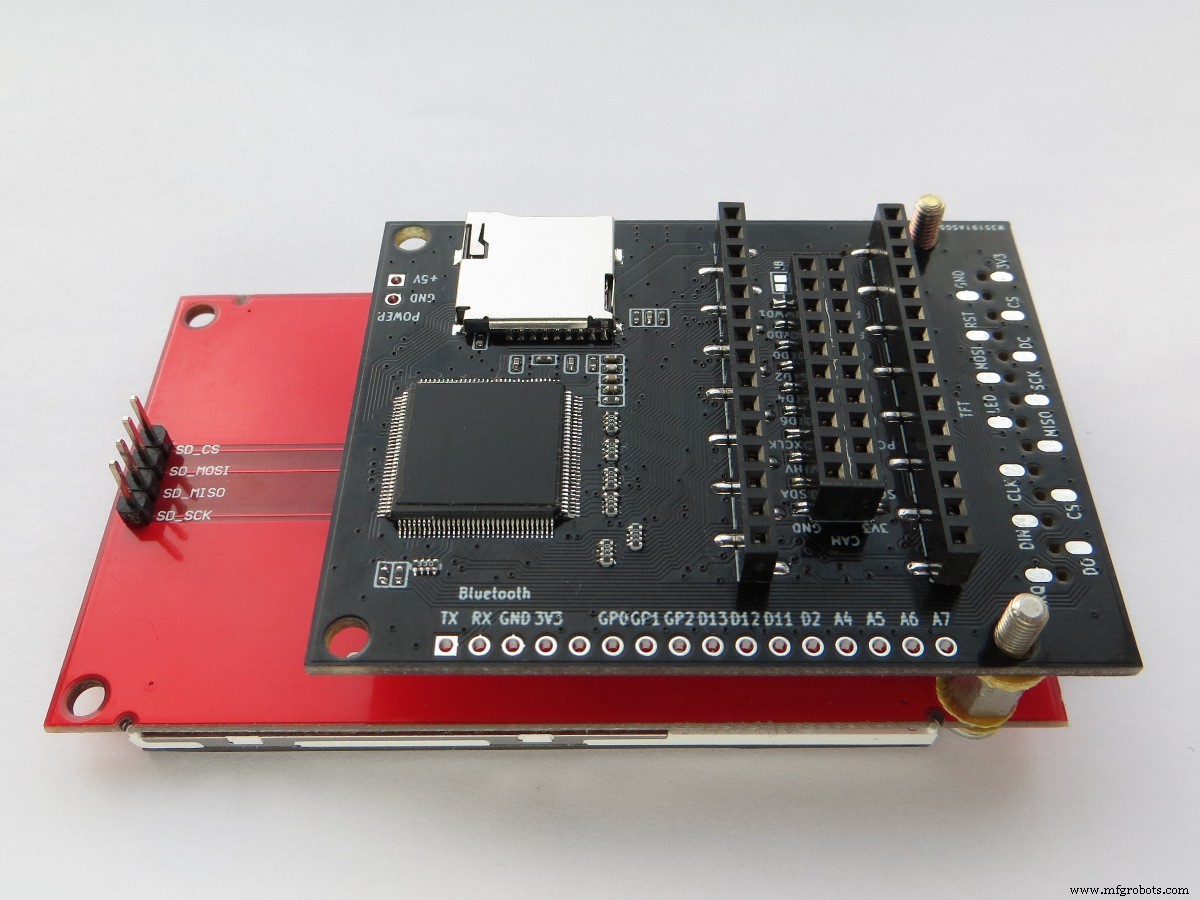
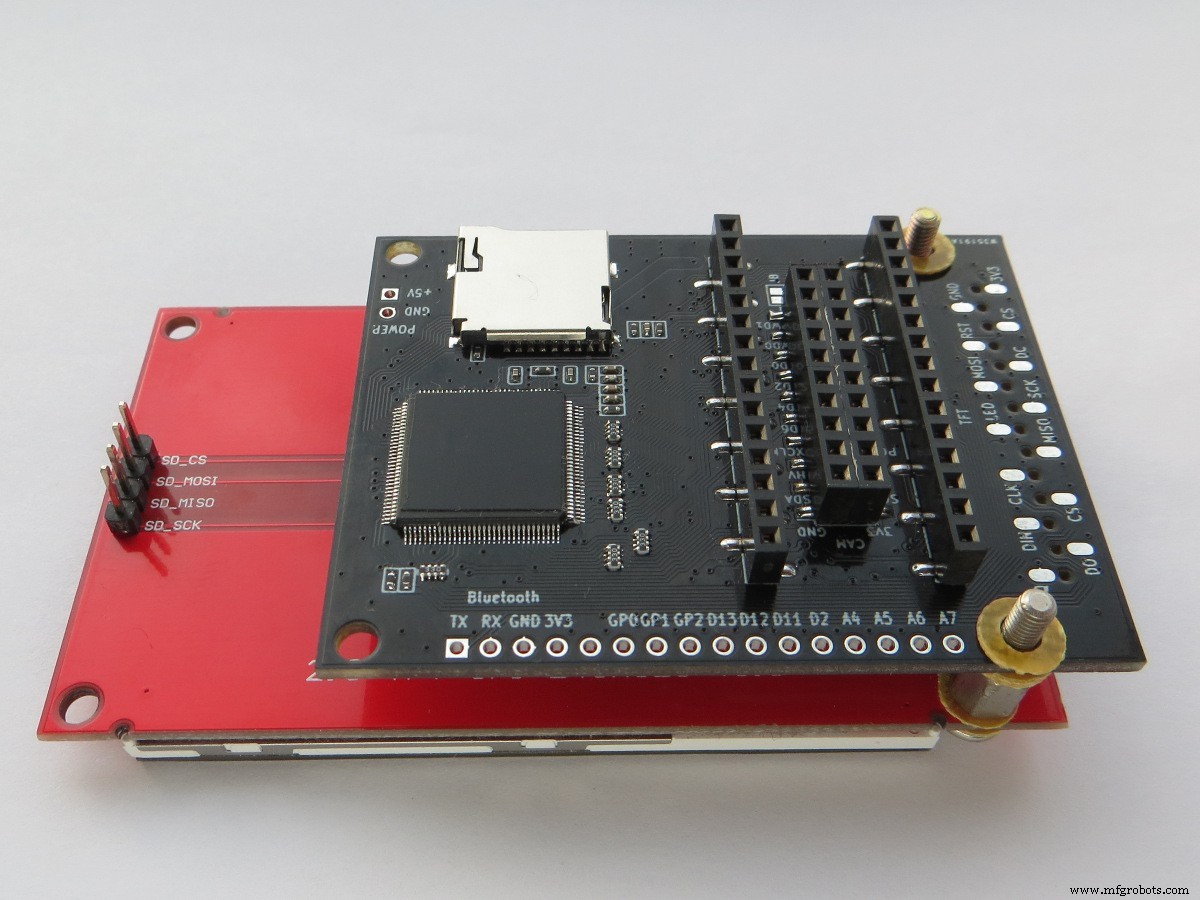
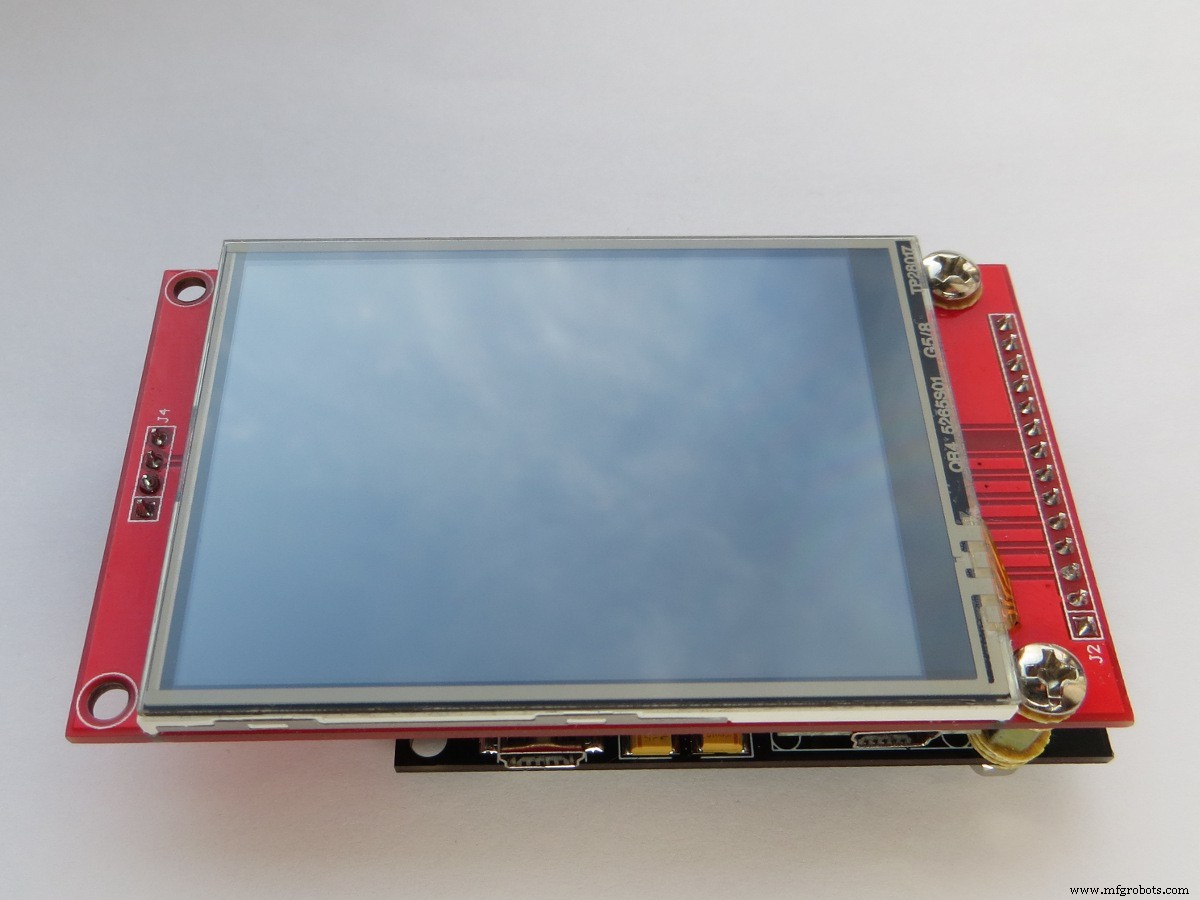
Assemblage
L'assemblage des planches est très simple. Mais il faut prendre soin de lire les désignations des contacts avant l'installation. Vous devez d'abord installer la carte Arduino Nano comme indiqué sur la photo. Après cela, un écran est connecté, qui peut être connecté à la fois sur un côté de la carte (méthode 1 ) et de l'autre (méthode 2 ). Après cela, vous pouvez connecter l'alimentation avec un câble mini USB. Voici des photos.
Méthode 1 :
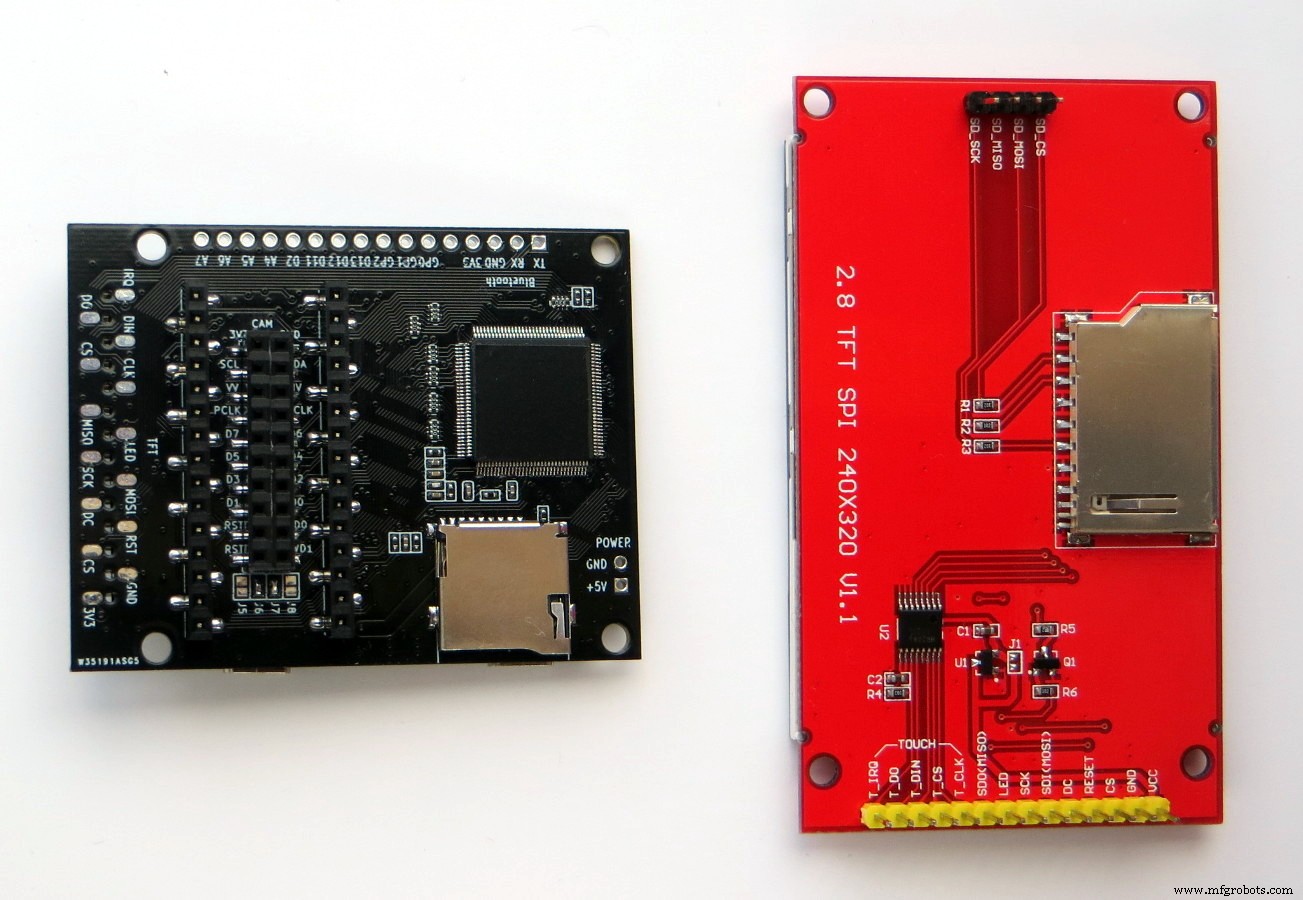


Méthode 2 :

Après l'assemblage, vous pouvez procéder au téléchargement des croquis, mais avant ceux-ci, n'oubliez pas d'installer la bibliothèque nécessaire pour travailler avec le bouclier TFT. La bibliothèque se trouve sur le lien :https://github.com/YATFT/YATFT.
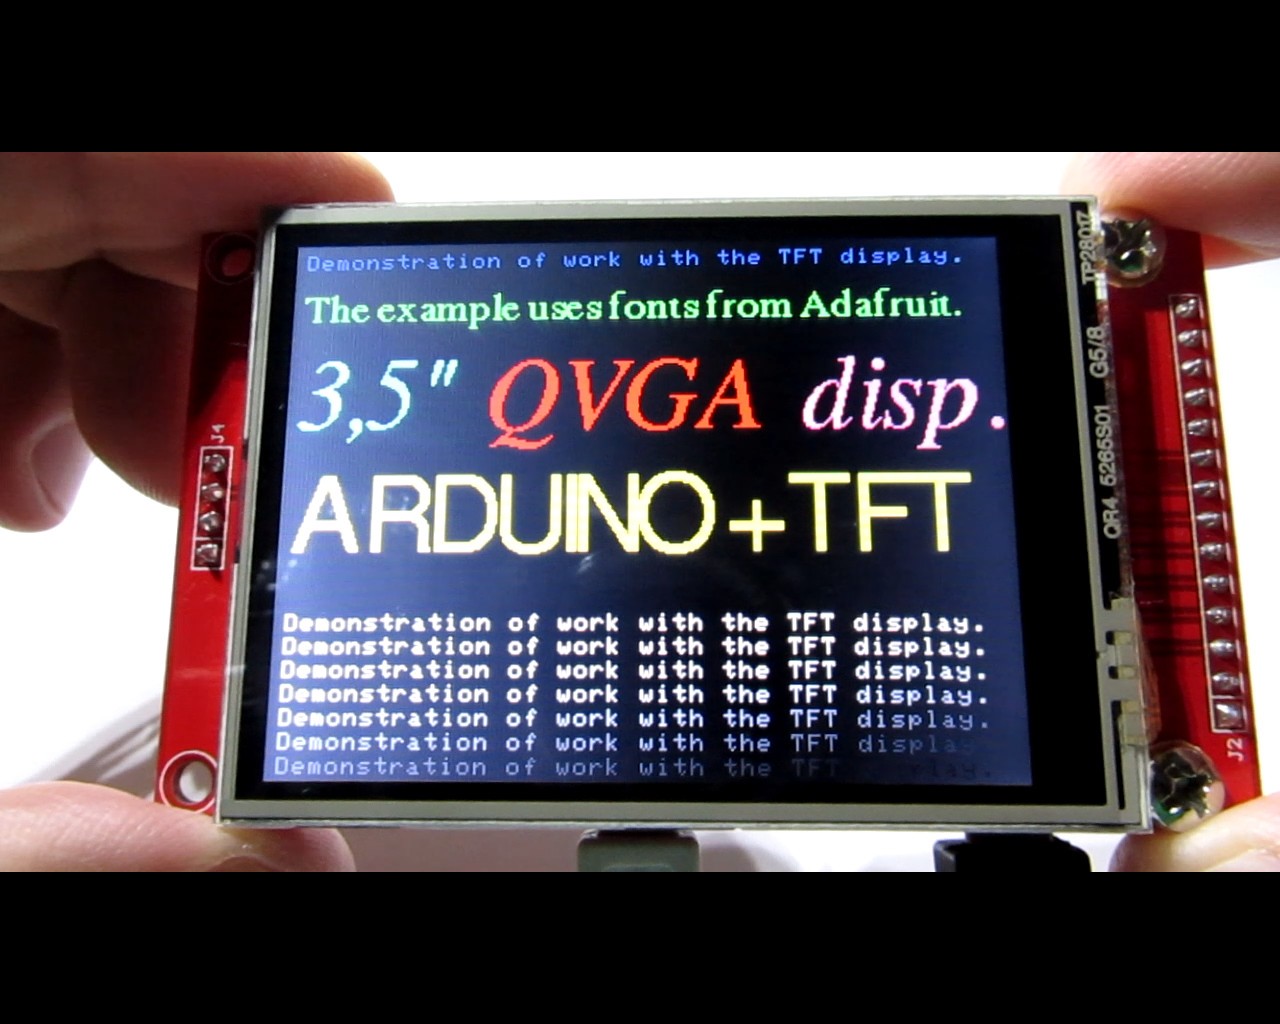
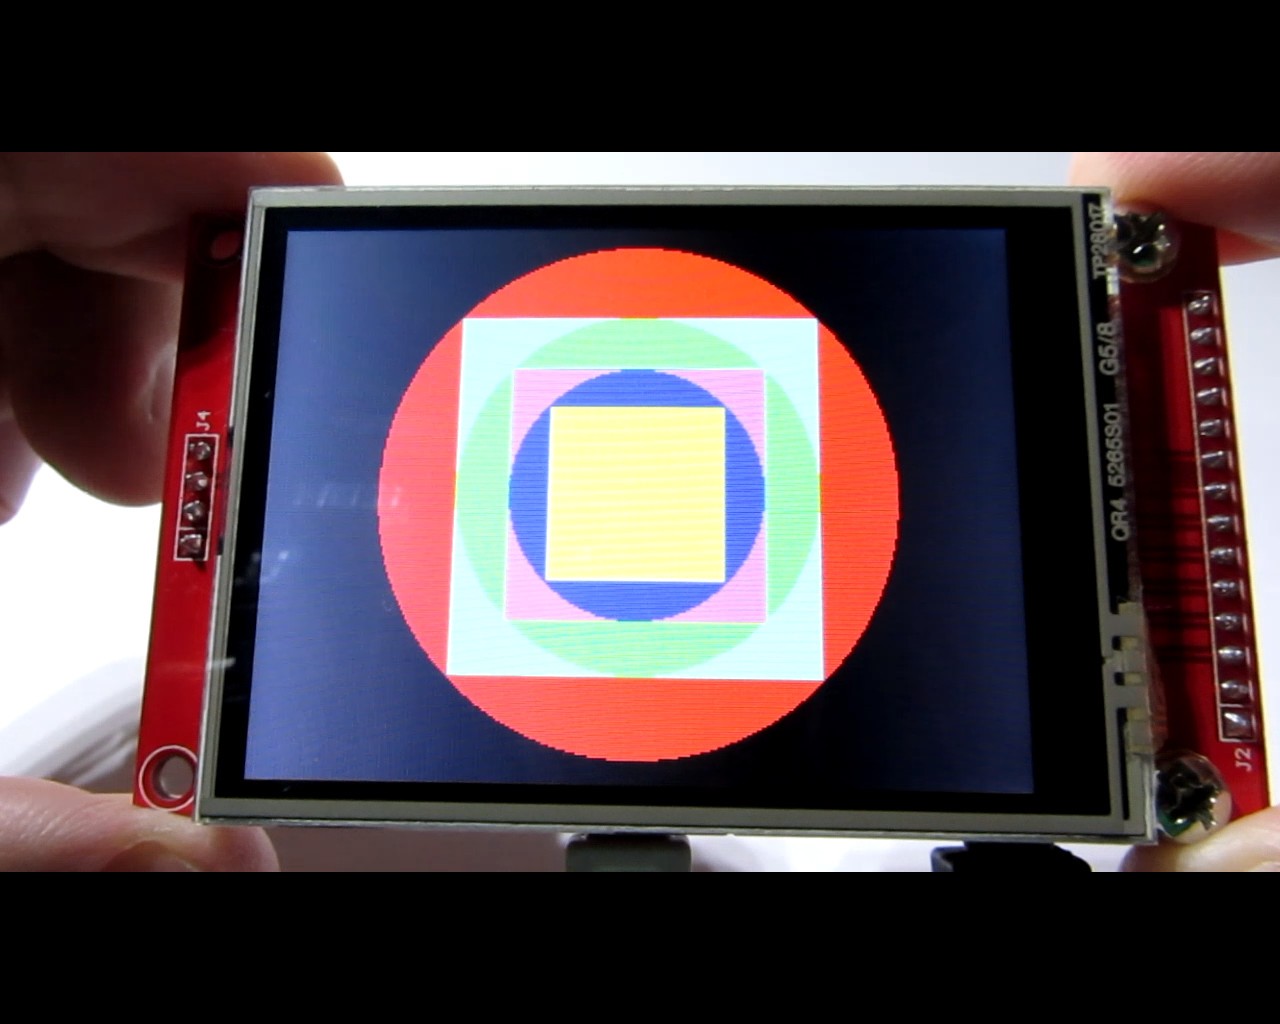
Démo 1. Graphiques et texte.
Ce chapitre fournit un exemple de travail avec du texte, des graphiques et un écran tactile. Pour plus de commodité, il est recommandé de programmer d'abord la carte Arduino Nano séparément, puis d'assembler l'appareil (mais vous pouvez également programmer la carte en tant que partie de l'appareil). Esquisse pour travailler avec du texte et des graphiques :
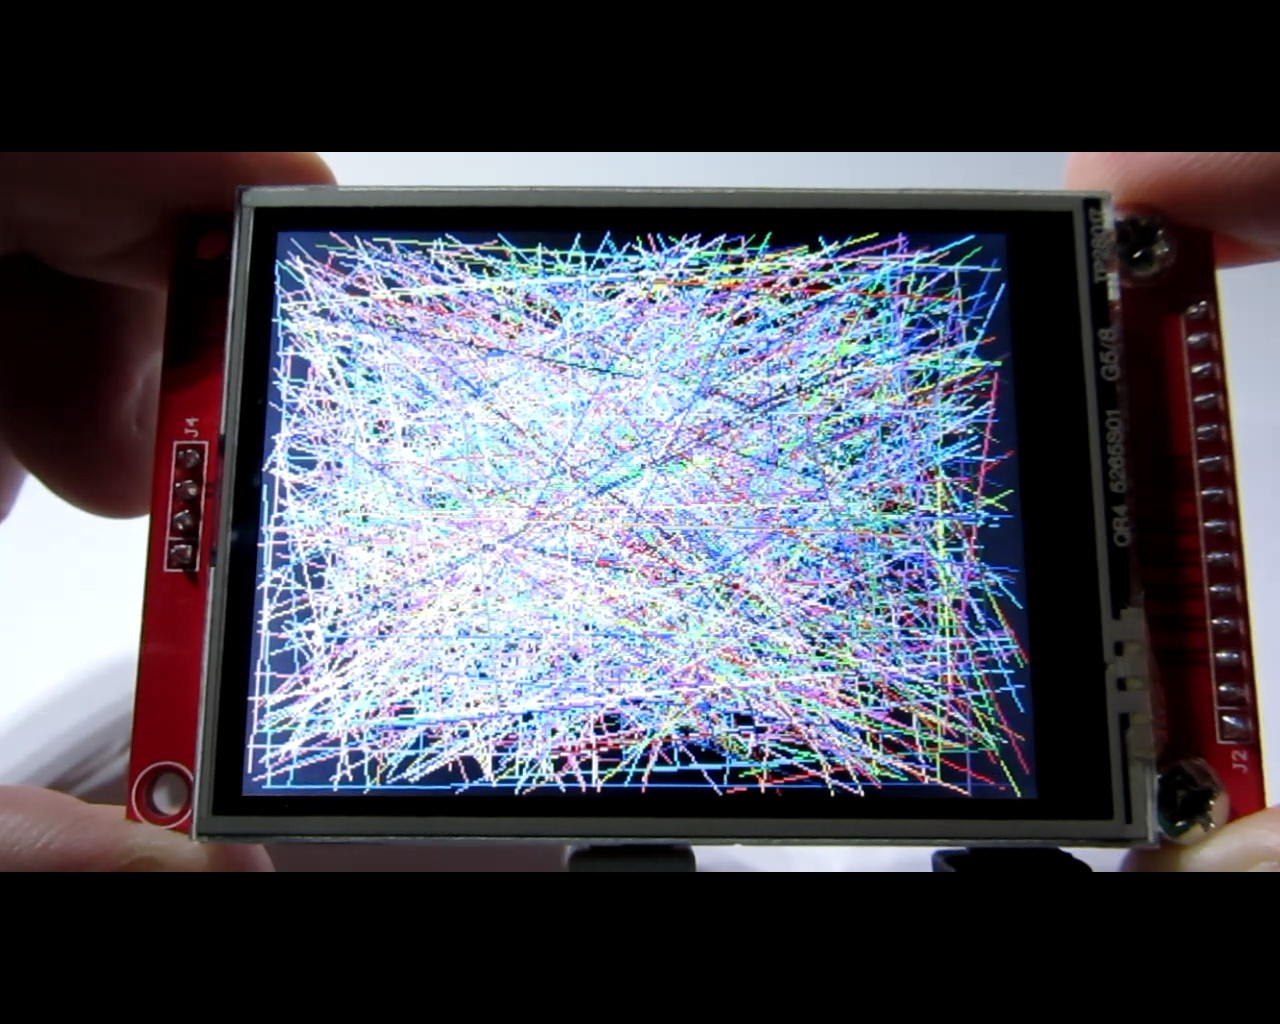
/************************************************ ************************************ LE LOGICIEL ET LA DOCUMENTATION SONT FOURNIS "EN L'ÉTAT" SANS GARANTIE D'AUCUNE* SORTE, EXPLICITE OU IMPLICITE, Y COMPRIS, SANS LIMITATION, TOUTE GARANTIE* DE QUALITÉ MARCHANDE, DE TITRE, DE NON-VIOLATION ET D'ADAPTATION À UN USAGE PARTICULIER*. EN AUCUN CAS L'AUTEUR OU SES CONCÉDANTS DE LICENCE NE SERONT RESPONSABLES OU* OBLIGÉS EN VERTU D'UN CONTRAT, D'UNE NÉGLIGENCE, D'UNE RESPONSABILITÉ STRICTE, D'UNE CONTRIBUTION*, D'UNE RUPTURE DE GARANTIE OU D'UNE AUTRE THÉORIE LÉGALE ÉQUITABLE DE TOUT DOMMAGE OU DÉPENSE DIRECT OU INDIRECT*, Y COMPRIS, MAIS SANS S'Y LIMITER, TOUT INCIDENT SPÉCIAL ,* DOMMAGES INDIRECTS, PUNITIFS OU CONSÉCUTIFS, PERTE DE PROFITS OU PERTE DE DONNÉES,* COT D'ACHAT DE BIENS DE REMPLACEMENT, DE TECHNOLOGIE, DE SERVICES OU DE TOUTE* RÉCLAMATION PAR DES TIERS (Y COMPRIS, MAIS SANS S'Y LIMITER, TOUTE DEFENSE DE CEUX-CI)* OU AUTRES COUTS SIMILAIRES .****************************************************** ******************************/#include // Bibliothèque spécifique au matériel#include // Inclut la bibliothèque Adafruit-GFX#include // Inclut les polices Adafruit#include #include YATFT tft(0);uint32_t total_t;uint16 Couleur[4] ={BLEU CLAIR, VERT CLAIR, ROUGE CLAIR, JAUNE CLAIR};uint16_t Gris[7] ={GRIS0, GRIS1, GRIS2, GRIS3, GRIS4, GR AY5, GRIS6} ;/************************************************ **********************************/void ClearScreen (void){ tft.SetColor(BLACK); // Définir la couleur du fone tft.ClearDevice(); // Remplir tout l'écran}void setup(){ Serial.begin(115200); // initialise le port série Serial.println("Arduino TFT_shield Exemple 1!"); tft.begin(); // initialise l'affichage}boucle vide(){ uint16_t x, y, x2, y2, mask_gray; uint16_t i; Écran propre(); // Polices Serial.print("1) Afficher les polices ("); total_time =millis(); tft.SetColor(BRIGHTBLUE); tft.SetFont(NULL); tft.OutTextXY(5, 5, "Démonstration du travail avec l'écran TFT."); tft.SetColor(VERT CLAIR); tft.SetFont(&FreeSerif9pt7b); tft.OutTextXY(5, 20, "L'exemple utilise des polices d'Adafruit."); tft.SetFont(&FreeSerifItalic24pt7b); tft.SetColor(BRIGHTCYAN); tft.OutTextXY(5, 45, "3,5''"); tft.SetColor(LUMINEUX); tft.OutTextXY(90, 45, "QVGA"); tft.SetColor(BRIGHTMAGENTA); tft.OutTextXY(230, 45, "disp."); tft.SetColor(BRIGHTYELLOW); tft.SetFont(&FreeSans24pt7b); tft.OutTextXY(5, 100, "A R D U I N O + T F T"); tft.SetFont(NULL); pour (i =0; i <7; i++) { tft.SetColor(Gray[i]); tft.OutTextXY(5, 170+10*i, "Démonstration de travail avec l'écran TFT."); } PrintTotalTime(); retard (3000); Écran propre(); // Circle Serial.print("2) Dessine un cercle ("); total_time =millis(); tft.SetColor(LUMINEUX); pour (i =10; i >1; i +=10) { tft.DrawCirc(GetMaxX()>>1, GetMaxY()>>1, i); } PrintTotalTime(); retard(1000); // DrawFillCircle &DrawFillRect Serial.print("3) Dessiner FillCircle et FillRect ("); total_time =millis(); tft.SetColor(LUMINEUX); tft.DrawFillCirc(GetMaxX()>>1,GetMaxY()>>1,110); tft.SetColor(BRIGHTCYAN); tft.DrawFillRect(GetMaxX()/2-77,GetMaxY()/2-77, GetMaxX()/2+77,GetMaxY()/2+77); tft.SetColor(VERT CLAIR); tft.DrawFillCirc(GetMaxX()>>1,GetMaxY()>>1,77) ; tft.SetColor(BRIGHTMAGENTA); tft.DrawFillRect(GetMaxX()/2-54,GetMaxY()/2-54, GetMaxX()/2+54,GetMaxY()/2+54); tft.SetColor(BRIGHTBLUE); tft.DrawFillCirc(GetMaxX()>>1,GetMaxY()>>1,54) ; tft.SetColor(BRIGHTYELLOW); tft.DrawFillRect(GetMaxX()/2-37,GetMaxY()/2-37, GetMaxX()/2+37,GetMaxY()/2+37); PrintTotalTime(); retard(1000); Écran propre(); // Arc Serial.print("4) Dessiner Arc ("); total_time =millis(); Écran propre(); tft.SetColor(BRIGHTBLUE); tft.DrawArc((GetMaxX()>>1)-60,(GetMaxY()>>1)-60,(GetMaxX()>>1)+60,(GetMaxY()>>1)+60,20, 30,0xFF); tft.SetColor(VERT CLAIR); tft.DrawArc((GetMaxX()>>1)-40,(GetMaxY()>>1)-40,(GetMaxX()>>1)+40,(GetMaxY()>>1)+40,20, 30,0xFF); tft.SetColor(LUMINEUX); tft.DrawArc((GetMaxX()>>1)-20,(GetMaxY()>>1)-20,(GetMaxX()>>1)+20,(GetMaxY()>>1)+20,20, 30,0xFF); PrintTotalTime(); retard(1000); Serial.print("5) Dessiner FillBevel ("); total_time =millis(); tft.SetColor(BRIGHTBLUE); tft.DrawFillBevel((GetMaxX()>>1)-60,(GetMaxY()>>1)-60,(GetMaxX()>>1)+60,(GetMaxY()>>1)+60,30); tft.SetColor(VERT CLAIR); tft.DrawFillBevel((GetMaxX()>>1)-40,(GetMaxY()>>1)-40,(GetMaxX()>>1)+40,(GetMaxY()>>1)+40,30); tft.SetColor(LUMINEUX); tft.DrawFillBevel((GetMaxX()>>1)-20,(GetMaxY()>>1)-20,(GetMaxX()>>1)+20,(GetMaxY()>>1)+20,30); PrintTotalTime(); retard(1000); Écran propre(); Serial.print("6) Dessiner l'arc ("); total_time =millis(); pour (i =0; i <4; i++) { tft.SetColor(Color[i]); tft.DrawArc((GetMaxX()>>1),(GetMaxY()>>1)-50,(GetMaxX()>>1),(GetMaxY()>>1)+50,50,60,0x11<>1),(GetMaxY()>>1)-30,(GetMaxX()>>1),(GetMaxY()>>1)+30,35,45,0x11<>1),(GetMaxY()>>1),(GetMaxX()>>1),(GetMaxY()>>1),20,30,0x11<
Quelques captures d'écran :

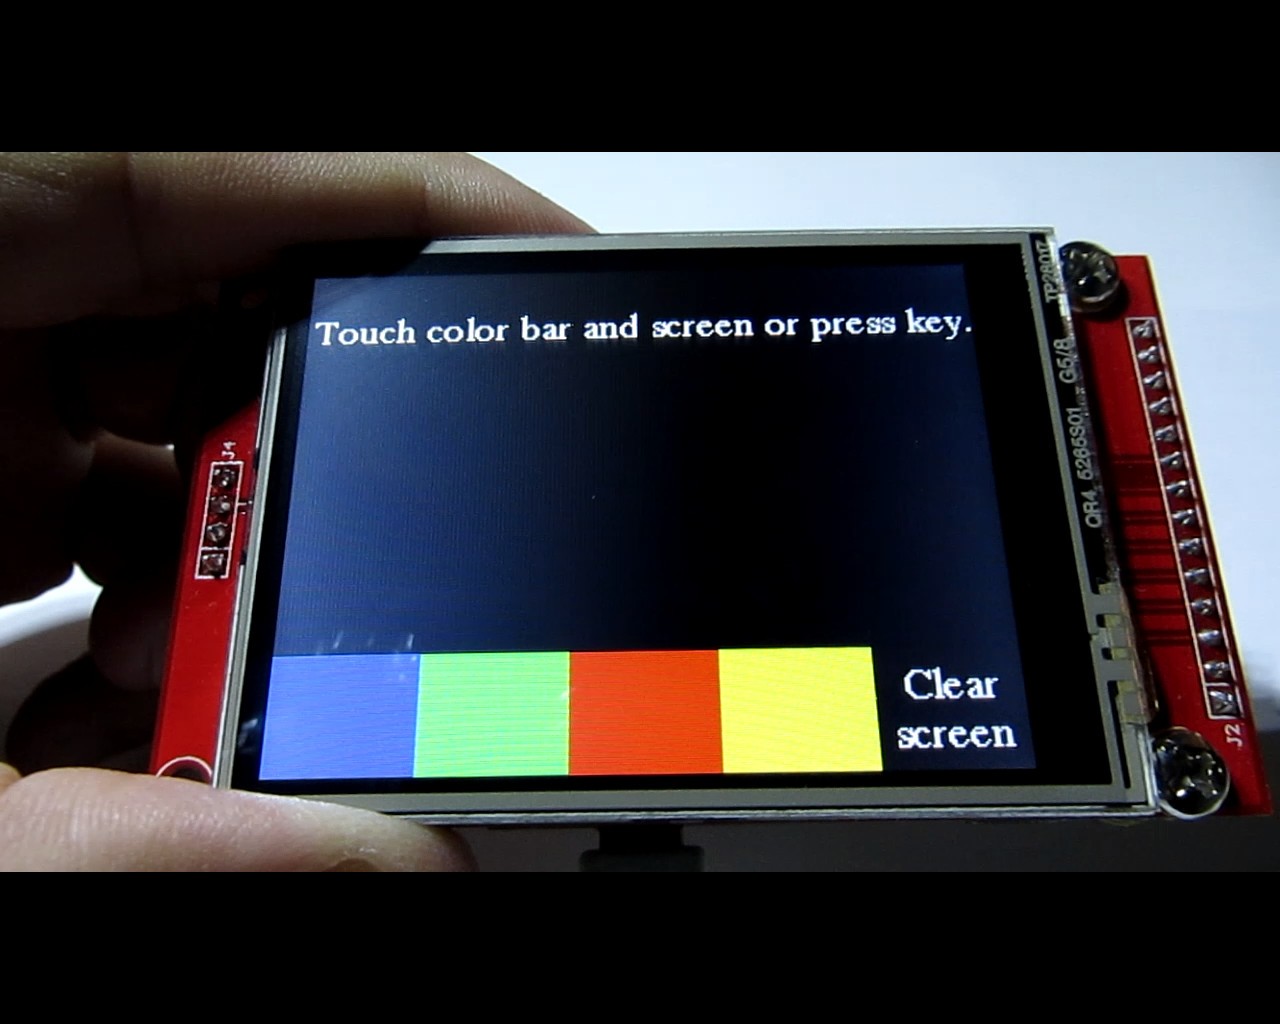
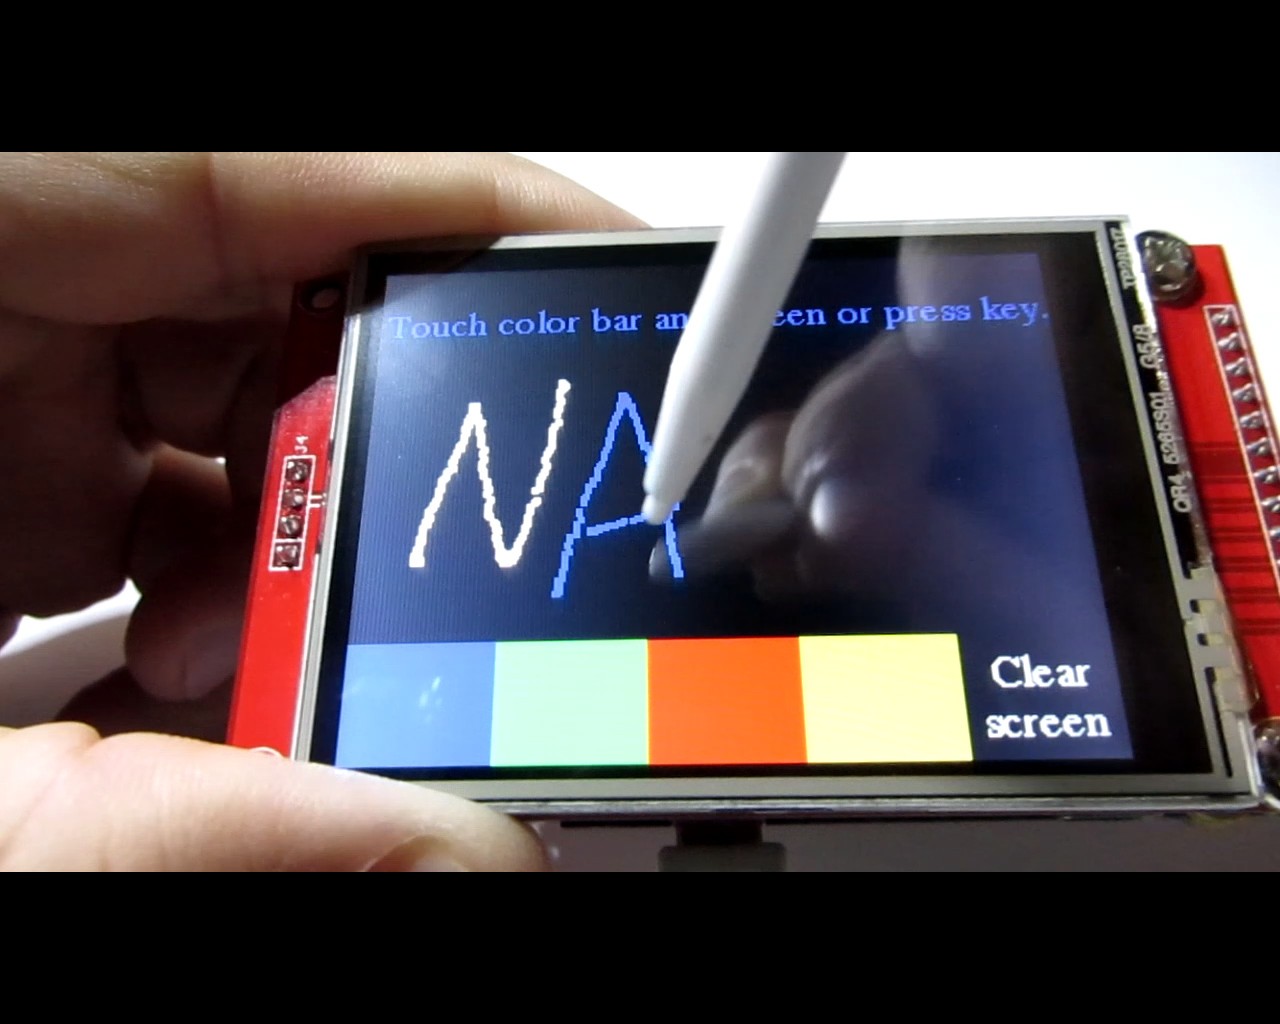
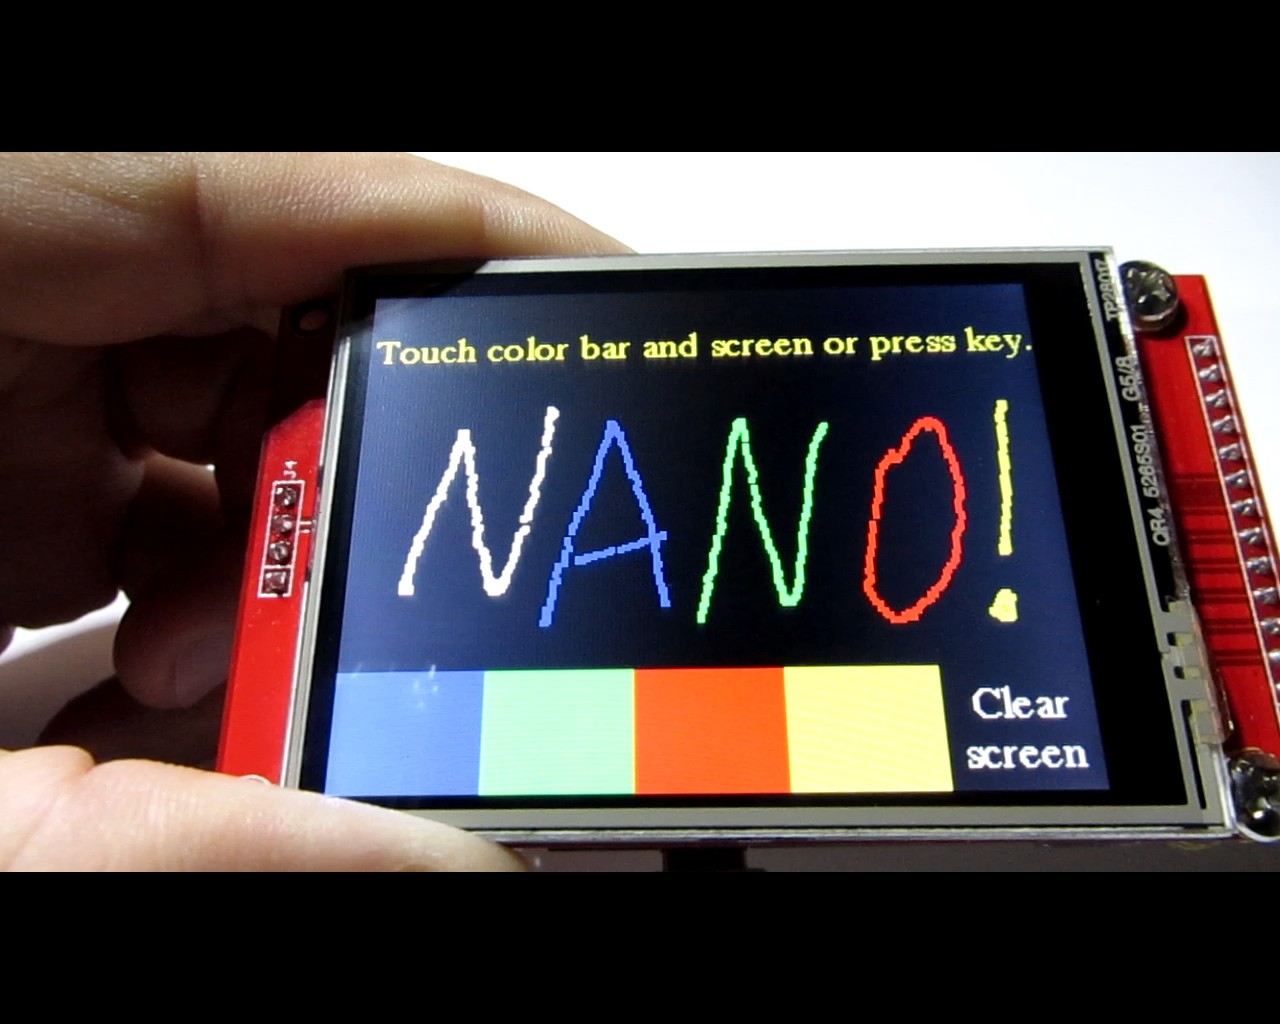
Démo 2. Écran tactile. /************************************************ ************************************ LE LOGICIEL ET LA DOCUMENTATION SONT FOURNIS "EN L'ÉTAT" SANS GARANTIE D'AUCUNE* SORTE, EXPLICITE OU IMPLICITE, Y COMPRIS, SANS LIMITATION, TOUTE GARANTIE* DE QUALITÉ MARCHANDE, DE TITRE, DE NON-VIOLATION ET D'ADAPTATION À UN USAGE PARTICULIER*. EN AUCUN CAS L'AUTEUR OU SES CONCÉDANTS DE LICENCE NE SERONT RESPONSABLES OU* OBLIGÉS EN VERTU D'UN CONTRAT, D'UNE NÉGLIGENCE, D'UNE RESPONSABILITÉ STRICTE, D'UNE CONTRIBUTION*, D'UNE RUPTURE DE GARANTIE OU D'UNE AUTRE THÉORIE LÉGALE ÉQUITABLE DE TOUT DOMMAGE OU DÉPENSE DIRECT OU INDIRECT*, Y COMPRIS, MAIS SANS S'Y LIMITER, TOUT INCIDENT SPÉCIAL ,* DOMMAGES INDIRECTS, PUNITIFS OU CONSÉCUTIFS, PERTE DE PROFITS OU PERTE DE DONNÉES,* COT D'ACHAT DE BIENS DE REMPLACEMENT, DE TECHNOLOGIE, DE SERVICES OU DE TOUTE* RÉCLAMATION PAR DES TIERS (Y COMPRIS, MAIS SANS S'Y LIMITER, TOUTE DEFENSE DE CEUX-CI)* OU AUTRES COUTS SIMILAIRES .****************************************************** ******************************/#include // Bibliothèque spécifique au matériel#include // Inclut la bibliothèque SPI#include // Inclut la bibliothèque Touchscreen#include // Inclut la bibliothèque Adafruit-GFX#include // Inclut les polices Adafruit#include #include // Écran tactile :MOSI=11, MISO=12, SCK=13, CS=2#define CS_PI N A0XPT2046_Touchscreen ts(CS_PIN, 255);YATFT tft(0);#define Y_BAR_TOP (GetMaxY()-50)#define Y_BAR_BOT GetMaxY()/* Si vous utilisez le shield, toutes les lignes de contrôle et de données sont fixes, et une déclaration plus simple peut être utilisé en option :*/uint16_t pos_x[] ={0,0,0,0};uint16_t pos_y[] ={0,0,0,0};uint8_t pos_x_cnt =0;uint8_t pos_y_cnt =0;uint16_t pos_x_mid =0;uint16_t pos_y_mid =0;uint16_t color_paint =WHITE;uint8_t boutons =0;uint16_t Color[4] ={BRIGHTBLUE, BRIGHTGREEN, BRIGHTRED, BRIGHTYELLOW};uint16_t Gray[7] ={GRAY0, GRAY1, GRAY2, GRAY3, GRAY4, GRIS5, GRIS6} ;/************************************************ ******************************************************** ***/void ClearScreen (void){ tft.SetColor(BLACK); // Définir la couleur du fone tft.ClearDevice(); // Remplir tout l'écran}void setup(){ Serial.begin(115200); // initialise le port série Serial.println("Arduino TFT_shield Example1!"); ts.begin(); // Initialiser l'écran tactile SPI.end(); // Désactiver SPI pour un travail correct. Broche DB2 (SS) tft.begin(); // initialise l'affichage RefreshWindow();}void loop(){ uint16_t x, y; // Touch // Lorsque la broche SS est définie sur OUTPUT, elle peut être utilisée // comme port de sortie à usage général (elle n'influence pas // les opérations SPI). SPI.begin(); if (ts.touched()) { TS_Point p =ts.getPoint(); Serial.print(F("Pression =")); Serial.print(p.z); Serial.print(F(", x =")); Serial.print(p.x); Serial.print(F(", y =")); Serial.print(p.y); Serial.println(); retard(3) ; // Délai de filtrage SPI.end(); // Désactiver SPI pour un travail correct Broche DB2 (SS) // Calculer les coordonnées x, y à partir du code ADC Serial.print(F("Pressure =")); Serial.print(p.z); Serial.print(F(", x =")); Serial.print(p.x); Serial.print(F(", ")); Serial.print(x); Serial.print(F(", y =")); Serial.print(p.y); Serial.print(F(", ")); Serial.print(y); Serial.println(); si (p.x <350) p.x =350 ; si (p.x> 3850) p.x =3850 ; si (p.y <250) p.y =250 ; si (p.y> 3850) p.y =3850 ; x =(uint16_t)(320L - ((uint32_t)p.x - 350L)*100L/1094L); y =(uint16_t)(240L - ((uint32_t)p.y - 250L)*100L/1510L); // Filtrage pos_x_mid =(pos_x[0] + pos_x[1] + pos_x[2] + pos_x[3])/4; pos_y_mid =(pos_y[0] + pos_y[1] + pos_y[2] + pos_y[3])/4 ; pos_x[pos_x_cnt++] =x; pos_y[pos_y_cnt++] =y; pos_x_cnt &=0x03; pos_y_cnt &=0x03; if (x> (pos_x_mid - 10) &&x <(pos_x_mid + 10) &&y> (pos_y_mid - 10) &&y <(pos_y_mid + 10 )) { if (y> Y_BAR_TOP &&y
Quelques captures d'écran :
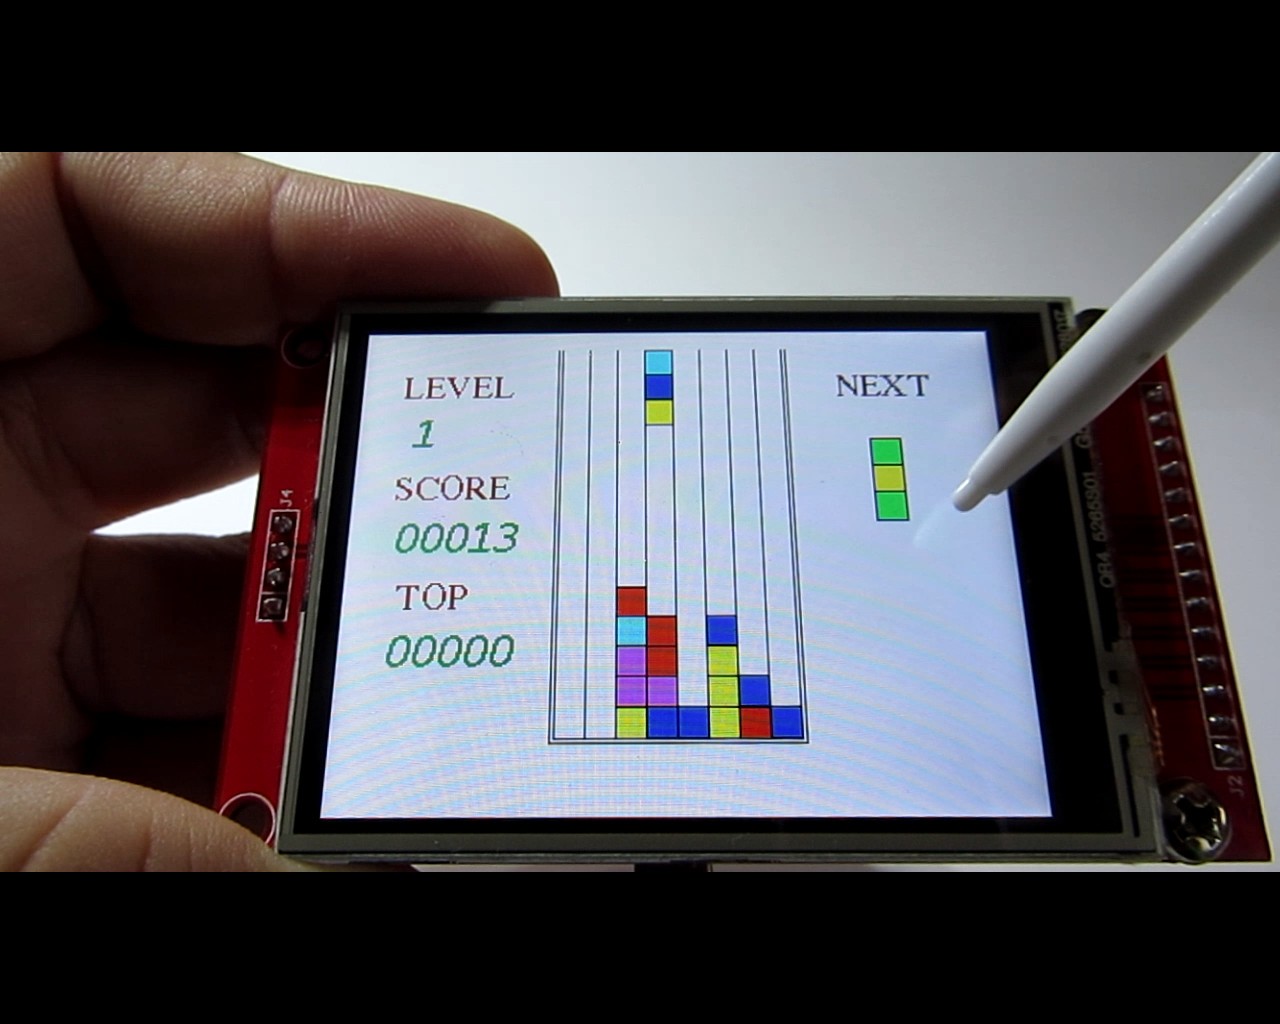
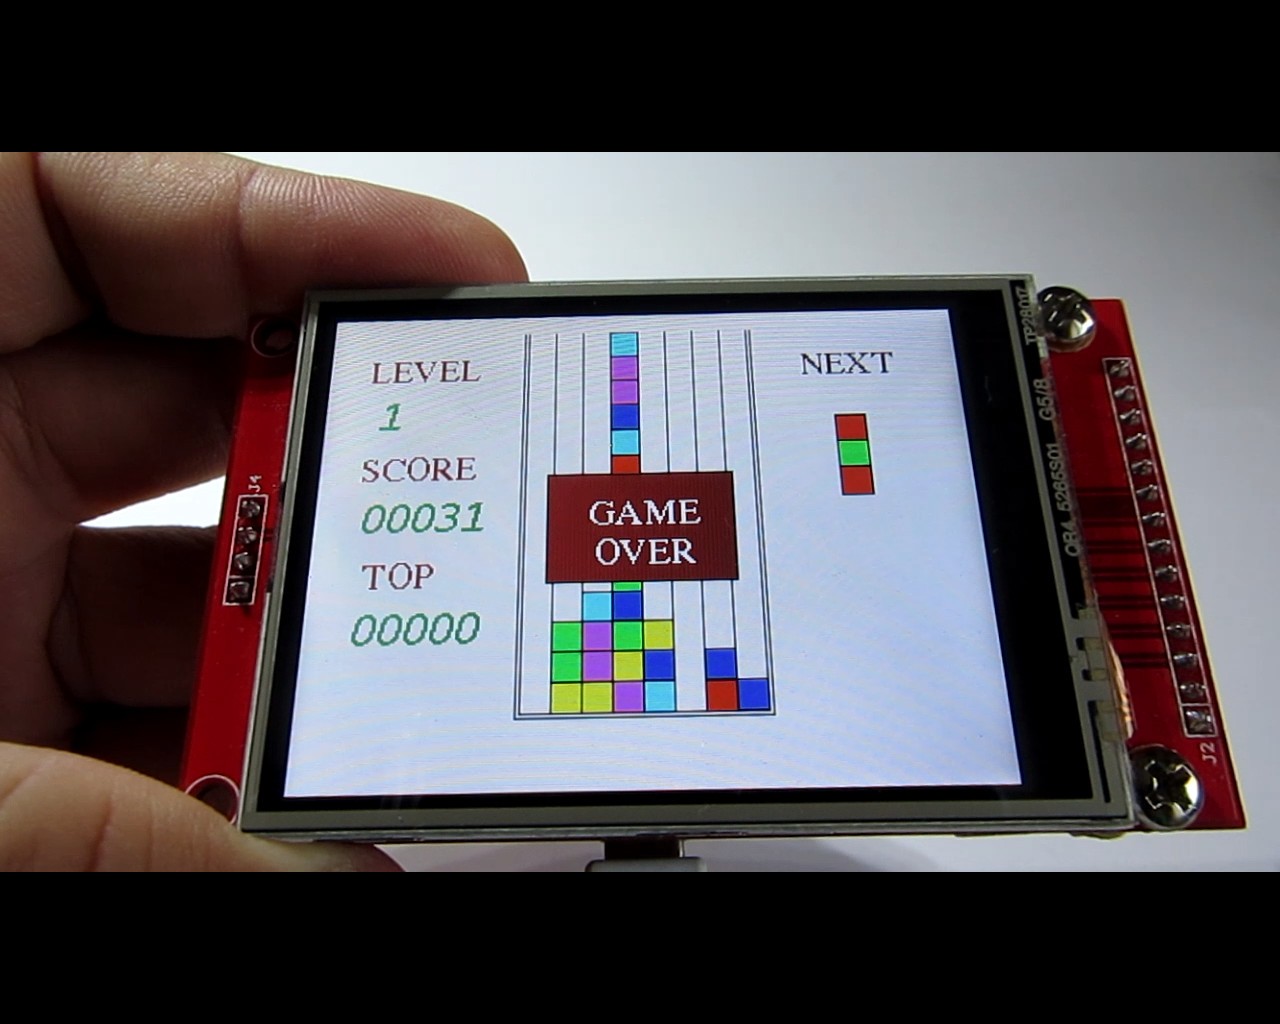
Démo 3. Jeu de logique "Colonnes". /************************************************ ************************************ LE LOGICIEL ET LA DOCUMENTATION SONT FOURNIS "EN L'ÉTAT" SANS GARANTIE D'AUCUNE* SORTE, EXPLICITE OU IMPLICITE, Y COMPRIS, SANS LIMITATION, TOUTE GARANTIE* DE QUALITÉ MARCHANDE, DE TITRE, DE NON-VIOLATION ET D'ADAPTATION À UN USAGE PARTICULIER*. EN AUCUN CAS L'AUTEUR OU SES CONCÉDANTS DE LICENCE NE SERONT RESPONSABLES OU* OBLIGÉS EN VERTU D'UN CONTRAT, D'UNE NÉGLIGENCE, D'UNE RESPONSABILITÉ STRICTE, D'UNE CONTRIBUTION*, D'UNE RUPTURE DE GARANTIE OU D'UNE AUTRE THÉORIE LÉGALE ÉQUITABLE DE TOUT DOMMAGE OU DÉPENSE DIRECT OU INDIRECT*, Y COMPRIS, MAIS SANS S'Y LIMITER, TOUT INCIDENT SPÉCIAL ,* DOMMAGES INDIRECTS, PUNITIFS OU CONSÉCUTIFS, PERTE DE PROFITS OU PERTE DE DONNÉES,* COT D'ACHAT DE BIENS DE REMPLACEMENT, DE TECHNOLOGIE, DE SERVICES OU DE TOUTE* RÉCLAMATION PAR DES TIERS (Y COMPRIS, MAIS SANS S'Y LIMITER, TOUTE DEFENSE DE CEUX-CI)* OU AUTRES COUTS SIMILAIRES .****************************************************** ******************************/#include #include #include #include // Bibliothèque graphique principale#include #include #define CS_PIN A0// MOSI=11, MISO=12, SCK=13XPT2046_Touchscreen ts (CS_PIN, 255);YATFT tft(0);/* Si vous utilisez le bouclier, toutes les lignes de contrôle et de données sont fixes et une déclaration plus simple peut éventuellement être utilisée :*/long randNumber;#define KEY_EMPTY 0#define KEY_SWAP 1#define KEY_FALL 2#define KEY_LEFT 3#define KEY_RIGHT 4#define DISPLAY_MAX_X 320#define DISPLAY_MAX_Y 240#define MaxCol 8 #define MaxRow 17#define SmeX 3 #define razmer 15#define LL 250#define NumCol 6#define MaxLevel 8#define PeriodLevel 80#define DISP_LEFT ((DISPLAY_MAX_X - MaxCol*razmer)/2 - 2)#define DISP_RIGHT ((DISPLAY_MAX_X + MaxCol*razmer)/2 + 2)#define DISP_TOP ((DISPLAY_MAX_Y - (MaxRow-4)*razmer)/2 - 2 - 10)#define DISP_BOT ((DISPLAY_MAX_Y + (MaxRow-4)*razmer)/2 + 2 - 10)uint8_t MasSt[MaxCol ][MaxRow], MasTmp[MaxCol][MaxRow], MasOld[MaxCol][MaxRow], fignext[3];uint8_t Level=1, OldLevel, tr, flfirst=1;uint16_t MasCol[]={BLANC, NOIR, ROUGE LUMINEUX , BRIGHTBLUE, BRIGHTGREEN, BRIGHTYELLOW, BRIGHTMAGENTA, BRIGHTCYAN};compteur long non signé,Score=0, TScore=0, Record=0, OldRecord, OldScore, myrecord;uint16_t tempspeed;bool fl, Demo=true, myfl=false, Arbeiten=faux, FlNew, FlZ=false;int8_t VAL, Mp, x,y;int8_t mmm [4][2]={ {-1,0},{0,-1},{1,0},{0,1}};uint16_t MasSpeed[MaxLevel]={500,450,400,350,300,250,200,100};/************ ******************************************************** ****/void setup(void){ // initialise le port série Serial.begin(115200); Serial.println("exemple TFT_shield_Game1 !"); ts.begin(); // Initialiser l'écran tactile SPI.end(); tft.begin(); // initialise l'affichage randomSeed(analogRead(5)); tft.SetColor(BLANC); tft.ClearDevice(); tft.SetColor(RED); tft.SetFont(&FreeSerif9pt7b); tft.OutTextXY( 20, 20, "NIVEAU"); tft.OutTextXY(240, 20, "SUIVANT"); tft.OutTextXY( 20, 75, "SCORE"); tft.OutTextXY (25, 130, "TOP"); FlNouveau =vrai ; VueStacan(); ObtenirSuivant(); retard (100); tft.SetColor(NOIR); tft.DrawLine(DISP_LEFT + 1, DISP_TOP + 0, DISP_LEFT + 1, DISP_BOT - 1); tft.DrawLine(DISP_LEFT + razmer*MaxCol+5-MaxCol,DISP_TOP + 0,DISP_LEFT + razmer*MaxCol+5-MaxCol, DISP_BOT - 1); tft.DrawLine(DISP_LEFT + 1, DISP_BOT - 1, DISP_LEFT + 1+razmer*MaxCol+5-MaxCol-1, DISP_BOT - 1);}void loop(void){ if (Demo) ProcDemo(); else { if (Arbeiten) { mydelay(tempspeed); figmove(0,1) ; } else if (mypush()==KEY_SWAP) NewGame(); }}uint8_t mypush(void){ non signé long tpr =millis(); uint8_t res =KEY_EMPTY; bouton uint8_t =0 ; statique uint8_t button_old ; statique uint8_t cnt =0 ; bouton =Toucher (); if (bouton) { cnt =5; Serial.print("Bouton Scan :"); Serial.print(bouton, HEX); Serial.println(); if (bouton !=button_old) { if (button &0x01) res =KEY_SWAP; if (bouton &0x02) res =KEY_FALL; if (bouton &0x04) {} ; if (bouton &0x08) res =KEY_LEFT; if (bouton &0x10) res =KEY_RIGHT; button_old =bouton ; } } if (!cnt) { button_old =bouton; } else { cnt--; } return(res); }void ViewQuad(uint8_t i,uint8_t j,uint8_t mycolor){ if (j<3) return ; uint16_t wy =DISP_TOP + SmeY + (j-3)*razmer - j; uint16_t wx =DISP_LEFT + SmeX + i*razmer - i; if (macouleur!=0) { tft.SetColor(NOIR); tft.DrawRect(wx, wy, wx+razmer-1, wy+razmer-1); tft.SetColor(MasCol[macouleur]); tft.DrawFillRect(wx+1, wy+1, wx+1+razmer-3, wy+1+razmer-3); } else { tft.SetColor(WHITE); tft.DrawFillRect(wx+1, wy+0, wx+1+razmer-3, wy+1+razmer-3); }}void ViewStacan(void){ char myStr2[5]; uint8_th =tft.GetTextHeight(&FreeMonoBoldOblique12pt7b); tft.SetFont(&FreeMonoBoldOblique12pt7b); if (AncienScore!=Score || FlNew) { sprintf(myStr2,"%05d",Score); int16_t w =tft.GetTextWidth(myStr2, &FreeMonoBoldOblique12pt7b); tft.SetColor(BLANC); tft.DrawFillRect (20 100,20+l+5 100+h); tft.SetColor(GREEN); tft.OutTextXY(20,100,myStr2) ; OldScore=Score ; } if (OldRecord!=Record || FlNew) { sprintf(myStr2,"%05d",Record ); int16_t w =tft.GetTextWidth(myStr2, &FreeMonoBoldOblique12pt7b); tft.SetColor(BLANC); tft.DrawFillRect(20,155,20+w+5,155+h); tft.SetColor(GREEN); tft.OutTextXY(20,155,myStr2) ; OldRecord=Enregistrement ; } if (OldLevel!=Level || FlNew) { sprintf(myStr2,"%01d",Level ); int16_t w =tft.GetTextWidth(myStr2, &FreeMonoBoldOblique12pt7b); tft.SetColor(BLANC); tft.DrawFillRect(25,45,25+w+5,45+h); tft.SetColor(GREEN); tft.OutTextXY(25,45,myStr2) ; OldLevel=Niveau ; } FlNouveau=faux ; for (byte j=3;j=0 &&ny>=0 &&nx1 || MasTmp[i][j]>2 )) { MasTmp[nx][ny]=3; MasTmp[i][j]=3 ; } else if (mode==3 &&MasTmp[nx][ny]==3) { if (MasTmp[i][j]!=3) { MasTmp[i][j]=3; fl=vrai; } } }}void Sos(int i,int j, byte mode){ pour (byte k=0;k<4;k++) Sosed(i,j,mmm[k][0],mmm[k][1 ],mode); }bool FindFull(void){ octet i,j,k; bool res; res =faux ; for (octet k=2;k<8;k++) { ClearMas(MasTmp); pour (j=3;j1) Sos(i,j,2) ; faire { fl=false; pour (j=3;j0) Sos(i,j,3) ; } tandis que (fl); pour (j=3;j0) { ViewStacan(); FlZ=vrai ; mondélai(500); } pour (j=0;jMaxLevel) Niveau=MaxLevel; } tempspeed=MasSpeed[Niveau-1] ; }}void MyScore(void){ TScore=0; while(FindFull()) { if (TScore>7) Score=Score+TScore+(TScore-8)*2 ; sinon Score=Score+TScore ; VueStacan(); FlZ=vrai ; mondélai(1000); } FlZ=false;}void ProcDemo(void){ Score=0; ObtenirSuivant(); pour (octet j=3;jMaxCol-1) return(false); if (dx!=0) if (MasSt[x+dx][y+dy+2]==0) return(true); else return(false); if (dy>0) { if (y+dy+2>MaxRow-1 || MasSt[x+dx][y+dy+2]>0) { if (y<3) gameover(); sinon fff=true ; } else { pour (octet i=0;i<3;i++) MasSt[x][y+2-i+dy]=MasSt[x][y+2-i]; MassSt[x][y]=0 ; y=y+dy ; } if (fff) { MonScore(); ObtenirSuivant(); } VueStacan(); } return(true);}uint8_t Touch(void){ uint16_t x, y; bouton uint8_t =0 ; // Touch // Lorsque la broche SS est définie sur OUTPUT, elle peut être utilisée // comme port de sortie à usage général (elle n'influence pas // les opérations SPI). SPI.begin(); if (ts.touched()) { TS_Point p =ts.getPoint(); retard(3) ; // Délai de filtrage SPI.end(); // Calcule les coordonnées x, y à partir du code ADC if (p.x <450) p.x =450; si (p.y <500) p.y =500 ; x =(uint16_t)(320L - ((uint32_t)p.x - 450L)*10L/106L); y =(uint16_t)(240L - ((uint32_t)p.y - 500L)*10L/140L); if (x <80) { // Bouton gauche =0x08; } else if (x> 240) { // Bouton droit =0x10; } else if (y <120) { // Bouton d'échange =0x01; } autre bouton =0x02 ; // Chute } SPI.end(); bouton retour ;}
Quelques captures d'écran :
Vidéo de démonstration
A suivre.
Merci pour l'attention!
Articles précédents :
1) Bouclier TFT unique pour Arduino Uno - Démarrer,
2) Blindage TFT unique pour Arduino Uno - OV7670 Cam Live View,
3) Blindage TFT unique pour Arduino Uno - Caméra Bluetooth Arduino (ABC).
Articles suivants :
4) Photos et vidéo RVB sur écran TFT SPI.
Mise à jour 01.04.2021 :
Rebonjour! Il existe une bibliothèque mise à jour pour une série d'écrans, qui se compose actuellement de deux boucliers et de deux tableaux de répartition. Le croquis est compilé en fonction de la version choisie (de 1 à 4) et du type de microcontrôleur (MegaAVR ou ESP-32). Ajout de photos, exemples. Vous trouverez plus d'informations sur https://github.com/Ekaburg/EkaTFT.
Code
Bibliothèque
https://github.com/YATFT/YATFTProcessus de fabrication
- Animation bitmap sur le bouclier d'affichage à écran tactile TFT ILI9341
- Contrôleur DMX Web
- Arduino Spybot
- Fleurs - Arduino Nano, CrazyCircuits, DFRobot
- Arduino Nano :contrôler 2 moteurs pas à pas avec joystick
- START :un terminal ARduino autonome
- Compteur Geiger portable avec Arduino Nano
- Surveillance SMART de la température pour les écoles
- Bibliothèque de ports E/S 8 bits pour Arduino