


Tutoriel sur l'écran tactile Arduino | LCD TFT
Dans ce didacticiel sur l'écran tactile Arduino, nous apprendrons à utiliser l'écran tactile TFT LCD avec Arduino. Vous pouvez regarder la vidéo suivante ou lire le didacticiel écrit ci-dessous.
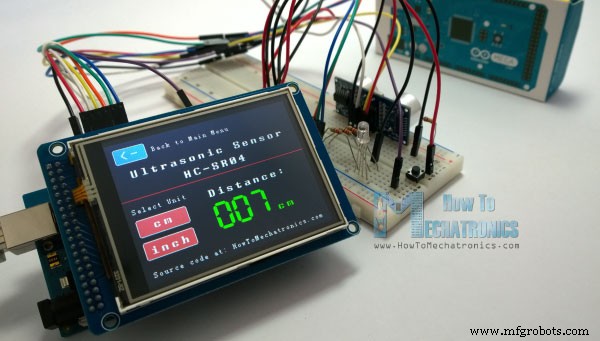
Pour ce tutoriel, j'ai composé trois exemples. Le premier exemple est la mesure de distance à l'aide d'un capteur à ultrasons. La sortie du capteur, ou la distance, est imprimée sur l'écran et à l'aide de l'écran tactile, nous pouvons sélectionner les unités, en centimètres ou en pouces.
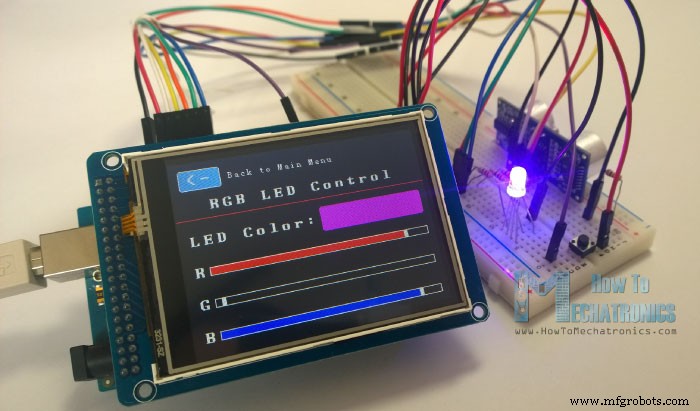
L'exemple suivant contrôle une LED RVB à l'aide de ces trois curseurs RVB. Par exemple, si nous commençons à faire glisser le curseur bleu, la LED s'allumera en bleu et augmentera la lumière car nous irions à la valeur maximale. Ainsi, les curseurs peuvent se déplacer de 0 à 255 et avec leur combinaison, nous pouvons définir n'importe quelle couleur pour la LED RVB, mais gardez à l'esprit que la LED ne peut pas représenter les couleurs avec autant de précision.
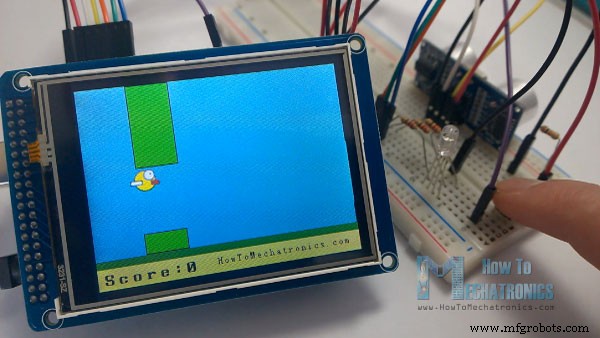
Le troisième exemple est un jeu. En fait, c'est une réplique du célèbre jeu Flappy Bird pour smartphones. Nous pouvons jouer au jeu en utilisant le bouton poussoir ou même en utilisant l'écran tactile lui-même.
Nous allons maintenant passer en revue chacun de ces exemples et expliquer étape par étape les codes qui les sous-tendent.
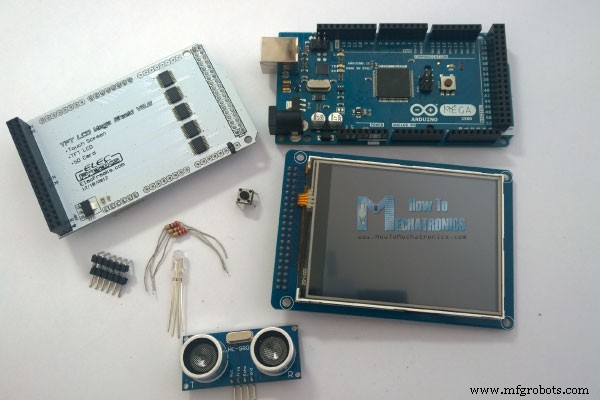
À titre d'exemple, j'utilise un écran tactile TFT de 3,2 pouces en combinaison avec un Arduino Mega Shield TFT LCD. Il nous faut un shield car l'écran TFT Touch fonctionne à 3.3V et les sorties Arduino Mega sont à 5V. Pour le premier exemple j'ai le capteur à ultrasons HC-SR04, puis pour le deuxième exemple une LED RGB avec trois résistances et un bouton poussoir pour l'exemple du jeu. J'ai également dû créer un en-tête de broche sur mesure comme celui-ci, en soudant des en-têtes de broche et en les pliant pour pouvoir les insérer entre la carte Arduino et le blindage TFT.
Vous pouvez obtenir ces composants sur l'un des sites ci-dessous :
Voici le schéma du circuit. Nous utiliserons la broche GND, les broches numériques de 8 à 13, ainsi que la broche numéro 14. Comme les broches 5V sont déjà utilisées par l'écran TFT, j'utiliserai la broche numéro 13 comme VCC, en la mettant tout de suite en haut dans la section de configuration du code.
Comme le code est un peu plus long et pour une meilleure compréhension, je publierai le code source du programme dans des sections avec une description pour chaque section. Et à la fin de cet article, je publierai le code source complet.
J'utiliserai les bibliothèques UTFT et URTouch créées par Henning Karlsen. Je voudrais ici lui dire merci pour le travail incroyable qu'il a accompli. Les bibliothèques permettent une utilisation très simple des écrans TFT et fonctionnent avec de nombreuses tailles d'écrans TFT, boucliers et contrôleurs différents. Vous pouvez télécharger ces bibliothèques à partir de son site Web, RinkyDinkElectronics.com et également trouver de nombreux exemples de démonstration et une documentation détaillée sur la façon de les utiliser.
Après avoir inclus les bibliothèques, nous devons créer des objets UTFT et URTouch. Les paramètres de ces objets dépendent du modèle de l'écran TFT et du bouclier et ces détails peuvent également être trouvés dans la documentation des bibliothèques.
Ensuite, nous devons définir les polices fournies avec les bibliothèques et également définir certaines variables nécessaires au programme. Dans la section de configuration, nous devons initialiser l'écran et le toucher, définir les modes de broche pour le capteur connecté, la led et le bouton, et appeler initialement la fonction personnalisée drawHomeSreen(), qui dessinera l'écran d'accueil du programme.
Alors maintenant, je vais vous expliquer comment nous pouvons créer l'écran d'accueil du programme. Avec la fonction setBackColor(), nous devons définir la couleur de fond du texte, noire dans notre cas. Ensuite, nous devons définir la couleur sur blanc, définir la grande police et, à l'aide de la fonction print(), nous imprimerons la chaîne "Arduino TFT Tutorial" au centre de l'écran et 10 pixels sur l'axe Y de l'écran. Ensuite, nous allons définir la couleur sur le rouge et tracer la ligne rouge sous le texte. Après cela, nous devons rétablir la couleur en blanc et imprimer les deux autres chaînes, "by HowToMechatronics.com" en utilisant la petite police et "Select Example" en utilisant la grande police.
Vient ensuite le bouton du capteur de distance. Nous devons d'abord définir la couleur, puis en utilisant la fonction fillRoundRect(), nous allons dessiner le rectangle arrondi. Ensuite, nous remettrons la couleur au blanc et en utilisant la fonction drawRoundRect() nous dessinerons un autre rectangle arrondi au-dessus du précédent, mais celui-ci sera sans remplissage afin que l'apparence générale du bouton ressemble à un cadre . En haut du bouton, nous imprimerons le texte en utilisant la grande police et la même couleur d'arrière-plan que le remplissage du bouton. La même procédure vaut pour les deux autres boutons.
Nous devons maintenant rendre les boutons fonctionnels afin que lorsque nous les appuyons, ils nous renvoient à l'exemple approprié. Dans la section de configuration, nous définissons le caractère '0' sur la variable currentPage, ce qui indiquera que nous sommes à l'écran d'accueil. Donc, si c'est vrai, et si nous appuyons sur l'écran, cette instruction if deviendrait vraie et en utilisant ces lignes ici, nous obtiendrons les coordonnées X et Y où l'écran a été pressé. Si c'est la zone qui couvre le premier bouton, nous appellerons la fonction personnalisée drawDistanceSensor() qui activera l'exemple du capteur de distance. Aussi, nous mettrons le caractère '1' à la variable currentPage qui indiquera que nous sommes au premier exemple. La fonction personnalisée drawFrame() est utilisée pour mettre en surbrillance le bouton lorsqu'il est enfoncé. La même procédure vaut pour les deux autres boutons.
Ainsi, la fonction personnalisée drawDistanceSensor() doit être appelée une seule fois lorsque le bouton est enfoncé afin de dessiner tous les graphiques de cet exemple de la même manière que nous l'avons décrit pour l'écran d'accueil. Cependant, la fonction personnalisée getDistance() doit être appelée à plusieurs reprises afin d'imprimer les derniers résultats de la distance mesurée par le capteur.
Voici cette fonction qui utilise le capteur à ultrasons pour calculer la distance et imprimer les valeurs avec la police SevenSegNum en couleur verte, en centimètres ou en pouces. Si vous avez besoin de plus de détails sur le fonctionnement du capteur à ultrasons, vous pouvez consulter mon tutoriel particulier pour cela. De retour dans la section de boucle, nous pouvons voir ce qui se passe lorsque nous appuyons sur les boutons de sélection d'unité ainsi que sur le bouton de retour.
Ok ensuite est l'exemple de contrôle LED RVB. Si nous appuyons sur le deuxième bouton, la fonction personnalisée drawLedControl() sera appelée une seule fois pour dessiner le graphique de cet exemple et la fonction personnalisée setLedColor() sera appelée à plusieurs reprises. Dans cette fonction, nous utilisons l'écran tactile pour définir les valeurs des 3 curseurs de 0 à 255. Avec les instructions if, nous limitons la zone de chaque curseur et obtenons la valeur X du curseur. Ainsi, les valeurs de la coordonnée X de chaque curseur sont de 38 à 310 pixels et nous devons mapper ces valeurs en valeurs de 0 à 255 qui seront utilisées comme signal PWM pour allumer la LED. Si vous avez besoin de plus de détails sur le fonctionnement de la LED RVB, vous pouvez consulter mon tutoriel particulier pour cela. Le reste du code de cette fonction personnalisée sert à dessiner les curseurs. De retour dans la section de boucle, nous n'avons que le bouton de retour qui éteint également la LED lorsqu'il est pressé.
Vient ensuite l'exemple de jeu Arduino, mais je le laisserai pour mon prochain tutoriel afin que nous puissions mieux le comprendre car il est un peu plus complexe.
Pour que le code fonctionne et se compile, vous devrez inclure un fichier ".c" supplémentaire dans le même répertoire que le croquis Arduino. Ce fichier est pour le troisième exemple de jeu et c'est un bitmap de l'oiseau. Pour plus de détails sur le fonctionnement de cette partie du code, vous pouvez consulter mon tutoriel particulier. Ici vous pouvez télécharger ce fichier :
Voici le code source complet du programme : Aperçu
Pièces nécessaires pour cet écran tactile Arduino
Code de l'écran tactile Arduino
#include <UTFT.h>
#include <URTouch.h>

//==== Creating Objects
UTFT    myGLCD(SSD1289,38,39,40,41); //Parameters should be adjusted to your Display/Schield model
URTouch  myTouch( 6, 5, 4, 3, 2);

//==== Defining Variables
extern uint8_t SmallFont[];
extern uint8_t BigFont[];
extern uint8_t SevenSegNumFont[];

extern unsigned int bird01[0x41A];

int x, y;

char currentPage, selectedUnit;

//Ultrasonic Sensor
const int VCC = 13;
const int trigPin = 11;
const int echoPin = 12;

long duration;
int distanceInch, distanceCm;

// RGB LEDs
const int redLed = 10;
const int greenLed = 9;
const int blueLed = 8;
int xR=38;
int xG=38;
int xB=38;

// Floppy Bird
int xP = 319;
int yP = 100;
int yB = 30;
int fallRateInt = 0;
float fallRate =0;
int score=0;
const int button = 14;
int buttonState = 0;

void setup() {
// Initial setup
  myGLCD.InitLCD();
  myGLCD.clrScr();
  myTouch.InitTouch();
  myTouch.setPrecision(PREC_MEDIUM);

  // Defining Pin Modes
  pinMode(VCC, OUTPUT); // VCC
  pinMode(trigPin, OUTPUT); // Sets the trigPin as an Output
  pinMode(echoPin, INPUT); // Sets the echoPin as an Input
  pinMode(redLed, OUTPUT);
  pinMode(greenLed, OUTPUT);
  pinMode(blueLed, OUTPUT);
  pinMode(button, INPUT);
  digitalWrite(VCC, HIGH); // +5V - Pin 13 as VCC

  drawHomeScreen();  // Draws the Home Screen
  currentPage = '0'; // Indicates that we are at Home Screen
  selectedUnit = '0'; // Indicates the selected unit for the first example, cms or inches
}Code language: Arduino (arduino)// drawHomeScreen - Custom Function
void drawHomeScreen() {
// Title
myGLCD.setBackColor(0,0,0); // Sets the background color of the area where the text will be printed to black
myGLCD.setColor(255, 255, 255); // Sets color to white
myGLCD.setFont(BigFont); // Sets font to big
myGLCD.print("Arduino TFT Tutorial", CENTER, 10); // Prints the string on the screen
myGLCD.setColor(255, 0, 0); // Sets color to red
myGLCD.drawLine(0,32,319,32); // Draws the red line
myGLCD.setColor(255, 255, 255); // Sets color to white
myGLCD.setFont(SmallFont); // Sets the font to small
myGLCD.print("by HowToMechatronics.com", CENTER, 41); // Prints the string
myGLCD.setFont(BigFont);
myGLCD.print("Select Example", CENTER, 64);
// Button - Distance Sensor
myGLCD.setColor(16, 167, 103); // Sets green color
myGLCD.fillRoundRect (35, 90, 285, 130); // Draws filled rounded rectangle
myGLCD.setColor(255, 255, 255); // Sets color to white
myGLCD.drawRoundRect (35, 90, 285, 130); // Draws rounded rectangle without a fill, so the overall appearance of the button looks like it has a frame
myGLCD.setFont(BigFont); // Sets the font to big
myGLCD.setBackColor(16, 167, 103); // Sets the background color of the area where the text will be printed to green, same as the button
myGLCD.print("DISTANCE SENSOR", CENTER, 102); // Prints the string
// Button - RGB LED Control
myGLCD.setColor(16, 167, 103);
myGLCD.fillRoundRect (35, 140, 285, 180);
myGLCD.setColor(255, 255, 255);
myGLCD.drawRoundRect (35, 140, 285, 180);
myGLCD.setFont(BigFont);
myGLCD.setBackColor(16, 167, 103);
myGLCD.print("RGB LED CONTROL", CENTER, 152);
// Button - Birduino
myGLCD.setColor(16, 167, 103);
myGLCD.fillRoundRect (35, 190, 285, 230);
myGLCD.setColor(255, 255, 255);
myGLCD.drawRoundRect (35, 190, 285, 230);
myGLCD.setFont(BigFont);
myGLCD.setBackColor(16, 167, 103);
myGLCD.print("BIRDUINO GAME", CENTER, 202);
}Code language: Arduino (arduino)//========== The loop section ========
void loop() {
// Home Screen
if (currentPage == '0') {
if (myTouch.dataAvailable()) {
myTouch.read();
x=myTouch.getX(); // X coordinate where the screen has been pressed
y=myTouch.getY(); // Y coordinates where the screen has been pressed
// If we press the Distance Sensor Button
if ((x>=35) && (x<=285) && (y>=90) && (y<=130)) {
drawFrame(35, 90, 285, 130); // Custom Function -Highlighs the buttons when it's pressed
currentPage = '1'; // Indicates that we are the first example
myGLCD.clrScr(); // Clears the screen
drawDistanceSensor(); // It is called only once, because in the next iteration of the loop, this above if statement will be false so this funtion won't be called. This function will draw the graphics of the first example.
}
// If we press the RGB LED Control Button
if ((x>=35) && (x<=285) && (y>=140) && (y<=180)) {
drawFrame(35, 140, 285, 180);
currentPage = '2';
myGLCD.clrScr();
drawLedControl();
}
// If we press the Birduino Game Button
if ((x>=35) && (x<=285) && (y>=190) && (y<=230)) {
drawFrame(35, 190, 285, 230);
currentPage = '3';
myGLCD.clrScr();
myGLCD.setColor(114, 198, 206);
myGLCD.fillRect(0,0,319,239);
drawGround();
drawPilars(xP,yP);
drawBird(30);
delay(1000);
}
}
}
// Distance Sensor Example
if (currentPage == '1') {
getDistance(); // Gets distance from the sensor and this function is repeatedly called while we are at the first example in order to print the lasest results from the distance sensor
if (myTouch.dataAvailable()) {
myTouch.read();
x=myTouch.getX();
y=myTouch.getY();
// If we press the Centimeters Button
if ((x>=10) && (x<=135) &&(y>=90) && (y<=163)) {
selectedUnit = '0';
}
// If we press the Inches Button
if ((x>=10) && (x<=135) &&(y>=173) && (y<=201)) {
selectedUnit = '1';
}
// If we press the Back Button
if ((x>=10) && (x<=60) &&(y>=10) && (y<=36)) {
drawFrame(10, 10, 60, 36);
currentPage = '0'; // Indicates we are at home screen
myGLCD.clrScr();
drawHomeScreen(); // Draws the home screen
}
}
}
// RGB LED Control
if (currentPage == '2') {
setLedColor();
if (myTouch.dataAvailable()) {
myTouch.read();
x=myTouch.getX();
y=myTouch.getY();
//Back button
if ((x>=10) && (x<=60) &&(y>=10) && (y<=36)) {
drawFrame(10, 10, 60, 36);
currentPage = '0';
myGLCD.clrScr();
drawHomeScreen();
// Turns the LED off
analogWrite(redLed, 0);
analogWrite(greenLed, 0);
analogWrite(blueLed, 0);
}
}
}
//==== This section of the code, for the game example, is explained in my next tutorial
// Birduino Game
if (currentPage == '3') {
//delay(1);
xP=xP-3;
drawPilars(xP, yP);
yB+=fallRateInt;
fallRate=fallRate+0.4;
fallRateInt= int(fallRate);
if (yB>=220) {
yB=220;
}
if(yB>=180 || yB<=0){
restartGame();
}
if((xP<=85) && (xP>=30) && (yB<=yP-2)){
restartGame();
}
if((xP<=85) && (xP>=30) && (yB>=yP+60)){
restartGame();
}
drawBird(yB);
if (xP<=-51){
xP=319;
yP = rand() % 100+20;
score++;
}
if (myTouch.dataAvailable()) {
myTouch.read();
x=myTouch.getX();
y=myTouch.getY();
if ((x>=0) && (x<=319) &&(y>=50) && (y<=239)) {
fallRate=-5;
}
}
buttonState = digitalRead(button);
if (buttonState == HIGH) {
fallRate=-5;
}
}
if (myTouch.dataAvailable()) {
myTouch.read();
x=myTouch.getX();
y=myTouch.getY();
if ((x>=10) && (x<=60) &&(y>=10) && (y<=36)) {
drawFrame(10, 10, 60, 36);
currentPage = '0';
myGLCD.clrScr();
drawHomeScreen();
analogWrite(redLed, 0);
analogWrite(greenLed, 0);
analogWrite(blueLed, 0);
}
}
}Code language: Arduino (arduino)//===== getDistance() - Custom Function
void getDistance() {
// Clears the trigPin
digitalWrite(trigPin, LOW);
delayMicroseconds(2);
// Sets the trigPin on HIGH state for 10 micro seconds
digitalWrite(trigPin, HIGH);
delayMicroseconds(10);
digitalWrite(trigPin, LOW);
// Reads the echoPin, returns the sound wave travel time in microseconds
duration = pulseIn(echoPin, HIGH);
// Calculating the distance
distanceCm= duration*0.034/2;
distanceInch= distanceCm/2.53;
// Prints the distance in centimeters
if (selectedUnit == '0' && distanceCm <=400) {
myGLCD.setFont(SevenSegNumFont);
myGLCD.setColor(0, 255, 0);
myGLCD.setBackColor(0, 0, 0);
myGLCD.printNumI(distanceCm,130, 145, 3,'0');
myGLCD.setFont(BigFont);
myGLCD.print("cm ", 235, 178);
}
// Prints the distance in inches
if (selectedUnit == '1' && distanceCm <=160) {
myGLCD.setFont(SevenSegNumFont);
myGLCD.setColor(0, 255, 0);
myGLCD.setBackColor(0, 0, 0);
myGLCD.printNumI(distanceInch,130, 145, 3,'0');
myGLCD.setFont(BigFont);
myGLCD.print("inch", 235, 178);
}
delay(10);
}Code language: Arduino (arduino)//============= setLedColor() - Custom Funtion
void setLedColor() {
if (myTouch.dataAvailable()) {
myTouch.read();
x=myTouch.getX();
y=myTouch.getY();
// Area of the Red color slider
if( (y>=130) && (y<=156)) {
xR=x; // Stores the X value where the screen has been pressed in to variable xR
if (xR<=38) { // Confines the area of the slider to be above 38 pixels
xR=38;
}
if (xR>=303){ /// Confines the area of the slider to be under 310 pixels
xR=303;
}
}
// Area of the Green color slider
if( (y>=170) && (y<=196)) {
xG=x;
if (xG<=38) {
xG=38;
}
if (xG>=303){
xG=303;
}
}
// Area of the Blue color slider
if( (y>=210) && (y<=236)) {
xB=x;
if (xB<=38) {
xB=38;
}
if (xB>=303){
xB=303;
}
}
}
// Maps the values of the X - Axis from 38 to 0 and 310 to 255, because we need values from 0 to 255 for turning on the led
int xRC = map(xR,38,310,0,255);
int xGC = map(xG,38,310,0,255);
int xBC = map(xB,38,310,0,255);
// Sends PWM signal to the pins of the led
analogWrite(redLed, xRC);
analogWrite(greenLed, xGC);
analogWrite(blueLed, xBC);
// Draws a rectangle with the latest color combination
myGLCD.setColor(xRC, xGC, xBC);
myGLCD.fillRoundRect(175, 87, 310, 119);
// Draws the positioners
myGLCD.setColor(255, 255, 255);
myGLCD.fillRect(xR,139,(xR+4),147); // Positioner
myGLCD.setColor(xRC, 0, 0);
myGLCD.fillRect(31, 139, (xR-1), 147);
myGLCD.setColor(0, 0, 0);
myGLCD.fillRect((xR+5), 139, 309, 147);
myGLCD.setColor(255, 255, 255);
myGLCD.fillRect(xG,179,(xG+4),187);
myGLCD.setColor(0, xGC, 0);
myGLCD.fillRect(31, 179, (xG-1), 187);
myGLCD.setColor(0, 0, 0);
myGLCD.fillRect((xG+5), 179, 309, 187);
myGLCD.setColor(255, 255, 255);
myGLCD.fillRect(xB,219,(xB+4),227);
myGLCD.setColor(0, 0, xBC);
myGLCD.fillRect(31, 219, (xB-1), 227);
myGLCD.setColor(0, 0, 0);
myGLCD.fillRect((xB+5), 219, 309, 227);
}Code language: Arduino (arduino)Code source complet du programme
Fichiers du didacticiel Arduino TFT
1 fichier(s) 6,07 Ko Télécharger /* Arduino TFT Tutorial
* Program made by Dejan Nedelkovski,
* www.HowToMechatronics.com
*/
/* This program uses the UTFT and URTouch libraries
* made by Henning Karlsen.
* You can find and download them at:
* www.RinkyDinkElectronics.com
*/
#include <UTFT.h>
#include <URTouch.h>
//==== Creating Objects
UTFT myGLCD(SSD1289,38,39,40,41); //Parameters should be adjusted to your Display/Schield model
URTouch myTouch( 6, 5, 4, 3, 2);
//==== Defining Variables
extern uint8_t SmallFont[];
extern uint8_t BigFont[];
extern uint8_t SevenSegNumFont[];
extern unsigned int bird01[0x41A];
int x, y;
char currentPage, selectedUnit;
//Ultrasonic Sensor
const int VCC = 13;
const int trigPin = 11;
const int echoPin = 12;
long duration;
int distanceInch, distanceCm;
// RGB LEDs
const int redLed = 10;
const int greenLed = 9;
const int blueLed = 8;
int xR=38;
int xG=38;
int xB=38;
// Floppy Bird
int xP = 319;
int yP = 100;
int yB = 30;
int fallRateInt = 0;
float fallRate =0;
int score=0;
const int button = 14;
int buttonState = 0;
void setup() {
// Initial setup
myGLCD.InitLCD();
myGLCD.clrScr();
myTouch.InitTouch();
myTouch.setPrecision(PREC_MEDIUM);
// Defining Pin Modes
pinMode(VCC, OUTPUT); // VCC
pinMode(trigPin, OUTPUT); // Sets the trigPin as an Output
pinMode(echoPin, INPUT); // Sets the echoPin as an Input
pinMode(redLed, OUTPUT);
pinMode(greenLed, OUTPUT);
pinMode(blueLed, OUTPUT);
pinMode(button, INPUT);
digitalWrite(VCC, HIGH); // +5V - Pin 13 as VCC
drawHomeScreen(); // Draws the Home Screen
currentPage = '0'; // Indicates that we are at Home Screen
selectedUnit = '0'; // Indicates the selected unit for the first example, cms or inches
}
void loop() {
// Home Screen
if (currentPage == '0') {
if (myTouch.dataAvailable()) {
myTouch.read();
x=myTouch.getX(); // X coordinate where the screen has been pressed
y=myTouch.getY(); // Y coordinates where the screen has been pressed
// If we press the Distance Sensor Button
if ((x>=35) && (x<=285) && (y>=90) && (y<=130)) {
drawFrame(35, 90, 285, 130); // Custom Function -Highlighs the buttons when it's pressed
currentPage = '1'; // Indicates that we are the first example
myGLCD.clrScr(); // Clears the screen
drawDistanceSensor(); // It is called only once, because in the next iteration of the loop, this above if statement will be false so this funtion won't be called. This function will draw the graphics of the first example.
}
// If we press the RGB LED Control Button
if ((x>=35) && (x<=285) && (y>=140) && (y<=180)) {
drawFrame(35, 140, 285, 180);
currentPage = '2';
myGLCD.clrScr();
drawLedControl();
}
// If we press the Birduino Game Button
if ((x>=35) && (x<=285) && (y>=190) && (y<=230)) {
drawFrame(35, 190, 285, 230);
currentPage = '3';
myGLCD.clrScr();
myGLCD.setColor(114, 198, 206);
myGLCD.fillRect(0,0,319,239);
drawGround();
drawPilars(xP,yP);
drawBird(30);
delay(1000);
}
}
}
// Distance Sensor Example
if (currentPage == '1') {
getDistance(); // Gets distance from the sensor and this function is repeatedly called while we are at the first example in order to print the lasest results from the distance sensor
if (myTouch.dataAvailable()) {
myTouch.read();
x=myTouch.getX();
y=myTouch.getY();
// If we press the Centimeters Button
if ((x>=10) && (x<=135) &&(y>=90) && (y<=163)) {
selectedUnit = '0';
}
// If we press the Inches Button
if ((x>=10) && (x<=135) &&(y>=173) && (y<=201)) {
selectedUnit = '1';
}
// If we press the Back Button
if ((x>=10) && (x<=60) &&(y>=10) && (y<=36)) {
drawFrame(10, 10, 60, 36);
currentPage = '0'; // Indicates we are at home screen
myGLCD.clrScr();
drawHomeScreen(); // Draws the home screen
}
}
}
// RGB LED Control
if (currentPage == '2') {
setLedColor();
if (myTouch.dataAvailable()) {
myTouch.read();
x=myTouch.getX();
y=myTouch.getY();
//Back button
if ((x>=10) && (x<=60) &&(y>=10) && (y<=36)) {
drawFrame(10, 10, 60, 36);
currentPage = '0';
myGLCD.clrScr();
drawHomeScreen();
// Turns the LED off
analogWrite(redLed, 0);
analogWrite(greenLed, 0);
analogWrite(blueLed, 0);
}
}
}
//==== This section of the code, for the game example, is explained in my next tutorial
// Birduino Game
if (currentPage == '3') {
//delay(1);
xP=xP-3;
drawPilars(xP, yP);
yB+=fallRateInt;
fallRate=fallRate+0.4;
fallRateInt= int(fallRate);
if (yB>=220) {
yB=220;
}
if(yB>=180 || yB<=0){
restartGame();
}
if((xP<=85) && (xP>=30) && (yB<=yP-2)){
restartGame();
}
if((xP<=85) && (xP>=30) && (yB>=yP+60)){
restartGame();
}
drawBird(yB);
if (xP<=-51){
xP=319;
yP = rand() % 100+20;
score++;
}
if (myTouch.dataAvailable()) {
myTouch.read();
x=myTouch.getX();
y=myTouch.getY();
if ((x>=0) && (x<=319) &&(y>=50) && (y<=239)) {
fallRate=-5;
}
}
buttonState = digitalRead(button);
if (buttonState == HIGH) {
fallRate=-5;
}
}
if (myTouch.dataAvailable()) {
myTouch.read();
x=myTouch.getX();
y=myTouch.getY();
if ((x>=10) && (x<=60) &&(y>=10) && (y<=36)) {
drawFrame(10, 10, 60, 36);
currentPage = '0';
myGLCD.clrScr();
drawHomeScreen();
analogWrite(redLed, 0);
analogWrite(greenLed, 0);
analogWrite(blueLed, 0);
}
}
}
// ====== Custom Funtions ======
// drawHomeScreen - Custom Function
void drawHomeScreen() {
// Title
myGLCD.setBackColor(0,0,0); // Sets the background color of the area where the text will be printed to black
myGLCD.setColor(255, 255, 255); // Sets color to white
myGLCD.setFont(BigFont); // Sets font to big
myGLCD.print("Arduino TFT Tutorial", CENTER, 10); // Prints the string on the screen
myGLCD.setColor(255, 0, 0); // Sets color to red
myGLCD.drawLine(0,32,319,32); // Draws the red line
myGLCD.setColor(255, 255, 255); // Sets color to white
myGLCD.setFont(SmallFont); // Sets the font to small
myGLCD.print("by HowToMechatronics.com", CENTER, 41); // Prints the string
myGLCD.setFont(BigFont);
myGLCD.print("Select Example", CENTER, 64);
// Button - Distance Sensor
myGLCD.setColor(16, 167, 103); // Sets green color
myGLCD.fillRoundRect (35, 90, 285, 130); // Draws filled rounded rectangle
myGLCD.setColor(255, 255, 255); // Sets color to white
myGLCD.drawRoundRect (35, 90, 285, 130); // Draws rounded rectangle without a fill, so the overall appearance of the button looks like it has a frame
myGLCD.setFont(BigFont); // Sets the font to big
myGLCD.setBackColor(16, 167, 103); // Sets the background color of the area where the text will be printed to green, same as the button
myGLCD.print("DISTANCE SENSOR", CENTER, 102); // Prints the string
// Button - RGB LED Control
myGLCD.setColor(16, 167, 103);
myGLCD.fillRoundRect (35, 140, 285, 180);
myGLCD.setColor(255, 255, 255);
myGLCD.drawRoundRect (35, 140, 285, 180);
myGLCD.setFont(BigFont);
myGLCD.setBackColor(16, 167, 103);
myGLCD.print("RGB LED CONTROL", CENTER, 152);
// Button - Birduino
myGLCD.setColor(16, 167, 103);
myGLCD.fillRoundRect (35, 190, 285, 230);
myGLCD.setColor(255, 255, 255);
myGLCD.drawRoundRect (35, 190, 285, 230);
myGLCD.setFont(BigFont);
myGLCD.setBackColor(16, 167, 103);
myGLCD.print("BIRDUINO GAME", CENTER, 202);
}
// Highlights the button when pressed
void drawFrame(int x1, int y1, int x2, int y2) {
myGLCD.setColor(255, 0, 0);
myGLCD.drawRoundRect (x1, y1, x2, y2);
while (myTouch.dataAvailable())
myTouch.read();
myGLCD.setColor(255, 255, 255);
myGLCD.drawRoundRect (x1, y1, x2, y2);
}
//====================================================
void drawDistanceSensor() {
myGLCD.setColor(100, 155, 203);
myGLCD.fillRoundRect (10, 10, 60, 36);
myGLCD.setColor(255, 255, 255);
myGLCD.drawRoundRect (10, 10, 60, 36);
myGLCD.setFont(BigFont);
myGLCD.setBackColor(100, 155, 203);
myGLCD.print("<-", 18, 15);
myGLCD.setBackColor(0, 0, 0);
myGLCD.setFont(SmallFont);
myGLCD.print("Back to Main Menu", 70, 18);
myGLCD.setFont(BigFont);
myGLCD.print("Ultrasonic Sensor", CENTER, 50);
myGLCD.print("HC-SR04", CENTER, 76);
myGLCD.setColor(255, 0, 0);
myGLCD.drawLine(0,100,319,100);
myGLCD.setBackColor(0, 0, 0);
myGLCD.setColor(255, 255, 255);
myGLCD.setFont(SmallFont);
myGLCD.print("Select Unit", 10, 114);
myGLCD.setFont(BigFont);
myGLCD.print("Distance:", 130, 120);
myGLCD.setColor(223, 77, 55);
myGLCD.fillRoundRect (10, 135, 90, 163);
myGLCD.setColor(225, 255, 255);
myGLCD.drawRoundRect (10, 135, 90, 163);
myGLCD.setBackColor(223, 77, 55);
myGLCD.setColor(255, 255, 255);
myGLCD.print("cm", 33, 140);
myGLCD.setColor(223, 77, 55);
myGLCD.fillRoundRect (10, 173, 90, 201);
myGLCD.setColor(255, 255, 255);
myGLCD.drawRoundRect (10, 173, 90, 201);
myGLCD.setBackColor(223, 77, 55);
myGLCD.setColor(255, 255, 255);
myGLCD.print("inch", 17, 180);
myGLCD.setBackColor(0, 0, 0);
myGLCD.setFont(SmallFont);
myGLCD.print("Source code at: HowToMechatronics.com", CENTER, 220);
}
//====================================================
//===== getDistance - Custom Function
void getDistance() {
// Clears the trigPin
digitalWrite(trigPin, LOW);
delayMicroseconds(2);
// Sets the trigPin on HIGH state for 10 micro seconds
digitalWrite(trigPin, HIGH);
delayMicroseconds(10);
digitalWrite(trigPin, LOW);
// Reads the echoPin, returns the sound wave travel time in microseconds
duration = pulseIn(echoPin, HIGH);
// Calculating the distance
distanceCm= duration*0.034/2;
distanceInch= distanceCm/2.53;
// Prints the distance in centimeters
if (selectedUnit == '0' && distanceCm <=400) {
myGLCD.setFont(SevenSegNumFont);
myGLCD.setColor(0, 255, 0);
myGLCD.setBackColor(0, 0, 0);
myGLCD.printNumI(distanceCm,130, 145, 3,'0');
myGLCD.setFont(BigFont);
myGLCD.print("cm ", 235, 178);
}
// Prints the distance in inches
if (selectedUnit == '1' && distanceCm <=160) {
myGLCD.setFont(SevenSegNumFont);
myGLCD.setColor(0, 255, 0);
myGLCD.setBackColor(0, 0, 0);
myGLCD.printNumI(distanceInch,130, 145, 3,'0');
myGLCD.setFont(BigFont);
myGLCD.print("inch", 235, 178);
}
delay(10);
}
//====================================================
void drawLedControl() {
myGLCD.setColor(100, 155, 203);
myGLCD.fillRoundRect (10, 10, 60, 36);
myGLCD.setColor(255, 255, 255);
myGLCD.drawRoundRect (10, 10, 60, 36);
myGLCD.setFont(BigFont);
myGLCD.setBackColor(100, 155, 203);
myGLCD.print("<-", 18, 15);
myGLCD.setBackColor(0, 0, 0);
myGLCD.setFont(SmallFont);
myGLCD.print("Back to Main Menu", 70, 18);
myGLCD.setFont(BigFont);
myGLCD.print("RGB LED Control", CENTER, 50);
myGLCD.print("LED Color:", 10, 95);
myGLCD.print("R", 10, 135);
myGLCD.print("G", 10, 175);
myGLCD.print("B", 10, 215);
myGLCD.setColor(255, 0, 0);
myGLCD.drawLine(0,75,319,75);
myGLCD.setColor(255, 255, 255);
myGLCD.drawRect(30, 138, 310, 148); // R - Slider
myGLCD.drawRect(30, 178, 310, 188);
myGLCD.drawRect(30, 218, 310, 228);
}
//====================================================
//============= setLedColor() - Custom Funtion
void setLedColor() {
if (myTouch.dataAvailable()) {
myTouch.read();
x=myTouch.getX();
y=myTouch.getY();
// Area of the Red color slider
if( (y>=130) && (y<=156)) {
xR=x; // Stores the X value where the screen has been pressed in to variable xR
if (xR<=38) { // Confines the area of the slider to be above 38 pixels
xR=38;
}
if (xR>=303){ /// Confines the area of the slider to be under 310 pixels
xR=303;
}
}
// Area of the Green color slider
if( (y>=170) && (y<=196)) {
xG=x;
if (xG<=38) {
xG=38;
}
if (xG>=303){
xG=303;
}
}
// Area of the Blue color slider
if( (y>=210) && (y<=236)) {
xB=x;
if (xB<=38) {
xB=38;
}
if (xB>=303){
xB=303;
}
}
}
// Maps the values of the X - Axis from 38 to 0 and 310 to 255, because we need values from 0 to 255 for turning on the led
int xRC = map(xR,38,310,0,255);
int xGC = map(xG,38,310,0,255);
int xBC = map(xB,38,310,0,255);
// Sends PWM signal to the pins of the led
analogWrite(redLed, xRC);
analogWrite(greenLed, xGC);
analogWrite(blueLed, xBC);
// Draws a rectangle with the latest color combination
myGLCD.setColor(xRC, xGC, xBC);
myGLCD.fillRoundRect(175, 87, 310, 119);
// Draws the positioners
myGLCD.setColor(255, 255, 255);
myGLCD.fillRect(xR,139,(xR+4),147); // Positioner
myGLCD.setColor(xRC, 0, 0);
myGLCD.fillRect(31, 139, (xR-1), 147);
myGLCD.setColor(0, 0, 0);
myGLCD.fillRect((xR+5), 139, 309, 147);
myGLCD.setColor(255, 255, 255);
myGLCD.fillRect(xG,179,(xG+4),187);
myGLCD.setColor(0, xGC, 0);
myGLCD.fillRect(31, 179, (xG-1), 187);
myGLCD.setColor(0, 0, 0);
myGLCD.fillRect((xG+5), 179, 309, 187);
myGLCD.setColor(255, 255, 255);
myGLCD.fillRect(xB,219,(xB+4),227);
myGLCD.setColor(0, 0, xBC);
myGLCD.fillRect(31, 219, (xB-1), 227);
myGLCD.setColor(0, 0, 0);
myGLCD.fillRect((xB+5), 219, 309, 227);
}
//====================================================
void drawGround() {
myGLCD.setColor(221,216,148);
myGLCD.fillRect(0, 215, 319, 239);
myGLCD.setColor(47,175,68);
myGLCD.fillRect(0, 205, 319, 214);
myGLCD.setColor(0, 0, 0);
myGLCD.setBackColor(221, 216, 148);
myGLCD.setFont(BigFont);
myGLCD.print("Score:",5,220);
myGLCD.setFont(SmallFont);
myGLCD.print("HowToMechatronics.com", 140, 220);
}
void drawPilars(int x, int y) {
if (x>=270){
myGLCD.setColor(0, 200, 20);
myGLCD.fillRect(318, 0, x, y-1);
myGLCD.setColor(0, 0, 0);
myGLCD.drawRect(319, 0, x-1, y);
myGLCD.setColor(0, 200, 20);
myGLCD.fillRect(318, y+81, x, 203);
myGLCD.setColor(0, 0, 0);
myGLCD.drawRect(319, y+80, x-1, 204);
}
else if( x<=268) {
myGLCD.setColor(114, 198, 206);
myGLCD.fillRect(x+51, 0, x+53, y);
myGLCD.setColor(0, 200, 20);
myGLCD.fillRect(x+49, 1, x+1, y-1);
myGLCD.setColor(0, 0, 0);
myGLCD.drawRect(x+50, 0, x, y);
myGLCD.setColor(114, 198, 206);
myGLCD.fillRect(x-1, 0, x-3, y);
myGLCD.setColor(114, 198, 206);
myGLCD.fillRect(x+51, y+80, x+53, 204);
myGLCD.setColor(0, 200, 20);
myGLCD.fillRect(x+49, y+81, x+1, 203);
myGLCD.setColor(0, 0, 0);
myGLCD.drawRect(x+50, y+80, x, 204);
myGLCD.setColor(114, 198, 206);
myGLCD.fillRect(x-1, y+80, x-3, 204);
}
myGLCD.setColor(0, 0, 0);
myGLCD.setBackColor(221, 216, 148);
myGLCD.setFont(BigFont);
myGLCD.printNumI(score, 100, 220);
}
//====================================================
void drawBird(int y) {
if(y<=219) {
myGLCD.drawBitmap (50, y, 35, 30, bird01);
myGLCD.setColor(114, 198, 206);
myGLCD.fillRoundRect(50,y,85,y-6);
myGLCD.fillRoundRect(50,y+30,85,y+36);
}
else if(y>=200) {
myGLCD.drawBitmap (50, 200, 35, 30, bird01);
myGLCD.setColor(114, 198, 206);
myGLCD.fillRoundRect(50,200,85,200-6);
myGLCD.fillRoundRect(50,200+30,85,200+36);
}
}
void gameOver() {
myGLCD.clrScr();
myGLCD.setColor(255, 255, 255);
myGLCD.setBackColor(0, 0, 0);
myGLCD.setFont(BigFont);
myGLCD.print("GAME OVER", CENTER, 40);
myGLCD.print("Score:", 100, 80);
myGLCD.printNumI(score,200, 80);
myGLCD.print("Restarting...", CENTER, 120);
myGLCD.setFont(SevenSegNumFont);
myGLCD.printNumI(2,CENTER, 150);
delay(1000);
myGLCD.printNumI(1,CENTER, 150);
delay(1000);
myGLCD.setColor(114, 198, 206);
myGLCD.fillRect(0,0,319,239);
drawBird(30);
drawGround();
delay(1000);
}
//====================================================
void restartGame() {
delay(1000);
gameOver();
xP=319;
yB=30;
fallRate=0;
score=0;
}
Code language: Arduino (arduino)
Processus de fabrication
- Tutoriel sur le verrouillage RFID Arduino
- Piano tactile capacitif portable
- Animation LCD et jeux
- Afficher une image sur un écran LCD TFT avec Arduino UNO !
- Afficher les images BMP de la carte SD sur l'écran LCD TFT
- Problème d'interfaçage et résolution du problème tactile sur le bouclier TFT LCD 2.4″
- Station météo Arduino
- Esquivez les défenses !
- Tutoriel Arduino 01 :Prise en main