



Afficher des images sur un écran TFT 1,17 pouces avec Arduino UNO
Composants nécessaires
- 1 × Arduino UNO
- 1 × Écran LCD/TFT 1,17 pouce
- 1 × Carte SD
Applications
- Arduino IDE
À propos du projet
Dans cet article, je vous montre comment afficher une image sur un écran TFT avec Arduino !
Schéma de câblage
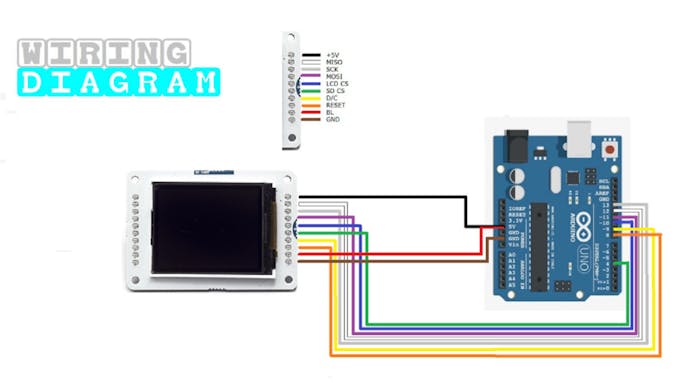
| Broche écran | Broche Arduino |
|---|---|
| 5V (LCD) | 5V |
| MISO | 12 |
| SCK | 13 |
| MOSI | 11 |
| LCD CS | 10 |
| SD CS | 4 |
| D/C | 9 |
| RESET | 8 |
| BL | 5V (ou PWM pour contrôle luminosité) |
| GND | GND |
Préparation de l'image sur carte SD
- Format : .bmp uniquement
- Résolution max : 160 × 128 pixels
- Nom de fichier : arduino.bmp (exactement)
- Placez le fichier à la racine de la carte SD
- Insérez la carte SD hors tension

Code Arduino
// CreaTechWeb : Affichage d'une image sur écran TFT avec Arduino UNO
// https://createchweb.com/displaying-an-image-on-a-tft-screen-with-arduino/

#include
#include
#include   // Bibliothèque Arduino LCD

#define sd_cs  4
#define lcd_cs 10
#define dc     9
#define rst    8

TFT TFTscreen = TFT(lcd_cs, dc, rst);
PImage logo;

void setup() {
  TFTscreen.begin();
  TFTscreen.background(255, 255, 255);
  TFTscreen.stroke(0, 0, 255);
  TFTscreen.println();
  TFTscreen.println(F("Arduino TFT Bitmap Example"));
  TFTscreen.stroke(0, 0, 0);
  TFTscreen.println(F("Open serial monitor"));
  TFTscreen.println(F("to run the sketch"));

  Serial.begin(9600);
  while (!Serial);

  TFTscreen.background(255, 255, 255);

  Serial.print(F("Initializing SD card..."));
  if (!SD.begin(sd_cs)) {
    Serial.println(F("failed!"));
    return;
  }
  Serial.println(F("OK!"));

  TFTscreen.begin();
  TFTscreen.background(255, 255, 255);

  logo = TFTscreen.loadImage("arduino.bmp");
  if (!logo.isValid()) {
    Serial.println(F("error while loading arduino.bmp"));
  }
}

void loop() {
  if (!logo.isValid()) return;

  Serial.println(F("drawing image"));
  int x = random(TFTscreen.width() - logo.width());
  int y = random(TFTscreen.height() - logo.height());
  TFTscreen.image(logo, x, y);
  delay(1500);
}
Résultat
Ouvrez le moniteur série dans l'IDE Arduino. Votre image .bmp s'affiche maintenant sur l'écran TFT à des positions aléatoires toutes les 1,5 secondes.

Robot commandé par la voix avec Arduino Nano et Bluetooth
Lunettes connectées « Smart Match-Making » avec Arduino 101 et tinyTILE BLE
Processus de fabrication
- Panneau de contrôle Arduino Nano pour Flight Simulator 2020 – Affichage LCD et CDI
- Horloge Arduino temps réel pour les heures de prière islamiques
- Afficher des images BMP depuis carte SD sur écran TFT LCD 2,4″ Shield Arduino
- Construire un affichage à persistance rétinienne portable avec Arduino UNO et ATtiny85
- Maîtriser une matrice LED 8×8 avec Arduino Uno : Guide pas à pas
- Construire un Cube LED 4x4x4 avec Arduino Uno et 1Sheeld – Projet LED Interactif
- Projet Arduino GPS + Écran Tactile TFT : Affichage Position Temps Réel
- Construire un Réveil Fiable avec RTC DS1302 et Arduino UNO
- Contrôle de ventilateur PWM 4 broches 25 kHz avec Arduino Uno – Construction, code et test