



Jeu Tetris sur Matrice LED 16×8 DIY avec Arduino Nano
Composants et Fournitures
| Arduino Nano R3 | ×1 |
| Bouton Poussoir 12 mm (SparkFun) | ×4 |
| Registre à Décalage 74HC595 (Texas Instruments) (Série → Parallèle) | ×2 |
| Interrupteur à Glissière | ×1 |
| LED 5 mm Jaune | ×128 |
Outils Nécessaires
- Fer à Souder (générique)
Applications et Services en Ligne
- Arduino IDE
À Propos du Projet
J'ai construit ce jeu Tetris avec une matrice LED 16×8 faite maison, un Arduino Nano et deux registres à décalage 74HC595. Un bip sonore retentit à chaque appui sur un bouton.
Code Arduino
/* Author: Jae Yeong Bae UBC ECE jocker.tistory.com
   Date: Jan.18.2013 | Tetris v2 | Affiche score au gameover
   Matrice LED: 2x 74HC595 (ordre: Vert, Bleu, Rouge - ici mono-couleur jaune)
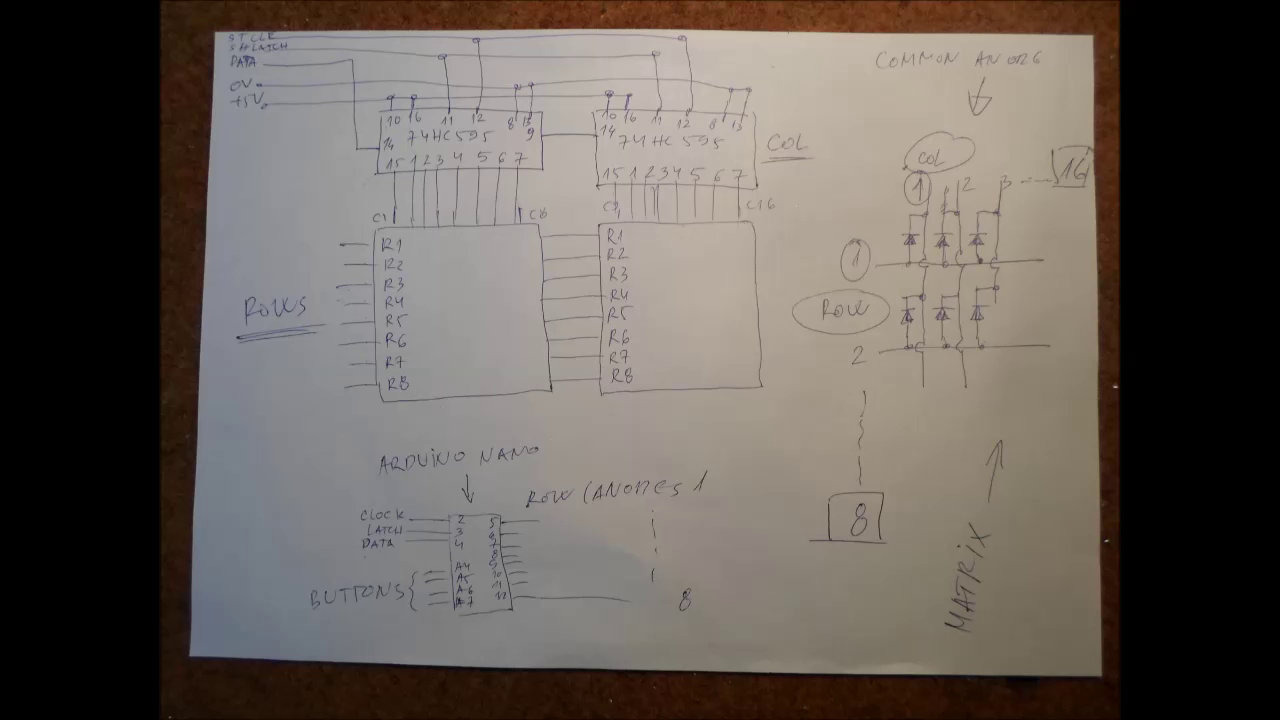
   Pins: Latch=3, Clock=2, Data=4, Row Anodes=5-12 (8 pins partagés)
   Boutons (analogiques): A4=Gauche, A5=Bas, A6=Droite, A7=Haut (Rotation) */

unsigned char latchPin = 3, clockPin = 2, dataPin = 4, rowPin = 5;
long delays = 0; short delay_ = 500;
long bdelay = 0; short buttondelay = 150, btdowndelay = 30, btsidedelay = 80;
unsigned char blocktype, blockrotation;
int lines = 0;
boolean block[8][18], pile[8][16], disp[8][16];
boolean lib[10][5][7]; // Polices chiffres pour score

void setup() {
  // Initialisation lib[] avec patterns 7 segments 5x7 pour chiffres 0-9
  // ... (initialisation complète dans le code source)

  int seed = (analogRead(0)+1)*(analogRead(1)+1)*(analogRead(2)+1)*(analogRead(3)+1);
  randomSeed(seed); random(10,9610806);
  seed = seed * random(3336,15679912) + analogRead(random(4));
  randomSeed(seed); random(10,98046);

  cli(); // Stop interrupts
  // Timer1 à 2 kHz pour rafraîchissement matrice
  TCCR1A = 0; TCCR1B = 0; TCNT1 = 0;
  OCR1A = 259; // (16MHz)/(2000*64) - 1
  TCCR1A |= (1 << WGM01); // CTC mode
  TCCR1B |= (1 << CS12) | (1 << CS10); // Prescaler 1024
  TIMSK1 |= (1 << OCIE0A); // Enable compare interrupt
  sei(); // Allow interrupts

  pinMode(latchPin, OUTPUT); pinMode(clockPin, OUTPUT); pinMode(dataPin, OUTPUT);
  pinMode(A7, INPUT); pinMode(A6, INPUT); pinMode(A5, INPUT); pinMode(A4, INPUT);
  for(int i=0;i<8;i++) pinMode(rowPin+i, OUTPUT);

  newBlock(); updateLED(); Serial.begin(9600);
}

void loop() {
  if (delays < millis()) { delays = millis() + delay_; movedown(); }

  int button = readBut();
  if (button == 1) rotate();      // Haut = Rotation
  if (button == 2) moveright();   // Droite
  if (button == 3) moveleft();    // Gauche
  if (button == 4) movedown();    // Bas = Chute rapide

  // Debug lecture analogique boutons
  Serial.print(analogRead(A4)); Serial.print(analogRead(A5));
  Serial.print(analogRead(A6)); Serial.println(analogRead(A7));
}

// Fonctions déplacement (moveleft, moveright, movedown), rotation, lecture boutons,
// détection collision, game over, nouveau bloc, vérification lignes complètes,
// rafraîchissement matrice LED (ISR TIMER1_COMPA_vect -> LEDRefresh)
// ... (Code complet très long, disponible dans la source originale)
Schéma de Câblage
Construisez un Stadiomètre Numérique : Suivez la Croissance avec Arduino et Capteur Laser
Bocal Intelligent IoT avec ESP8266, Arduino et Capteur Ultrasonique – Surveillance Temps Réel
Processus de fabrication
- Construire un jeu gyroscopique temps réel avec Arduino Nano et capteur MPU-6050
- Dé numérique Arduino sur écran LCD 16x2 – Générateur aléatoire à bouton poussoir
- TV-B-Gone DIY Arduino : Télécommande universelle pour toutes les TV
- Manette de jeu USB Arduino DIY – Construisez votre propre gamepad haute performance
- Construire une console Pong 24×16 LED avec Arduino Nano et MAX7219
- Pixel Chaser : Jeu LED interactif à une touche avec Arduino Nano
- Horloge à bascule Arduino avec matrice LED 8×8 – Projet DIY d'horloge temps réel
- Jeu Pong sur Matrice NeoPixel avec Arduino Nano
- Never Ride Alone : Système de sécurité vélo intelligent