



Créer un bot Telegram ESP8266 : contrôle IoT simplifié
Composants et fournitures
| Composant | Quantité | Remarques |
|---|---|---|
| ESP8266 ESP-01 (Espressif) | 1 | |
| Arduino UNO | 1 | Utilisé comme programmateur USB-série pour l'ESP-01. |
| Fils de connexion (génériques) | 7 | |
| Appareil Android | 1 | Pour l'application Telegram. |
Applications et services en ligne
- API Telegram Bot
- Arduino IDE
À propos du projet
Bonjour les codeurs,
C'est un plaisir de débuter sur Hackster avec l'API Telegram Bot et l'ESP8266. Ce projet montre comment contrôler un ESP8266 via un bot Telegram, ouvrant ainsi les portes du vaste monde de l'IoT.
1. Installation de la bibliothèque Telegram Bot
Téléchargez la bibliothèque Telegram Bot et ajoutez-la à l'Arduino IDE (Croquis > Inclure une bibliothèque > Ajouter la bibliothèque .ZIP).
2. Configuration du bot Telegram
- Installez Telegram sur votre téléphone ou ordinateur.
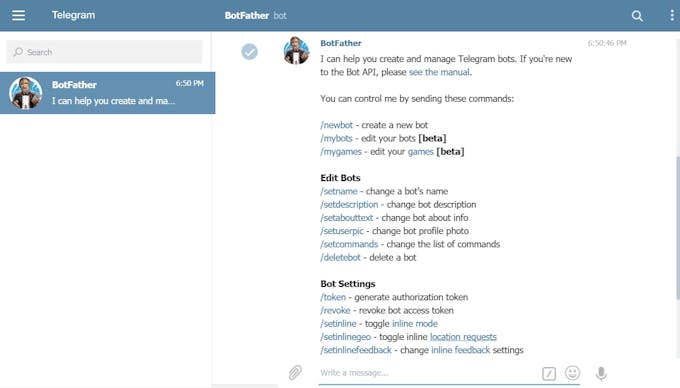
- Recherchez @BotFather et démarrez une conversation.
- Envoyez
/newbotet suivez les instructions pour créer votre bot. - BotFather vous fournira un token d'API (ex:
123456789:ABCdefGhIJKlmNoPQRsTUVwxyZ). Notez-le précieusement.
3. Mise en place du matériel
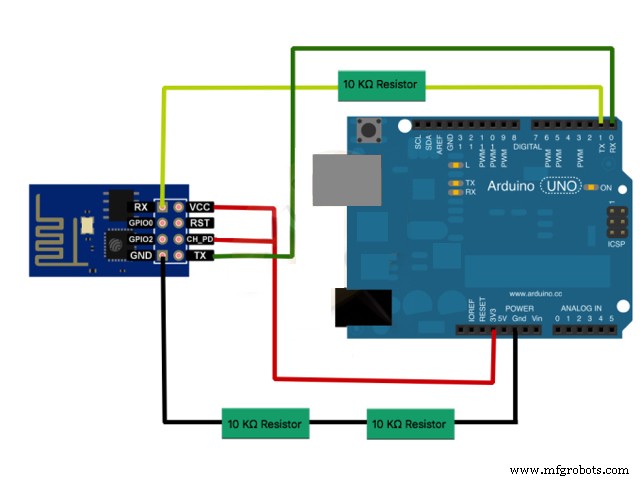
Connectez l'ESP8266 à l'Arduino UNO comme indiqué :
- GPIO0 → GND (mode flash)
- RST → RST de l'Arduino
- TX ESP → TX Arduino (pin 1)
- RX ESP → RX Arduino (pin 0) via diviseur de tension
- VCC → 3.3V (pas 5V !)
- CH_PD → 3.3V
- GND → GND
Téléversez le code via l'Arduino IDE (carte : "Generic ESP8266 Module").

4. Le code
#include <ESP8266WiFi.h>
#include <WiFiClientSecure.h>
#include <TelegramBot.h>

#define LED 1          // Broche de la LED (GPIO1 sur ESP-01)

// Identifiants WiFi
const char* ssid = "VOTRE_SSID";
const char* password = "VOTRE_MOT_DE_PASSE";

// Token du bot Telegram
const char BotToken[] = "VOTRE_TOKEN_BOTFATHER";

WiFiClientSecure net_ssl;
TelegramBot bot(BotToken, net_ssl);

void setup() {
  Serial.begin(115200);
  while (!Serial) {}
  delay(3000);

  Serial.print("Connexion WiFi : ");
  Serial.println(ssid);
  while (WiFi.begin(ssid, password) != WL_CONNECTED) {
    Serial.print(".");
    delay(500);
  }
  Serial.println("");
  Serial.println("WiFi connecté");

  bot.begin();
  pinMode(LED, OUTPUT);
}

void loop() {
  message m = bot.getUpdates(); // Récupère les nouveaux messages

  if (m.text.equals("on")) {
    digitalWrite(LED, HIGH);
    bot.sendMessage(m.chat_id, "La LED est maintenant ALLUMÉE");
  } else if (m.text.equals("off")) {
    digitalWrite(LED, LOW);
    bot.sendMessage(m.chat_id, "La LED est maintenant ÉTEINTE");
  }
}
Remplacez ssid, password et BotToken par vos valeurs, puis téléversez.
5. Test de fonctionnement
Ouvrez Telegram, trouvez votre bot, envoyez on et off. La LED intégrée (ou une LED externe sur GPIO1) doit s'allumer/s'éteindre, et le bot répondra.
Code source
Disponible sur GitHub : https://github.com/CodersCafeCommunity/TelegramBot
Schémas
Processus de fabrication
- Capteur CO2 K30 : Surveillance en temps réel de la qualité de l'air intérieur
- Faciliter la communication sourd-aveugle avec 1Sheeld et Arduino
- Construire une Tirelire Intelligente : Contrôler un Accepteur de Pièces avec Arduino Nano
- Contrôler une LED par Bluetooth avec Arduino et MIT App Inventor
- Intégrer un capteur d'empreintes capacitif DFRobot (ID809) avec Arduino ou ESP8266
- Station météo interactive Nextion HMI avec Arduino Mega et capteurs
- Bras robotique 6 DoF piloté par Nunchuk Wii – Kit Arduino Mega
- Mesure précise du rayonnement solaire avec Arduino UNO et shield Ethernet
- Système radar compact Arduino avec capteur ultrasonique HC-SR04 et écran 1,8"