



Construisez un compagnon LCD IA : votre ami interactif
Composants et fournitures
| Arduino UNO | × | 1 |
| Potentiomètre rotatif (générique) | × | 1 |
| Fils de connexion (générique) | × | 19 |
| Plaque d'essai (générique) | × | 1 |
| Bouton poussoir | × | 4 |
| Résistance 100 ohm | × | 3 |
| Résistance 221 ohm | × | 1 |
| Adafruit LCD standard - 16x2 blanc sur bleu | × | 1 |
Applications et services en ligne
- Arduino IDE
- Arduino Web Editor
À propos de ce projet
Pour vous offrir un compagnon pendant les moments de solitude.
Code
Le code (C/C++)
Vous pouvez l'étendre si vous le souhaitez, publiez simplement le code étendu dans un commentaire ! Copiez-collez ceci après « à suivre » :
lcd.clear();
lcd.print("To be ");
lcd.setCursor(2, 2);
lcd.print("continued.");
delay(2000);
#include <LiquidCrystal.h>
LiquidCrystal lcd(12, 11, 5, 4, 3, 2);
const int buttonPin = 9;
int buttonState = 0;
const int buttonPin2 = 10;
const int buttonPin3 = 8;

void setup() {
  pinMode(buttonPin, INPUT);
  pinMode(buttonPin2, INPUT);
  pinMode(buttonPin3, INPUT);
  lcd.begin(16, 2);
  lcd.print(" (.) (.) Hi I");
  lcd.setCursor(2, 2);
  lcd.print("(____) am Robi");
  delay(2000);
  lcd.clear();
  lcd.print(" (.) (.) You ");
  lcd.setCursor(2, 2);
  lcd.print(" ____ can talk");
  delay(2000);
  lcd.clear();
  lcd.print(" (-) (-) to ");
  lcd.setCursor(2, 2);
  lcd.print(" (____) me!");
  delay(2000);
  lcd.clear();
  lcd.print(" (.) (.)Tap");
  lcd.setCursor(2, 2);
  lcd.print(" ____ the");
  delay(2000);
  lcd.clear();
  lcd.print(" (.) (.) but");
  lcd.setCursor(2, 2);
  lcd.print(" (____) ton");
  delay(2000);
}

void loop() {
  buttonState = digitalRead(buttonPin);
  if (buttonState == HIGH) {
    lcd.clear();
    lcd.print("Hello I am");
    lcd.setCursor(2, 2);
    lcd.print("Alexander");
    delay(2000);
    lcd.clear();
    lcd.print(" (*) (*) Hi!");
    lcd.setCursor(2, 2);
    lcd.print(" (____)");
    delay(2000);
    lcd.clear();
    lcd.print(" (.) (.)Let's");
    lcd.setCursor(2, 2);
    lcd.print(" ____ play");
    delay(2000);
    lcd.clear();
    lcd.print("OK!");
    lcd.setCursor(2, 2);
    lcd.print("But Where?");
    delay(2000);
    lcd.clear();
    lcd.print(" (.) (.) Park");
    lcd.setCursor(2, 2);
    lcd.print(" (____)or home?");
    delay(2000);
    lcd.clear();
    lcd.print("Left = Park");
    lcd.setCursor(2, 2);
    lcd.print("Right = Home");
    delay(2000);
  }

  buttonState = digitalRead(buttonPin2);
  if (buttonState == HIGH) {
    lcd.clear();
    lcd.print("You go to");
    lcd.setCursor(2, 2);
    lcd.print("the Park...");
    delay(2000);
    lcd.clear();
    lcd.print(" (.) (.) Lets");
    lcd.setCursor(2, 2);
    lcd.print(" ____ swing!");
    delay(2000);
    lcd.clear();
    lcd.print("OK!");
    lcd.setCursor(2, 2);
    lcd.print("You swing...");
    delay(2000);
    lcd.clear();
    lcd.print(" (*) (*) I'm");
    lcd.setCursor(2, 2);
    lcd.print(" (___) tired");
    delay(2000);
    lcd.clear();
    lcd.print("Me too!");
    lcd.setCursor(2, 2);
    lcd.print("Lets drink.");
    delay(2000);
    lcd.clear();
    lcd.print(" (.) (.) Yeah");
    lcd.setCursor(2, 2);
    lcd.print(" (____) ");
    delay(2000);
    lcd.clear();
    lcd.print("You go buy");
    lcd.setCursor(2, 2);
    lcd.print("a drink...");
    delay(2000);
    lcd.clear();
    lcd.print(" (*) (*) Ahh!");
    lcd.setCursor(2, 2);
    lcd.print(" ____ OW!!");
    delay(2000);
    lcd.clear();
    lcd.print("What?");
    lcd.setCursor(2, 2);
    lcd.print("...");
    delay(2000);
    lcd.clear();
    lcd.print(" (*) (*)Water");
    lcd.setCursor(2, 2);
    lcd.print(" []got in my eye");
    delay(2000);
    lcd.clear();
    lcd.print("To be ");
    lcd.setCursor(2, 2);
    lcd.print("continued.");
    delay(2000);
  }

  buttonState = digitalRead(buttonPin3);
  if (buttonState == HIGH) {
    lcd.clear();
    lcd.print("You go to");
    lcd.setCursor(2, 2);
    lcd.print("your home...");
    delay(2000);
    lcd.clear();
    lcd.print(" (.) (.) WOW!");
    lcd.setCursor(2, 2);
    lcd.print(" ___ Cool!");
    delay(2000);
    lcd.clear();
    lcd.print("You play for");
    lcd.setCursor(2, 2);
    lcd.print("the day...");
    delay(2000);
    lcd.clear();
    lcd.print("To be");
    lcd.setCursor(2, 2);
    lcd.print("continued.");
    delay(2000);
    lcd.clear();
  }
}
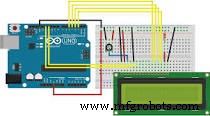
Schéma de câblage
Système de contrôle de cafard DIY avec Arduino – Construisez-le pour moins de 30 €
Serrure à gestes sans contact : Accès sécurisé avec APDS-9960 et Arduino
Processus de fabrication
- Jeu UFO Attack DIY avec Arduino UNO et Afficheur MAX7219
- Construire un oscilloscope Arduino 20 kHz sur écran Nokia 5110 – Guide DIY facile
- Stores intelligents : contrôle automatisé de la lumière avec Arduino et énergie solaire
- Horloge 3D RGB Arduclock – Montre LED Bluetooth avec horloge temps réel
- Surveillance de la Qualité de l'Eau : Système Arduino MKR1000 pour Rivières et Lacs
- Capteur d'obstacle IR simple avec Arduino — LED IR + Photodiode
- Jeu interactif joystick + LEDs avec Arduino
- Find Me : Localisateur d'objets intelligent avec Arduino et Bluetooth
- Oscilloscope DIY Arduino Nano (10 Hz – 50 kHz) avec écran LCD 128×64