



Thermomètre portable DIY low-cost avec intégration Android
Composants et fournitures
| Composant | Quantité |
|---|---|
| Arduino Nano R3 | 1 |
| Capteur IR MLX90614 (I2C) | 1 |
| Câble OTG (Micro-USB mâle ↔ Mini-USB mâle) | 1 |
| Boîtier imprimé 3D (fichier GrabCAD) | 1 |
Outils nécessaires
- Fer à souder + fil soudure sans plomb
Application Android
- Portable Thermometer (Play Store :
io.cordova.sensorsuhu)
À propos du projet
Les thermomètres infrarouges (pistolets thermiques) sont devenus chers. Alternative DIY bas budget : mesure sans contact température corporelle via MLX90614 + Arduino Nano + smartphone Android (OTG).
Câblage hardware (I2C)

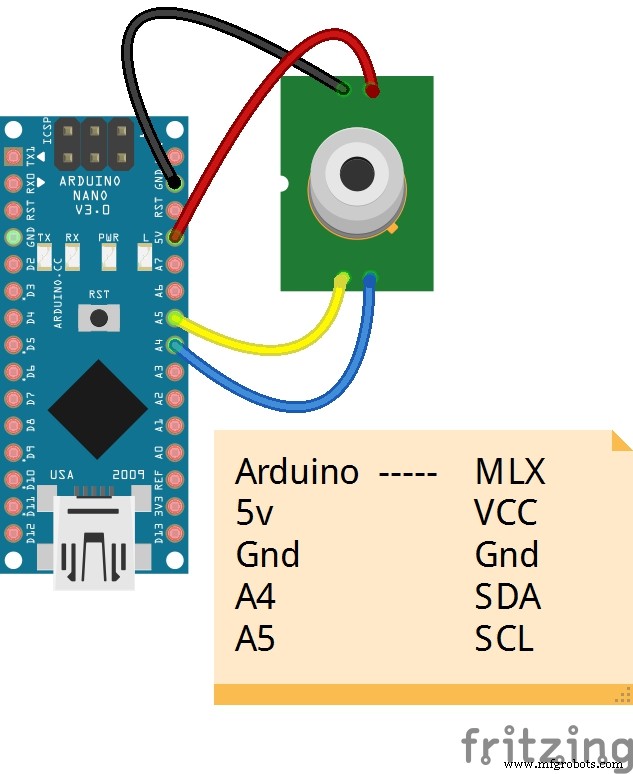
MLX90614 → Arduino Nano : SDA → A4, SCL → A5, VCC → 3.3V, GND → GND.
Préparation logicielle
- IDE Arduino → Outils → Gérer les bibliothèques → « Adafruit MLX90614 Library » → Installer
- Test : Fichier → Exemples → Adafruit MLX90614 → mlxtest → Téléverser → Moniteur série : température ambiante + objet

Circuit final, OTG et boîtier 3D

Boîtier 3D : GrabCAD portable-thermometer-box-1. Câble OTG DIY : Micro-USB mâle + Mini-USB mâle.
Installation application

Rechercher « Portable Thermometer » sur Play Store ou scanner le QR code.
Utilisation
- Connecter l'appareil au smartphone via OTG
- Activer la connexion OTG dans les paramètres téléphone
- Lancer l'application
- Appuyer « Check Now » pour mesurer
Code Arduino
/* MLX90614 → OTG Android
   ecole.robot@gmail.com */

#define LED 13
#include <Wire.h>
#include <Adafruit_MLX90614.h>

Adafruit_MLX90614 mlx = Adafruit_MLX90614();
unsigned long previousMillis;
int interval = 50;
char cmd;
int data = 0;

void setup() {
  Serial.begin(9600);
  mlx.begin();
  pinMode(LED, OUTPUT);
}

void loop() {
  if (Serial.available() > 0) {
    cmd = Serial.read();
    switch (cmd) {
      case '0': digitalWrite(LED, LOW); data = 0; break;
      case '1': digitalWrite(LED, HIGH); data = 1; break;
    }
  }
  if (data == 1) {
    if (millis() - previousMillis >= interval) {
      previousMillis = millis();
      Serial.print(mlx.readAmbientTempC());
      Serial.print(";");
      Serial.println(mlx.readObjectTempC());
    }
  }
}
Protocole série simple : Android envoie '1' → Arduino répond « ambiant;objet » toutes les 50 ms. '0' arrête.
Pièces 3D personnalisées

Schéma
Contrôlez un rover Arduino avec Firmata et une manette Xbox One
Économisez les broches Arduino : clavier 4×3 sur 3 entrées analogiques
Processus de fabrication
- Toilettes portables : histoire, conception et impact environnemental
- Le thermomètre : du thermoscope de Galilée aux capteurs numériques modernes
- Gestion de devices : Scaler les déploiements de compteurs intelligents à travers des millions de devices
- Choisir le bon dispositif pour Bluetooth Mesh : Guide pratique pour le matériel, le logiciel et les exigences d'application
- Construire un thermostat intelligent type NEST avec Node-RED sur Raspberry Pi
- Allocation mémoire dynamique en C : Comprendre malloc() avec exemples pratiques
- calloc() en C : Allocation mémoire initialisée à zéro et exemple pratique
- Routeur CNC 1325 multi-têtes 8 broches avec dispositif rotatif personnalisé
- Dispositif portable détecte E. coli nocif dans les aliments sur site par bioluminescence