


Microfusion de pièces imprimées en 3D avec des résines calcinables
Microfusion ou moulage à la cire perdue est l'une des méthodes de fabrication les plus largement utilisées dans l'industrie de la bijouterie et est le plus ancien procédé de moulage connu.
Le moulage permet d'obtenir des répliques en métal au moyen d'un moule réalisé à partir d'un prototype traditionnellement modelé en cire. Dans ce cas, des pièces imprimées en 3D avec des résines calcinables sont utilisées pour remplacer les modèles en cire.
Les bijoux peuvent être fabriqués à partir d'une variété de métaux, y compris l'or, le platine, l'argent et le laiton , en utilisant le procédé de moulage. Ci-dessous, vous pouvez voir le processus de microfusion de bijoux à partir de pièces imprimées en 3D avec des résines calcinables :
1- Impression 3D de la pièce
Basé sur des conceptions créées à l'aide d'un logiciel de CAO, les modèles souhaités doivent être imprimés en 3D. Il existe actuellement un grand nombre de résines calcinables disponibles auprès de différents fabricants. L'utilisation d'un matériau ou d'un autre dépend de l'imprimante 3D utilisée et des caractéristiques requises pour les pièces.
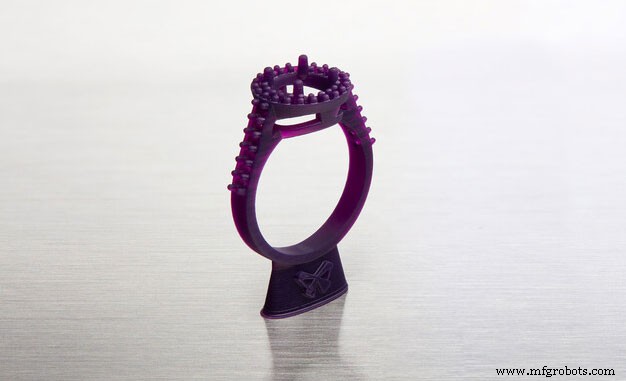
Image 1 :Anneau imprimé en 3D avec de la résine calcinable FormLabs. Source :FormLabs.
L'une des imprimantes 3D les plus populaires pour l'impression 3D dans le secteur de la bijouterie est la Form3 du célèbre fabricant FormLabs. Cette imprimante 3D ne nécessite pas de connaissances techniques avancées et peut donc être utilisée sans difficulté . L'imprimante 3D Form3 limite son utilisation enne prenant en charge que les matériaux développés par le fabricant. Cela peut être un avantage, car aucune configuration n'est requise et les paramètres de configuration et les valeurs modifiables sont réduits au minimum, avec seulement le type de matériau et quelques paramètres de base à sélectionner. Cela réduit la marge d'erreur au minimum.
Le tableau suivant présente certaines des résines brûlables les plus populaires et leur compatibilité avec les imprimantes 3D :
| Résine | Fabricant | Technologie | Compatibilité |
|---|---|---|---|
| Cire coulable | FormLabs | SLA | Formulaire 2, Formulaire 3, Formulaire 3L, Formulaire3+ |
| Cire Castable 40 | FormLabs | SLA | Formulaire 2, Formulaire 3, Formulaire 3L, Formulaire3+ |
| zCire Ambre | UniZ | LCD | Slash, Slash 2, Slash 2 Plus, Slash 2 Pro |
| zCire Violet | UniZ | LCD | Slash, Slash 2, Slash 2 Plus, Slash 2 Pro |
| Bluecast original | Zortrax | LCD | UniZ, WANHAO, zortrax, ANYCUBIC, ASIGA, B9 Creator, FLASH FORGE Moon Ray, Prusa. |
| Bluecast X5 | Zortrax | LCD | UniZ, WANHAO, zortrax, ANYCUBIC, ASIGA, B9 Creator, FLASH FORGE Moon Ray, Prusa. |
| Bluecast X10 | Zortrax | LCD | UniZ, WANHAO, zortrax, ANYCUBIC, ASIGA, B9 Creator, FLASH FORGE Moon Ray, Prusa. |
| Dental Cast | Harz Labs | LCD | Formlabs, PEOPOLY, UniZ, WANHAO, zortrax, ANYCUBIC, ASIGA, B9 Creator, FLASH FORGE Moon Ray, Prusa. |
Table 1:Burn-out resins and compatibility. Source :Filament2print.
Each material has different properties and requires different parameters. However, they all have a common characteristic:they have been developed to replace wax parts in the microfusion process, with a composition that achieves castings free of residues that could affect the final result of the parts.
Once the parts have been printed, they must be cured if the material requires it. This depends on the composition of the resin and the manufacturer's advice should always be followed to achieve an optimum result.
2- Wax tree
Once the parts are cured (in cases where this step is required), the removal of the backing can be carried out, always with great care. Sandpaper (400 grit or higher) or even a rotary tool with a polishing attachment can be used to achieve total removal of the support and a perfect finish.
To create the wax tree, a wax base is taken and attached to a rubber cover of the sprue. Small cylindrical wax rods are welded to the wax base using a heat tool. The 3D printed parts are welded to the other end of the bars.
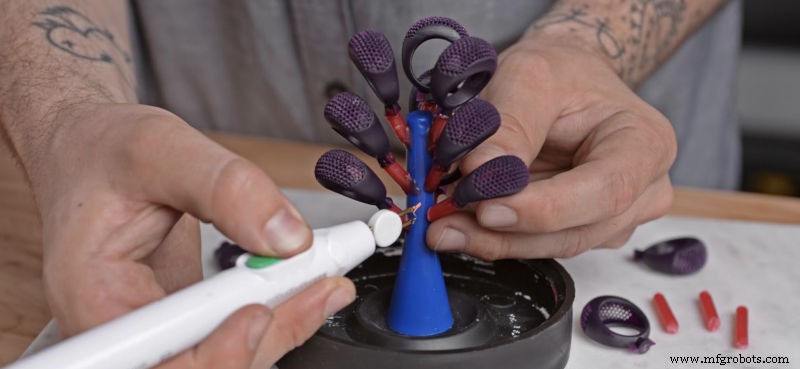
Image 2:Casting wax tree. Source:FormLabs.
This process is similar to that carried out in microfusion when casting traditionally carved wax pieces.
3- Mould preparation
The wax tree with the 3D printed parts in burn-out resin is to be placed inside a refractory steel cylinder, which is to be fitted into the rubber cylinder cover. In case the refractory steel cylinder has holes, these should be covered by wrapping the cylinder in adhesive tape.
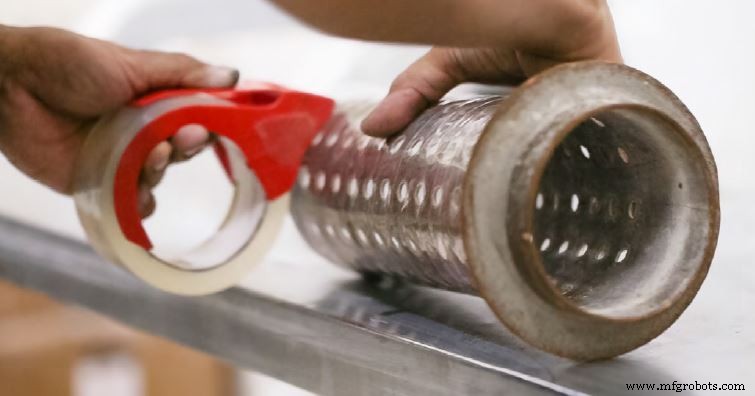
Image 3:Refractory steel cylinder shell. Source:Formlabs.
The casting must then be poured slowly, always from the side of the cylinder to avoid damaging the tree with the parts 3D printed with calcineable resin.
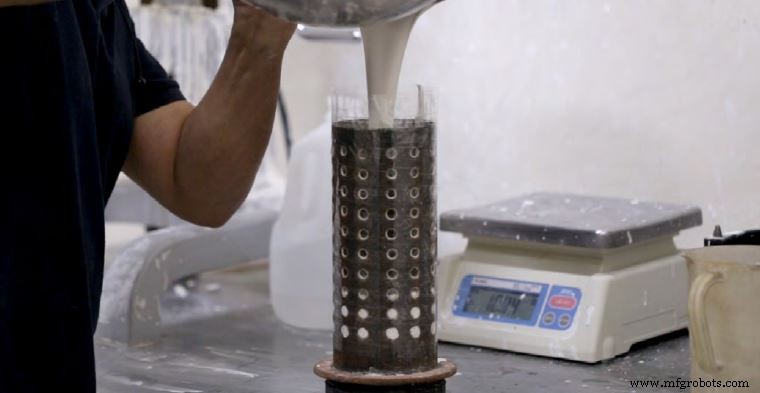
Image 4:Pouring of the casting into a refractory steel cylinder. Source:Formlabs.
When pouring the casting, it is possible that small air pockets may remain which can affect the quality of the final parts. For this reason, it is very important to carry out the degassing process in a vacuum chamber.
4- Burnout
The cylinder is placed in the oven following the time and temperature instructions recommended by the manufacturer. During this time, the wax will burn out without leaving residues, leaving the mould ready.
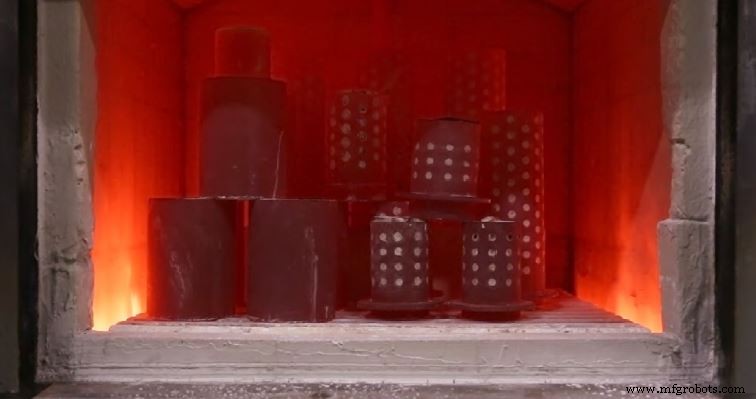
Image 5:Burnout process. Source:Formlabs.
The desired metal must then be poured into the mould to produce the final parts.
5- Washing and polishing
After casting, the mould is carefully removed from the furnace and immersed in water using tongs. During this process, the casting will melt, leaving the metal parts visible. Once washed, the metal parts are separated from the tree, polished and polished until the desired finish is achieved.
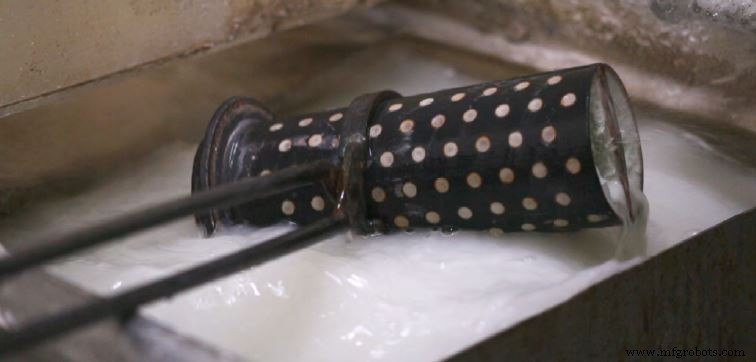
Image 6:Washing process. Source:Formlabs.
Once washed, the metal parts are separated from the tree, polished and polished to the desired finish.
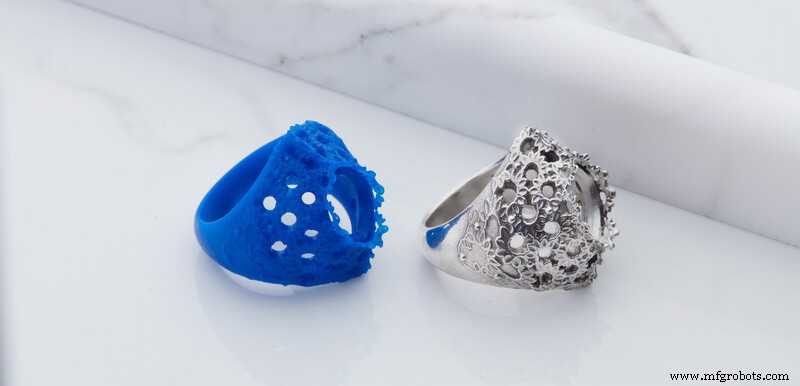
Image 7:3D printed ring with burn-out resin and silver ring after the microfusion process. Source:Formlabs.
The use of castable resins in the jewellery sector offers numerous advantages . Among others, it allows you to 3D print as many models as you want, quickly and with extreme precision . This results in a significant reduction in costs and production times.
impression en 3D
- Soudage et collage de pièces en plastique imprimées en 3D
- Devez-vous terminer vos pièces imprimées en 3D en interne ?
- Finir des pièces imprimées en 3D avec… des crayons ?
- Introduction à l'impression 3D avec frittage laser sélectif
- Impression 3D avec des résines :une introduction
- Faire des pièces métalliques plus légères avec l'impression 3D en métal
- Impression du fusible 1 avec le fusible 1
- Remplacement des pièces en aluminium par de la fibre de carbone imprimée en 3D
- Meilleur contrôle qualité avec les pièces imprimées en 3D