



CNC 3 Axes DIY : Construire une Fraiseuse de Précision (VMC)
Composants et Fournitures
| Arduino Nano R3 | × | 1 |
| Raspberry Pi 3 Model B | × | 1 |
| Pilote moteur pas-à-pas SparkFun A4988 | × | 1 |
| Shield RepRap Arduino Nano 4 pas-à-pas 1 DC (Adafruit) | × | 1 |
| Entretoises Aluminium OpenBuilds | × | 1 |
| Alimentation 12V/5A | × | 1 |
| Équerre L OpenBuilds | × | 1 |
| Écrous en T M5 OpenBuilds (lot de 10) | × | 1 |
| Vis à tête basse M5 OpenBuilds (lot de 10) | × | 1 |
| Vis à tête cylindrique M3 OpenBuilds | × | 1 |
| Vis de pression OpenBuilds | × | 1 |
| Rondelle à rainure 15×5×2mm OpenBuilds | × | 1 |
| Bloc écrou anti-recul pour vis trapézoïdale 8mm OpenBuilds | × | 2 |
| Plaque filetée pour moteur NEMA 17 OpenBuilds | × | 1 |
| Vis trapézoïdale métrique 8mm OpenBuilds | × | 1 |
| Roulement à billes 625 2RS 5×16×5 OpenBuilds | × | 1 |
| Barre lisse (guide linéaire) | × | 1 |
| Ventilateur BLDC de refroidissement | × | 1 |
| Moteur DC (générique) | × | 1 |
| Servomoteur Tower Pro MG996R | × | 1 |
| Double pont en H L293D (Texas Instruments) | × | 1 |
Outils et Machines Nécessaires
- Tournevis
- Perceuse
- Dremel / Outil rotatif de coupe
- Pistolet à colle
- Fer à souder
- Meuleuse d'angle
Applications et Services en Ligne
- Linux
- ArtCAM
- GRBL 0.9
- Autodesk Fusion 360
- Arduino IDE
- Google Android Things
- VNC
À Propos de ce Projet
Notre prototype est basé sur l'IoT, offrant une architecture évolutive utilisable pratiquement n'importe où avec une connexion Internet. C'est une CNC 350×350 mm avec zone de travail 250×240 mm, pilotée par le logiciel open-source GRBL. Le matériel est aussi majoritairement open-source, ce qui réduit considérablement les coûts. La machine est entièrement construite avec des composants achetés localement et peut usiner bois, plastiques, caoutchouc dur, résine dure, etc. Notre cible principale : la fabrication de PCB à bas coût. La gravure sur bois est également possible.
Nous prévoyons d'ajouter le support de l'usinage laser dans un futur projet.
Actuellement contrôlable depuis un réseau local sans fil, nous voulons l'étendre vers une application web distribuée pour connecter un écosystème de plusieurs machines de ce type. Les possibilités sont illimitées.
Structure Mécanique
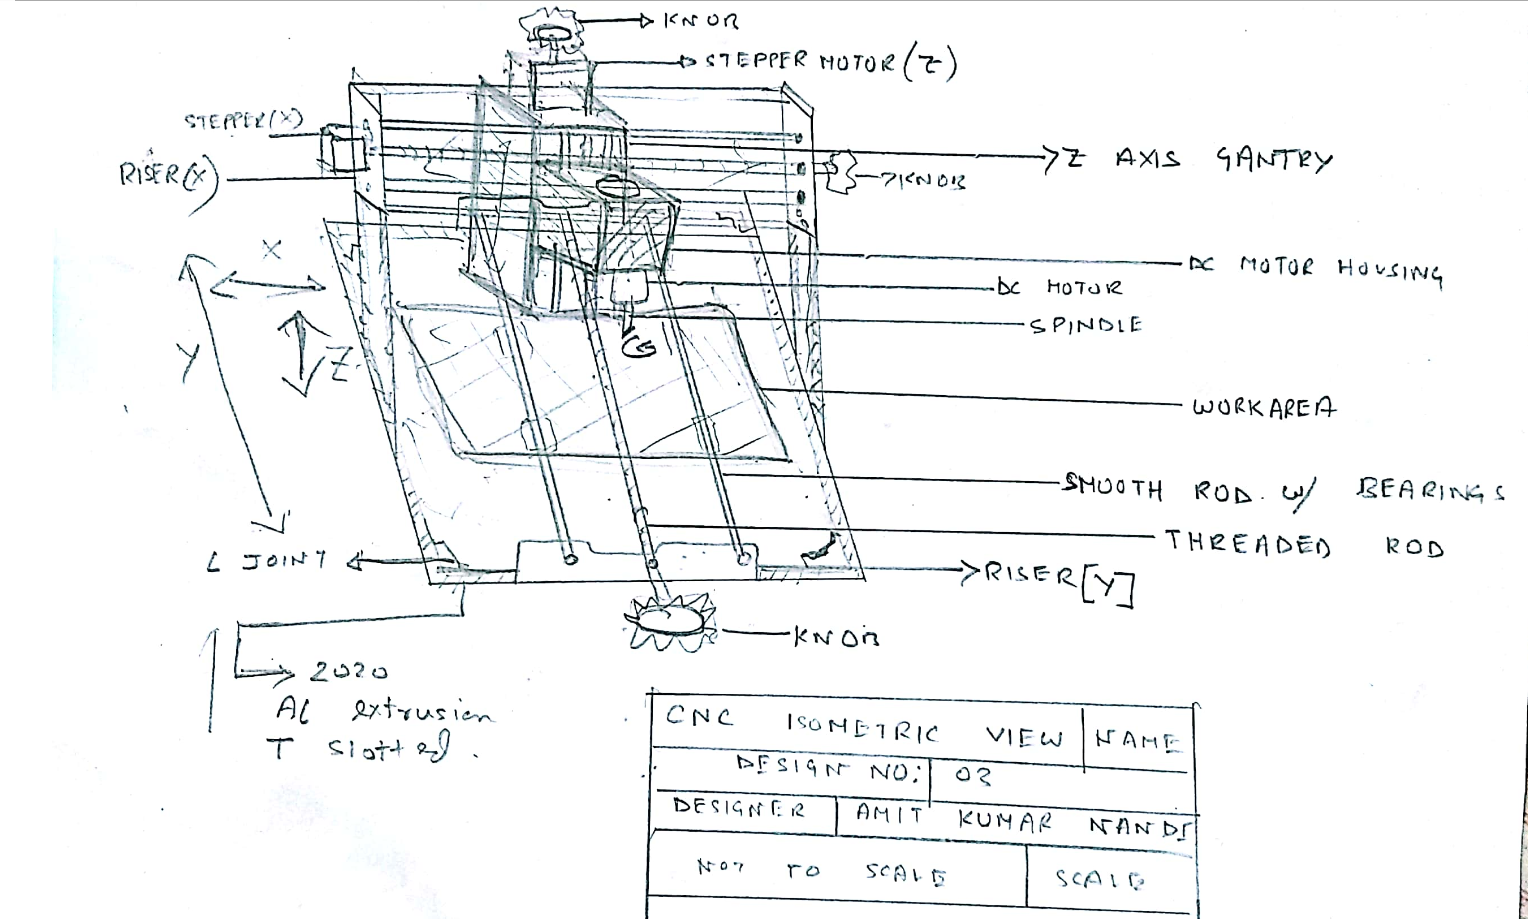
Le châssis de base utilise des profilés aluminium à rainure en T 2020 et des équerres L. La machine développe environ 80-85 Watts avec sa broche DC 2000 tr/min. Mouvement par vis trapézoïdale et tige filetée sur les 3 axes, guidage par barres lisses avec roulements à billes à rainure radiale (snap-fit) pour un mouvement fluide.
Pas minimal de la vis : 0.8 mm/tour. Avec 2000 pas/tour, résolution de 1600 sur tous les axes. Dimensions machine ~430×430×330 mm, zone de travail ~270×170×65 mm, précision positionnelle 0.04 mm. Le portique Z est imprimé en 3D avec double guidage. Course Z : 4.8 cm avec fraise montée.
Outils : fraise en V à 45° pour gravure PCB, supporte aussi fraises à queue de 0.2 à 1.8 mm. Moteurs pas-à-pas NEMA 23, 3A max par axe. Pilotes A4988 2.5A avec micro-pas 1/16 max, offrant une précision d'usinage ultime à coût très économique.
Partie IoT / Industrie 4.0
Contrôle de la fraiseuse CNC depuis un écran déporté (mobile/tablette comme IHM) depuis n'importe où avec connexion Internet. Raspberry Pi + routeur (sécurité) connectés à Internet, serveur web pour interface de contrôle sans fil. Nous visons aussi à récupérer des données machines précieuses : couple moteur temps réel, courant absorbé, vibrations, bruit, etc., et afficher des insights temps réel sur plateforme web pour meilleure collaboration. C'est ce qu'on appelle dans l'industrie : IIoT (Industrie 4.0).
Code
Exemple de G-code VHDL
(Scribbled version of C:\Users\ABDERR~1\AppData\Local\Temp\ink_ext_XXXXXX.svgISF45X @ 3000.00)
(unicorn.py --tab="plotter_setup" --pen-up-angle=50 --pen-down-angle=30 ...)
G21 (métrique) G90 (mode absolu) G92 X0.00 Y0.00 Z0.00 (position initiale)
M300 S30 (stylo bas) G4 P160 (attente 160ms)
M300 S50 (stylo haut) G4 P150 (attente 150ms)
M18 (désengager moteurs) M01 (test enregistrement ok?) M17 (réengager si OUI)
M01 (Tracé calque 'Calque 1') (Polyligne 29 segments)
G1 X16.85 Y4.97 F3000.00 M300 S30.00 G4 P160
G1 X14.07 Y5.98 F3000.00 ...
... (fichier tronqué, téléchargez pour voir la suite) ...
Code Pilotage Pas-à-Pas Arduino
// AMIT
#include <Servo.h>
#include <AFMotor.h>
#define LINE_BUFFER_LENGTH 512
char STEP = MICROSTEP;
const int penZUp = 115;
const int penZDown = 83;
const int penServoPin = 10;
const int stepsPerRevolution = 48;

Servo penServo;
AF_Stepper myStepperY(stepsPerRevolution, 1);
AF_Stepper myStepperX(stepsPerRevolution, 2);

struct point { float x; float y; float z; };
struct point actuatorPos;

float StepInc = 1;
int StepDelay = 0, LineDelay = 0, penDelay = 50;
float StepsPerMillimeterX = 100.0;
float StepsPerMillimeterY = 100.0;
float Xmin = 0, Xmax = 40, Ymin = 0, Ymax = 40, Zmin = 0, Zmax = 1;
float Xpos = Xmin, Ypos = Ymin, Zpos = Zmax;
boolean verbose = false;

void setup() {
  Serial.begin(9600);
  penServo.attach(penServoPin);
  penServo.write(penZUp); delay(100);
  myStepperX.setSpeed(600);
  myStepperY.setSpeed(600);
  Serial.println("Mini CNC Plotter alive and kicking!");
  Serial.print("X range: "); Serial.print(Xmin); Serial.print(" to "); Serial.print(Xmax); Serial.println(" mm.");
  Serial.print("Y range: "); Serial.print(Ymin); Serial.print(" to "); Serial.print(Ymax); Serial.println(" mm.");
}

void loop() {
  delay(100);
  char line[LINE_BUFFER_LENGTH]; char c;
  int lineIndex; bool lineIsComment, lineSemiColon;
  lineIndex = 0; lineSemiColon = false; lineIsComment = false;
  while (1) {
    while (Serial.available() > 0) {
      c = Serial.read();
      if (c == '\n' || c == '\r') {
        if (lineIndex > 0) {
          line[lineIndex] = '\0';
          if (verbose) { Serial.print("Received: "); Serial.println(line); }
          processIncomingLine(line, lineIndex);
          lineIndex = 0;
        } else { /* ligne vide ou commentaire */ }
        lineIsComment = false; lineSemiColon = false;
        Serial.println("ok");
      } else {
        if (lineIsComment || lineSemiColon) {
          if (c == ')') lineIsComment = false;
        } else {
          if (c <= ' ') { /* ignore espaces */ }
          else if (c == '/') { /* block delete non supporté */ }
          else if (c == '(') { lineIsComment = true; }
          else if (c == ';') { lineSemiColon = true; }
          else if (lineIndex >= LINE_BUFFER_LENGTH-1) {
            Serial.println("ERROR - lineBuffer overflow");
            lineIsComment = false; lineSemiColon = false;
          }
          else if (c >= 'a' && c <= 'z') line[lineIndex++] = c - 'a' + 'A';
          else line[lineIndex++] = c;
        }
      }
    }
  }
}

void processIncomingLine(char* line, int charNB) {
  int currentIndex = 0; char buffer[64];
  struct point newPos; newPos.x = 0; newPos.y = 0;
  while (currentIndex < charNB) {
    switch (line[currentIndex++]) {
      case 'U': penUp(); break;
      case 'D': penDown(); break;
      case 'G':
        buffer[0] = line[currentIndex++]; buffer[1] = '\0';
        switch (atoi(buffer)) {
          case 0: case 1: // G00/G01 déplacement
            char* indexX = strchr(line+currentIndex, 'X');
            char* indexY = strchr(line+currentIndex, 'Y');
            if (indexY <= 0) { newPos.x = atof(indexX+1); newPos.y = actuatorPos.y; }
            else if (indexX <= 0) { newPos.y = atof(indexY+1); newPos.x = actuatorPos.x; }
            else { newPos.y = atof(indexY+1); *indexY = '\0'; newPos.x = atof(indexX+1); }
            drawLine(newPos.x, newPos.y);
            actuatorPos.x = newPos.x; actuatorPos.y = newPos.y;
            break;
        }
        break;
      case 'M':
        buffer[0] = line[currentIndex++]; buffer[1] = line[currentIndex++]; buffer[2] = line[currentIndex++]; buffer[3] = '\0';
        switch (atoi(buffer)) {
          case 300:
            char* indexS = strchr(line+currentIndex, 'S');
            float Spos = atof(indexS+1);
            if (Spos == 30) penDown();
            if (Spos == 50) penUp();
            break;
          case 114: // M114 position
            Serial.print("Absolute position: X = "); Serial.print(actuatorPos.x);
            Serial.print(" - Y = "); Serial.println(actuatorPos.y);
            break;
          default:
            Serial.print("Command not recognized: M"); Serial.println(buffer);
        }
    }
  }
}

void drawLine(float x1, float y1) {
  if (x1 >= Xmax) x1 = Xmax; if (x1 <= Xmin) x1 = Xmin;
  if (y1 >= Ymax) y1 = Ymax; if (y1 <= Ymin) y1 = Ymin;
  x1 = (int)(x1 * StepsPerMillimeterX);
  y1 = (int)(y1 * StepsPerMillimeterY);
  float x0 = Xpos, y0 = Ypos;
  long dx = abs(x1-x0), dy = abs(y1-y0);
  int sx = x0 dy) {
    for (i=0; i= dx) { over -= dx; myStepperY.onestep(sy, STEP); }
      delay(StepDelay);
    }
  } else {
    for (i=0; i= dy) { over -= dy; myStepperX.onestep(sx, STEP); }
      delay(StepDelay);
    }
  }
  Xpos = x1; Ypos = y1; delay(LineDelay);
}

void penUp() { penServo.write(penZUp); delay(penDelay); Zpos=Zmax; digitalWrite(15,LOW); digitalWrite(16,HIGH); if(verbose)Serial.println("Pen up!"); }
void penDown() { penServo.write(penZDown); delay(penDelay); Zpos=Zmin; digitalWrite(15,HIGH); digitalWrite(16,LOW); if(verbose)Serial.println("Pen down."); }
Bibliothèques Arduino
// Bibliothèque Adafruit Motor Shield
// Copyright Adafruit Industries LLC, 2009 - Domaine public
// ... (code complet de la bibliothèque AFMotor pour contrôle moteurs DC et pas-à-pas)
Pièces Personnalisées et Boîtiers
cnc_contour_SNa09InGkY.gm1cnc_coppertop_PIxEVyoMWI.gtl
Schémas
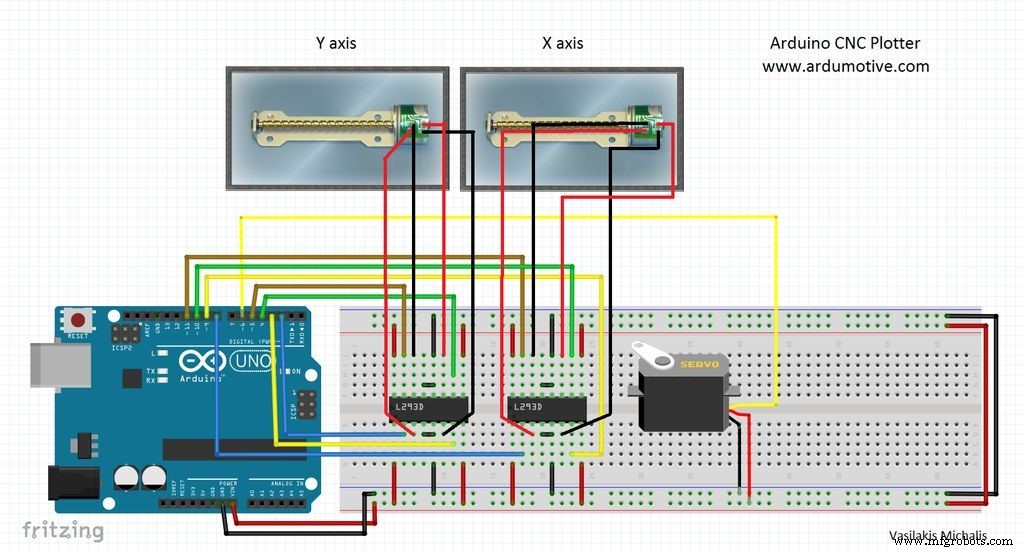
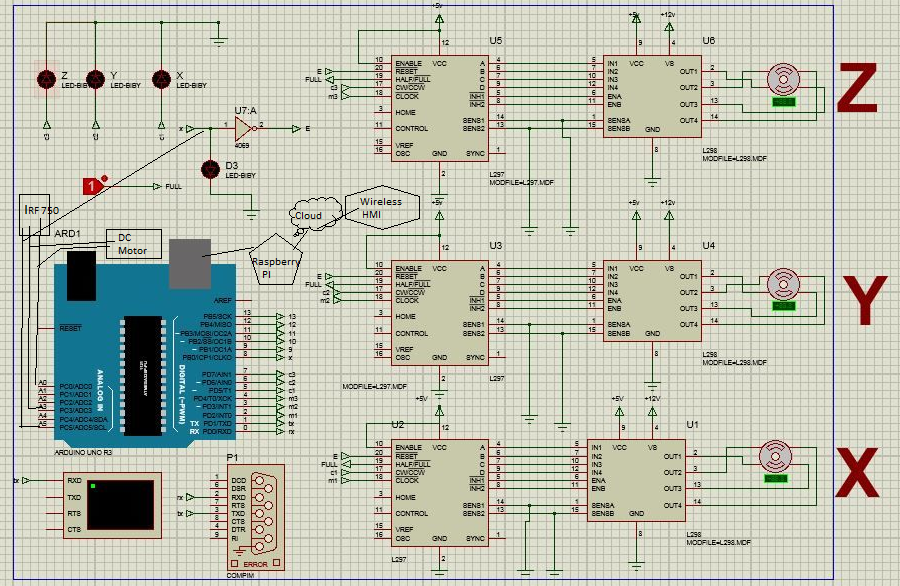
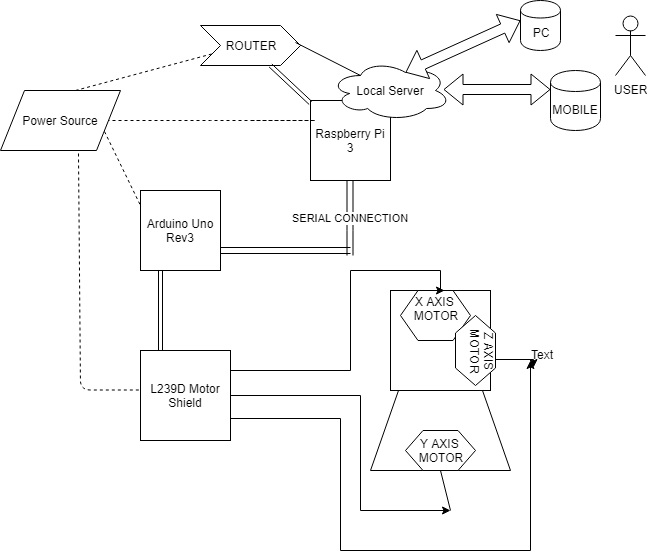
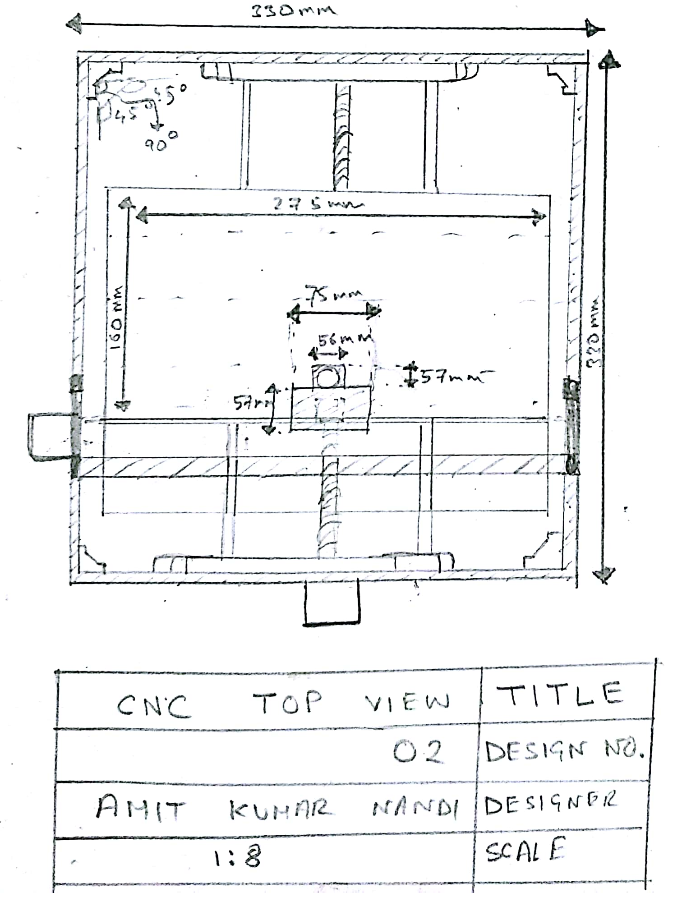
Processus de fabrication
- Construisez votre propre LUMAZOID : Visualiseur musical DIY Arduino
- Construire un Voltmètre Intelligent avec Arduino et Smartphone – Projet DIY Facile
- Construisez un skateboard VR DIY avec Arduino, Google Cardboard et Bluetooth
- Machine CNC triple fonction – Version premium améliorée
- Table Basse Zen à Commande CNC : Construisez Votre Propre Meuble Intelligent
- Dispositif de Traitement Radionique EMR DIY avec Arduino Nano
- Construire une machine CNC entièrement fonctionnelle avec Arduino Nano R3
- Usinage vertical & centre d'usinage vertical CNC : introduction complète
- Mini VMC expliquée : fraisage CNC compact pour projets à petite échelle