



Contrôleur Intelligent de Ventilation pour Meuble AV – Arduino Nano, DHT11 et Relais
Composants et Fournitures
| Arduino Nano R3 | × | 1 |
| Capteur Température/Humidité DHT11 (4 broches) | × | 1 |
| Module Relais 5V DC | × | 1 |
À Propos du Projet
Mon récepteur AV surchauffait (température armoire 43°C / 109°F contre 24°C / 75°F ambiante). Je voulais ajouter une ventilation pilotée par température, avec temporisation après extinction, sans source 5-12V accessible à l'extérieur de l'appareil.
Les contrôleurs commerciaux coûtaient 30€+ pour juste un ventilateur, une sonde et un relais. J'avais tout en stock : Arduino Nano 2€, DHT11, relais 5V.
Prototype et Évolution
Premier prototype sur breadboard fonctionnel. Ajout de LEDs d'état et buzzer pour alarme surchauffe. Intégration dans un petit boîtier projet, alimenté par chargeur USB téléphone (5V). Deux ventilateurs 80mm et un 120mm récupérés, fonctionnant en 5V (<200mA chacun), câblés en USB.
Indicateurs Visuels
- LED verte haut-gauche : alimentation
- LED verte bas-gauche : température OK
- LED orange centre : ventilateurs actifs
- LED rouge droite : alarme surchauffe
Au démarrage : auto-test (POST) de tous les ventilateurs, LEDs et buzzer.
Logique de Contrôle
- Moyenne de température sur 30 secondes (10 mesures espacées de 3s)
- Si moyenne > 35°C (95°F) : ventilateurs ON 5 min avant nouvelle vérification
- Si moyenne > 49°C (120°F) : alarme sonore + ventilateurs continus, vérification toutes les 30s
- En pratique : ventilateurs démarrent ~2 min après allumage récepteur, tournent tant qu'il est allumé, continuent 5+ min après extinction
Améliorations Futures
Remplacer Nano par ATtiny85 et relais par MOSFET pour format plus compact et contrôle PWM de la vitesse des ventilateurs.
Code Arduino
// Contrôleur température pour armoire A/V
// Ventilateur piloté par relais 10A sur ventilateur 12V (PC) ou 5V (USB)
// Alarme piezo pour surchauffe

int FANTEMP = 95;    // Seuil déclenchement ventilateur (°F)
int ALARMTEMP = 120; // Seuil alarme surchauffe (°F)
int FANLED = 2;      // LED ventilateur ON
int TEMPOK = 3;      // LED température OK
int ALARMLED = 4;    // LED alarme
int ALARMPIN = 7;    // Buzzer alarme
#define DHTPIN 8     // Capteur DHT
int FANPIN = 9;      // Relais ventilateur

#include "DHT.h"
#define DHTTYPE DHT11
DHT dht(DHTPIN, DHTTYPE);

const int numReadings = 10;
float avetemp = 0;
float temp = 0;
float checkdelay = 0;

void setup() {
  Serial.begin(9600);
  Serial.println("Temp Monitor Started");
  dht.begin();

  pinMode(FANPIN, OUTPUT);
  pinMode(ALARMPIN, OUTPUT);
  pinMode(ALARMLED, OUTPUT);
  pinMode(FANLED, OUTPUT);
  pinMode(TEMPOK, OUTPUT);

  // État initial : tout éteint (relais actif LOW)
  digitalWrite(FANPIN, HIGH);
  digitalWrite(FANLED, HIGH);
  digitalWrite(ALARMLED, HIGH);
  digitalWrite(TEMPOK, HIGH);

  // Test alarme au démarrage
  for (int x = 0; x < 5; x++) {
    tone(ALARMPIN, 220 * x, 75);
    delay(100);
  }

  // Test ventilateur 5s
  Serial.print("Fan Test Started (5 Seconds) ");
  for (int x = 0; x < 5; x++) {
    Serial.print(".");
    delay(1000);
  }
  Serial.println("Done");

  digitalWrite(FANPIN, LOW);
  digitalWrite(FANLED, LOW);
  digitalWrite(ALARMLED, LOW);
  digitalWrite(TEMPOK, LOW);
  noTone(ALARMPIN);
}

void loop() {
  delay(2000);
  temp = 0;
  Serial.print("Realtime Temp: \t");

  // 10 lectures sur 30s
  for (int x = 0; x < numReadings; x++) {
    float f = dht.readTemperature(true); // Fahrenheit
    Serial.print(f); Serial.print("\t");
    temp += f;
    delay(3000);
  }
  Serial.println();

  avetemp = temp / numReadings;
  Serial.print("Average Temp is "); Serial.println(avetemp);

  if (isnan(temp)) {
    Serial.println("Failed to read from DHT sensor!");
    return;
  }

  // Gestion alarme surchauffe
  if (avetemp > ALARMTEMP) {
    digitalWrite(ALARMLED, HIGH);
    Serial.print("Temperature over "); Serial.print(ALARMTEMP); Serial.println(", Alarm ON");
    for (int x = 0; x < 3; x++) {
      tone(ALARMPIN, 660, 1000); delay(500);
      tone(ALARMPIN, 440, 1000); delay(500);
    }
    noTone(ALARMPIN);
    checkdelay = 30000; // 30s avant prochaine boucle
  } else {
    digitalWrite(ALARMLED, LOW);
    Serial.print("Temperature under "); Serial.print(ALARMTEMP); Serial.println(", Alarm OFF");
    checkdelay = 300000; // 5 min
  }

  // Contrôle ventilateur
  if (avetemp > FANTEMP) {
    digitalWrite(FANPIN, HIGH);
    digitalWrite(FANLED, HIGH);
    digitalWrite(TEMPOK, LOW);
    Serial.print("Temperature over "); Serial.print(FANTEMP);
    Serial.print(", Fan ON (for "); Serial.print(checkdelay / 1000 / 60); Serial.println(" minutes)");
    delay(checkdelay);
  } else {
    digitalWrite(FANPIN, LOW);
    digitalWrite(FANLED, LOW);
    digitalWrite(TEMPOK, HIGH);
    Serial.print("Temperature under "); Serial.print(FANTEMP); Serial.println(", Fan OFF");
  }
  Serial.println(); Serial.println();
}
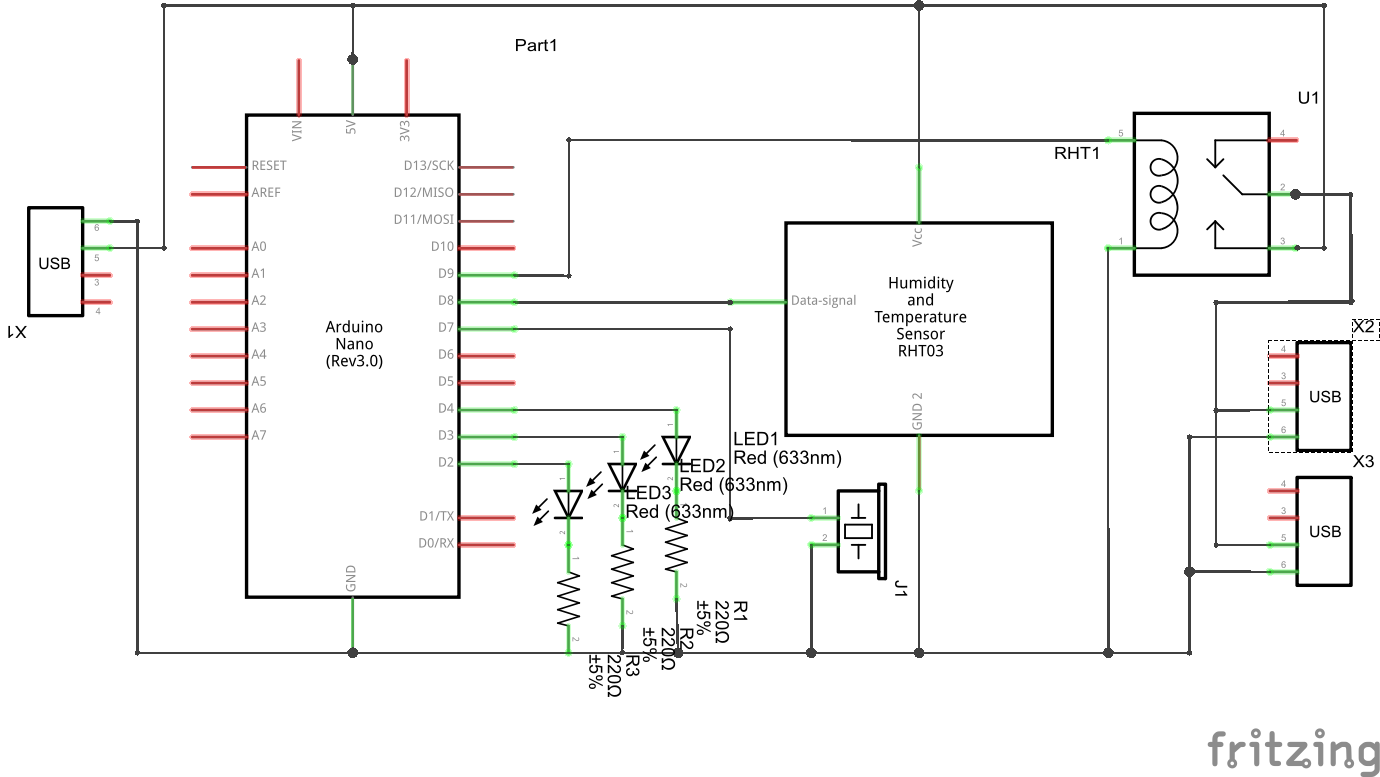
Schéma de Câblage
Processus de fabrication
- Contrôleur de puissance PWM : construction d'un driver de lampe à modulation de largeur d'impulsion
- Armoire de Classement : Design, Fabrication et Usage Moderne
- Ventilateur à contrôle de température : système relais DIY pour refroidissement meuble multimédia
- Éliminer les vibrations de ventilateur : Solution pratique d'équilibrage sur site
- Système d'éclairage DMX piloté par web – Contrôleur maître Arduino
- Assistant de jeu automatisé : Dispositif intelligent d'automatisation de tâches pour gamers
- Manette de jeu USB Arduino DIY – Construisez votre propre gamepad haute performance
- Unopad : contrôleur MIDI Arduino fluide pour Ableton Live
- Kit contrôleur d'affichage VFD (afficheur fluorescent sous vide) basé sur Arduino