



Affichage LED matrice interactif porte avec capteur PIR - Salutations fêtes Arduino
Composants et fournitures
| Composant | Quantité |
|---|---|
| Arduino UNO (matrices LED) | 1 |
| Arduino Nano (bandeau LED escalier) | 1 |
| Capteur PIR (détection mouvement) | 2 |
| Relais 5V (commande bandeau 12V) | 1 |
| Matrice NeoPixel 8×8 WS2812B | 3 |
| Bandeau RGB LED 12V | 1 |
| Alimentation 5V 30A (matrices) | 1 |
| Cordon alimentation PC (pour alim 5V) | 1 |
| Fils de connexion | 1 lot |
Outils
- Fer à souder
- Dénudeur
À propos du projet
Trois matrices 8×8 WS2812B (24×8 au total) + capteur PIR pour saluer les visiteurs : « Happy Holidays & Happy New Year ! » quand on approche de la porte. En veille : effets visuels type économiseur d'écran (FastLED DemoReel100).
Deuxième PIR (plafond, bas escalier) → relais → bandeau RGB 12V + guirlandes sur rallonge. Allumage à l'approche des marches.
Contrôle : UNO (matrices) + Nano (escalier). Alim 5V 30A pour les 192 LEDs.


Code source : fusion de 3 bases :
- FastLED DemoReel100 (effets veille)
- Code capteur PIR standard
- Initialisation NeoMatrix Adafruit
Code Arduino UNO (matrices porte)
#include <FastLED.h>
#include <Adafruit_GFX.h>
#include <Adafruit_NeoMatrix.h>
#include <Adafruit_NeoPixel.h>

#define PIN 6
#define LED_TYPE WS2811
#define COLOR_ORDER GRB
#define NUM_LEDS 192
#define BRIGHTNESS 50
#define FRAMES_PER_SECOND 120

const uint8_t kMatrixWidth = 24;
const uint8_t kMatrixHeight = 8;
const bool kMatrixSerpentineLayout = true;

CRGB leds[NUM_LEDS];
Adafruit_NeoMatrix matrix = Adafruit_NeoMatrix(24, 8, PIN,
  NEO_MATRIX_TOP + NEO_MATRIX_RIGHT + NEO_MATRIX_COLUMNS + NEO_MATRIX_PROGRESSIVE,
  NEO_GRB + NEO_KHZ800);

const uint16_t colors[] = {
  matrix.Color(255,0,0), matrix.Color(0,255,0), matrix.Color(0,0,255),
  matrix.Color(0,255,255), matrix.Color(255,0,255), matrix.Color(255,255,0),
  matrix.Color(255,255,255)
};

int pirPin = 5;
bool pirState = true; // true = pas de mouvement
int val = 0;
int calibrationTime = 30;
long timeLow = 0;
boolean takeLowTime;
int minimumSecsLowForInactive = 5000;

int textX = matrix.width();
int pass = 0;

typedef void (*PatternList[])();
PatternList gPatterns = { rainbow, rainbowWithGlitter, confetti, sinelon, juggle, bpm, cylon };
uint8_t gCurrentPattern = 0;
uint8_t gHue = 0;

void setup() {
  delay(3000);
  FastLED.addLeds<LED_TYPE, PIN, COLOR_ORDER>(leds, NUM_LEDS).setCorrection(TypicalLEDStrip);
  FastLED.setBrightness(BRIGHTNESS);
  matrix.setTextWrap(false);
  matrix.setBrightness(40);
  matrix.setTextColor(colors[0]);
  pinMode(pirPin, INPUT);
  x = random16(); y = random16(); z = random16();
}

void loop() {
  val = digitalRead(pirPin);
  if (val == HIGH) { // Mouvement détecté
    matrix.fillScreen(0);
    matrix.setCursor(textX, 0);
    matrix.print(F("Happy Holidays & Happy New Year!"));
    if (--textX < -200) {
      textX = matrix.width();
      if (++pass >= 6) pass = 0;
      matrix.setTextColor(colors[pass]);
    }
    matrix.show();
    delay(100);
    if (pirState) { pirState = false; }
    takeLowTime = true;
  } else { // Veille : effets FastLED
    gPatterns[gCurrentPattern]();
    FastLED.show();
    FastLED.delay(1000 / FRAMES_PER_SECOND);
    EVERY_N_MILLISECONDS(20) { gHue++; }
    EVERY_N_SECONDS(10) { nextPattern(); }
  }
}

// --- Effets FastLED (DemoReel100) ---
void nextPattern() { gCurrentPattern = (gCurrentPattern + 1) % 7; }
void rainbow() { fill_rainbow(leds, NUM_LEDS, gHue, 7); }
void rainbowWithGlitter() { rainbow(); addGlitter(80); }
void addGlitter(fract8 chance) { if (random8() < chance) leds[random16(NUM_LEDS)] += CRGB::White; }
void confetti() { fadeToBlackBy(leds, NUM_LEDS, 10); leds[random16(NUM_LEDS)] += CHSV(gHue + random8(64), 200, 255); }
void sinelon() { fadeToBlackBy(leds, NUM_LEDS, 20); leds[beatsin16(13, 0, NUM_LEDS-1)] += CHSV(gHue, 255, 192); }
void bpm() {
  uint8_t bpm = 62; CRGBPalette16 palette = PartyColors_p;
  uint8_t beat = beatsin8(bpm, 64, 255);
  for (int i=0; i=0; i--) { leds[i] = CHSV(hue++, 255, 255); FastLED.show(); fadeall(); delay(10); }
}
void fadeall() { for(int i=0; i
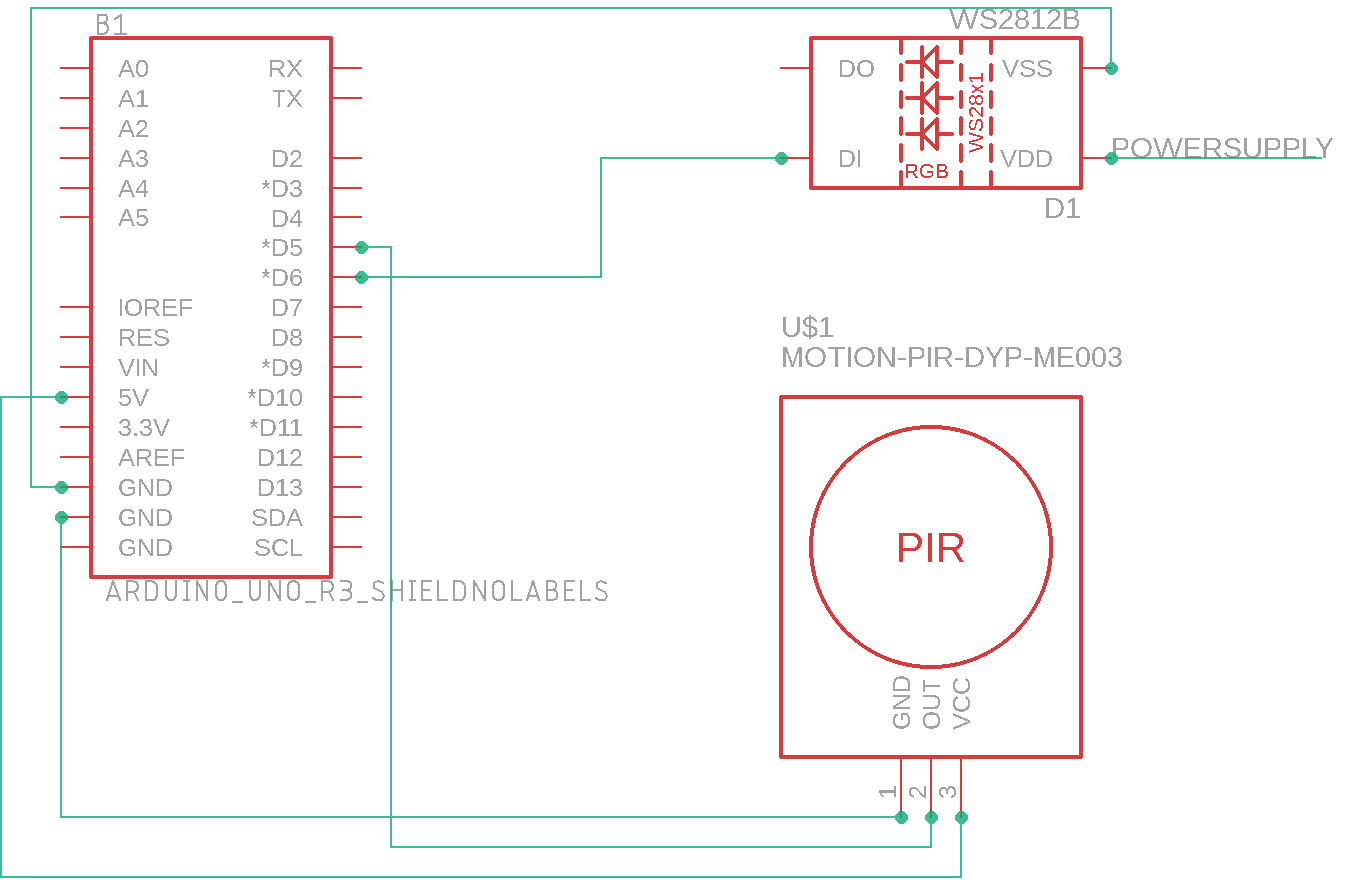
Schéma
Liens réseaux sociaux : Facebook fb.me/HeathenHacks | Twitter @HeathenHacks | Instagram @HeathenHacks
Alertes Email/SMS instantanées pour fréquence cardiaque anormale
Oxymètre de pouls portable pour usage d'urgence COVID-19
Processus de fabrication
- Construisez votre propre LUMAZOID : Visualiseur musical DIY Arduino
- Projet capteur DHT11 température/humidité avec indicateurs LED et buzzer piézo
- Surveillance de la Qualité de l'Eau : Système Arduino MKR1000 pour Rivières et Lacs
- Capteur d'obstacle IR simple avec Arduino — LED IR + Photodiode
- Find Me : Localisateur d'objets intelligent avec Arduino et Bluetooth
- Construire un robot quadrupède Arduino intelligent : guide étape par étape
- Pistolet à eau intelligent à détection de mouvement avec Arduino Nano
- Mesure de distance en temps réel par sonar Arduino et visualisation Processing
- Oscilloscope DIY Arduino Nano (10 Hz – 50 kHz) avec écran LCD 128×64