


ARTIK + MKR1000 + DHT11 + MQTT
Composants et fournitures
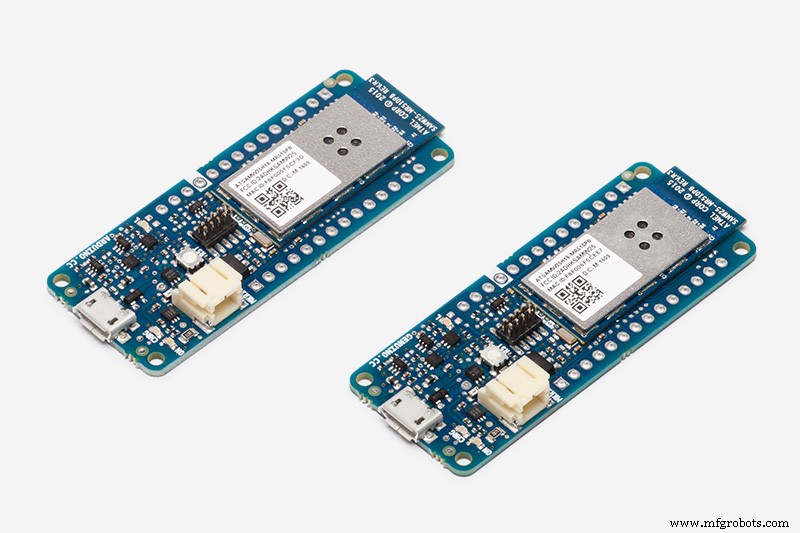 |
| × | 2 | |||
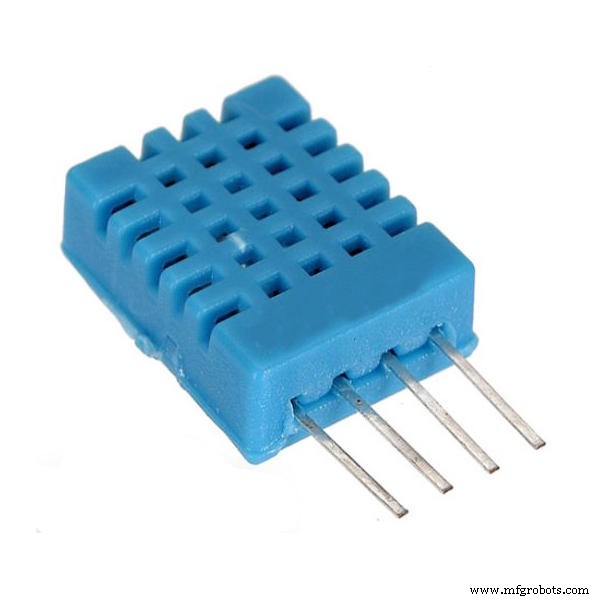 |
| × | 1 | |||
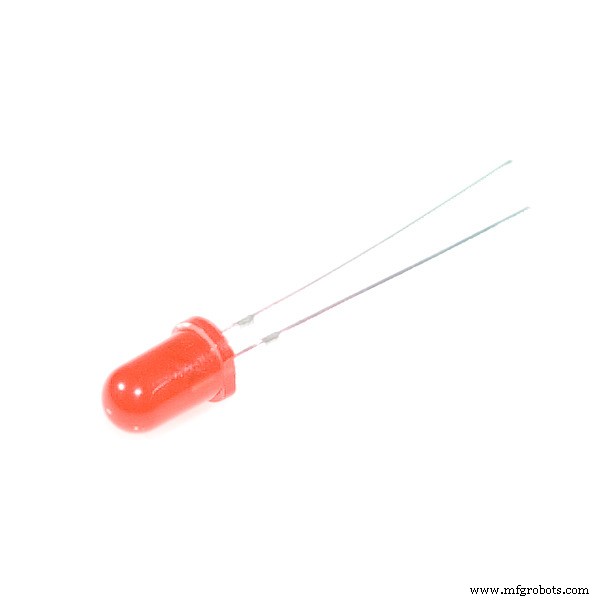 |
| × | 2 |
Applications et services en ligne
 |
| |||
 |
|
À propos de ce projet
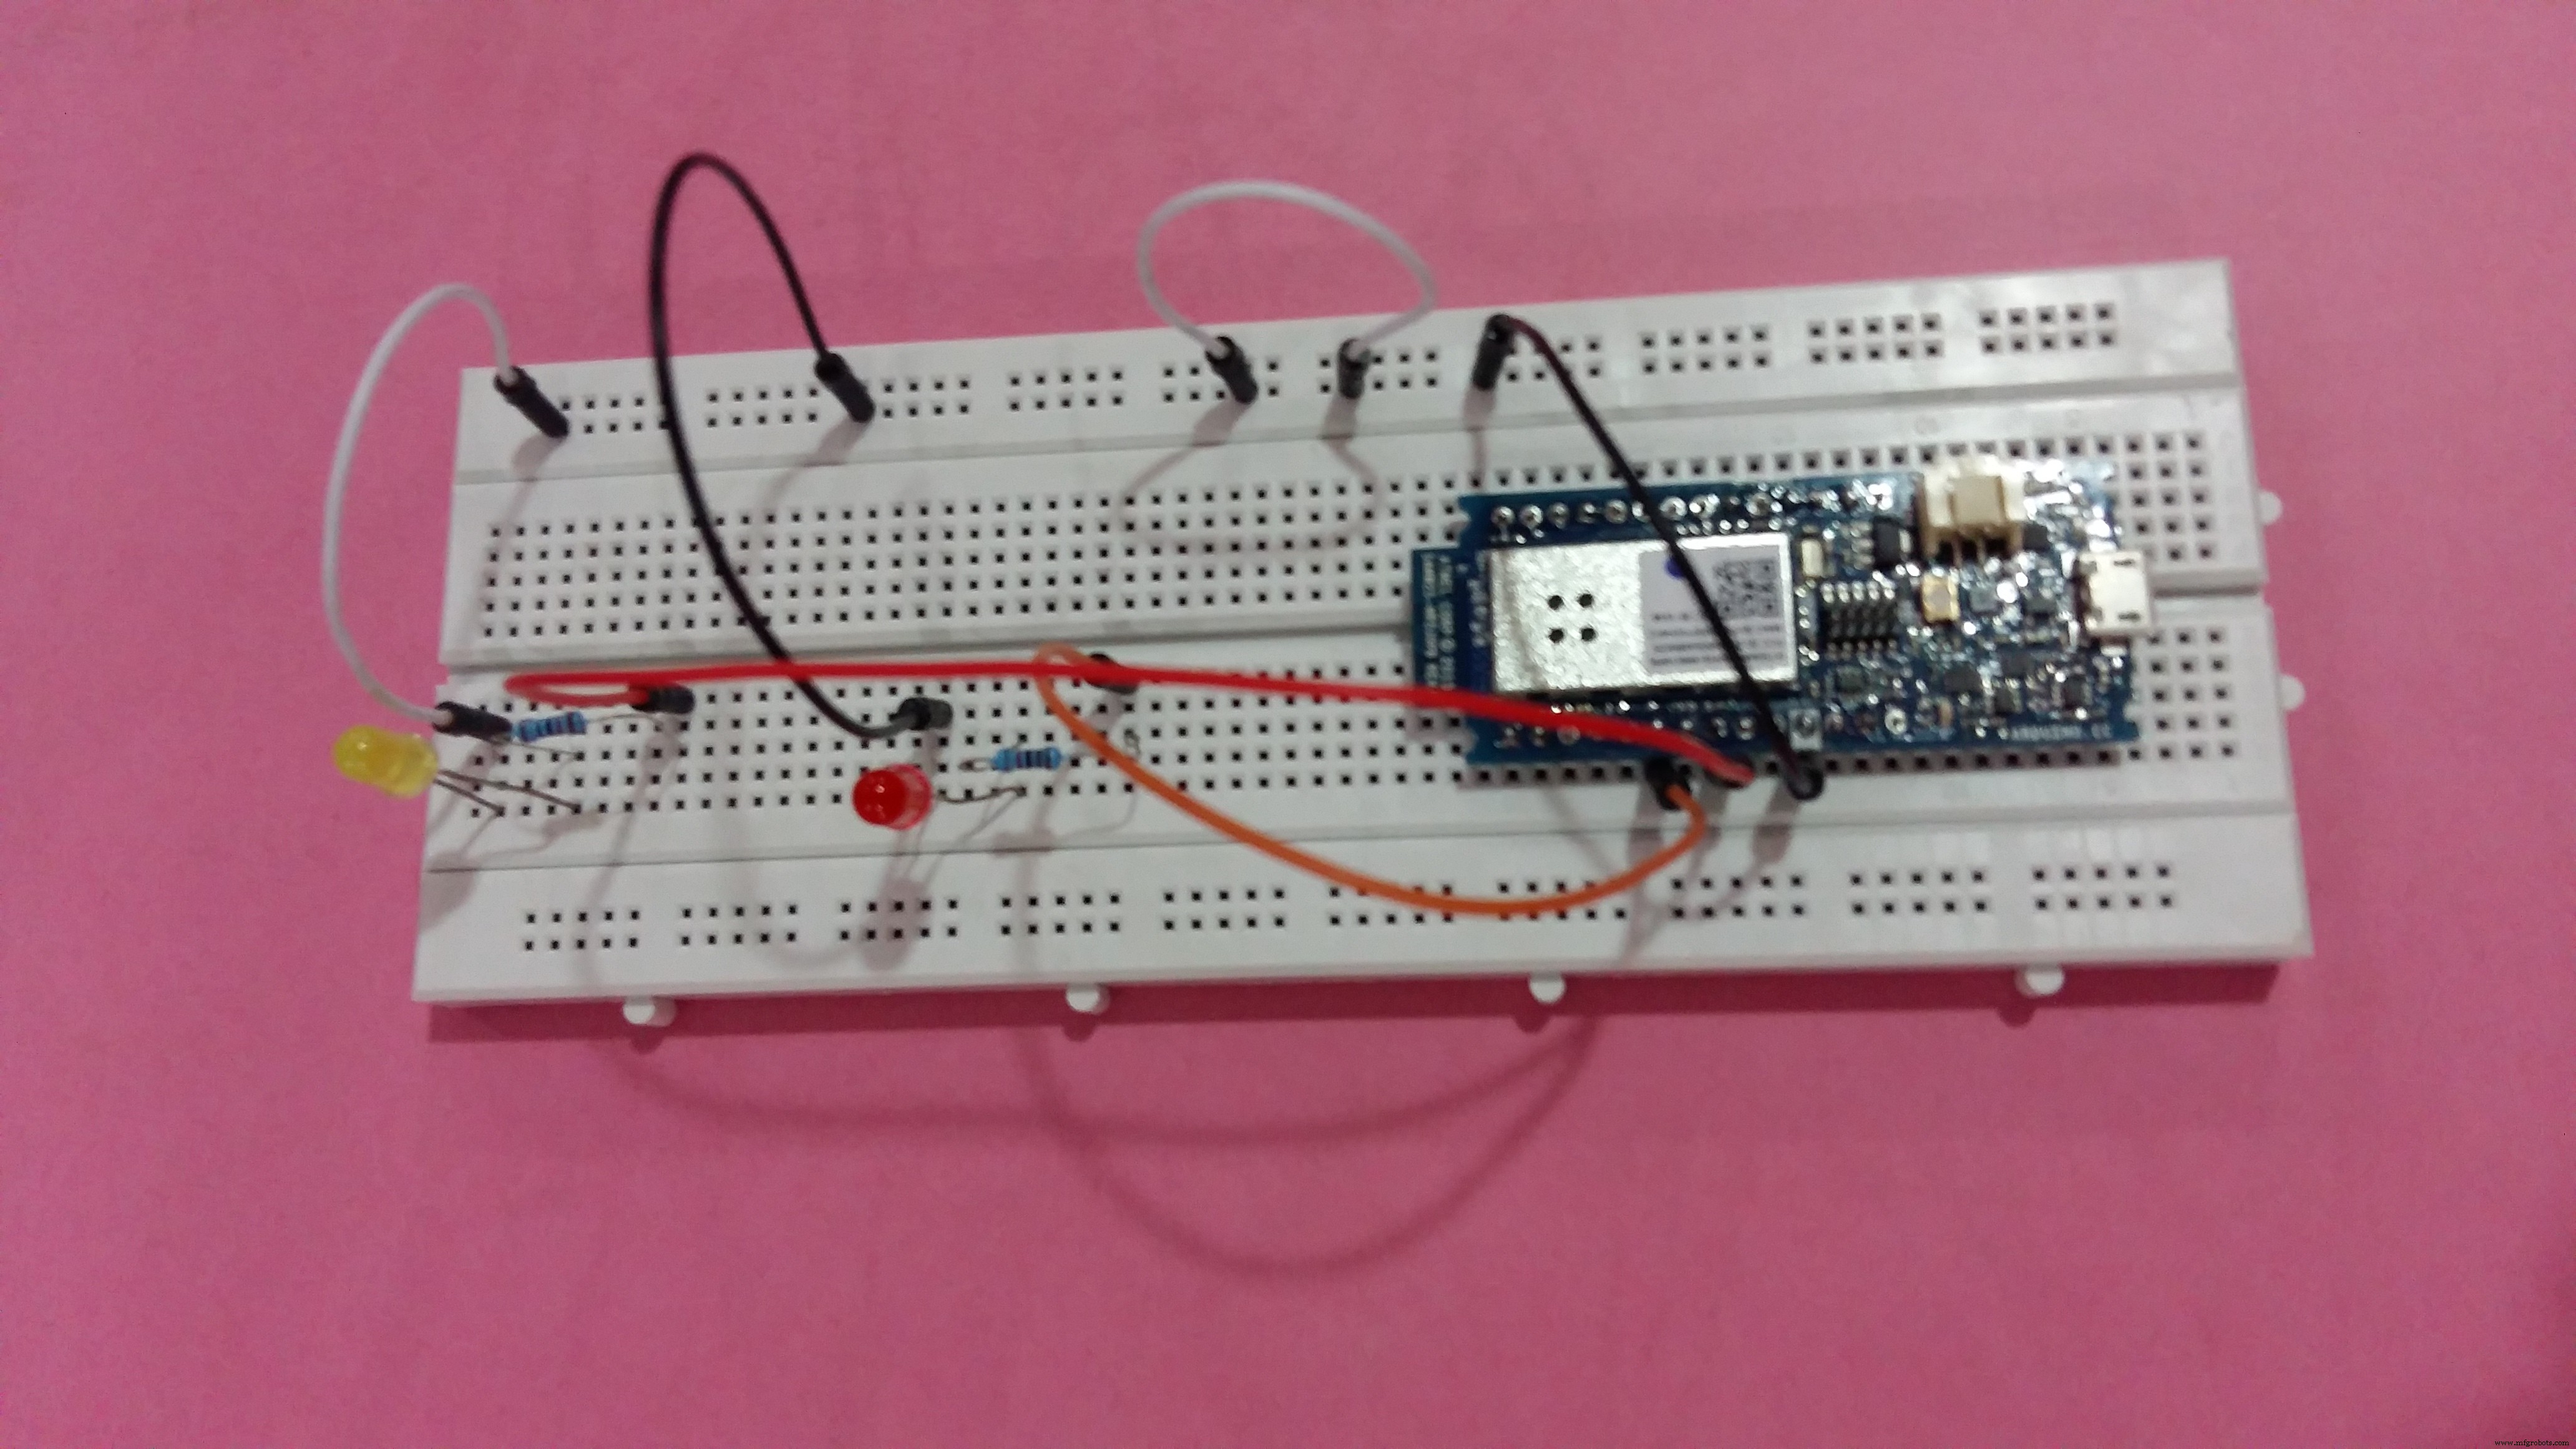
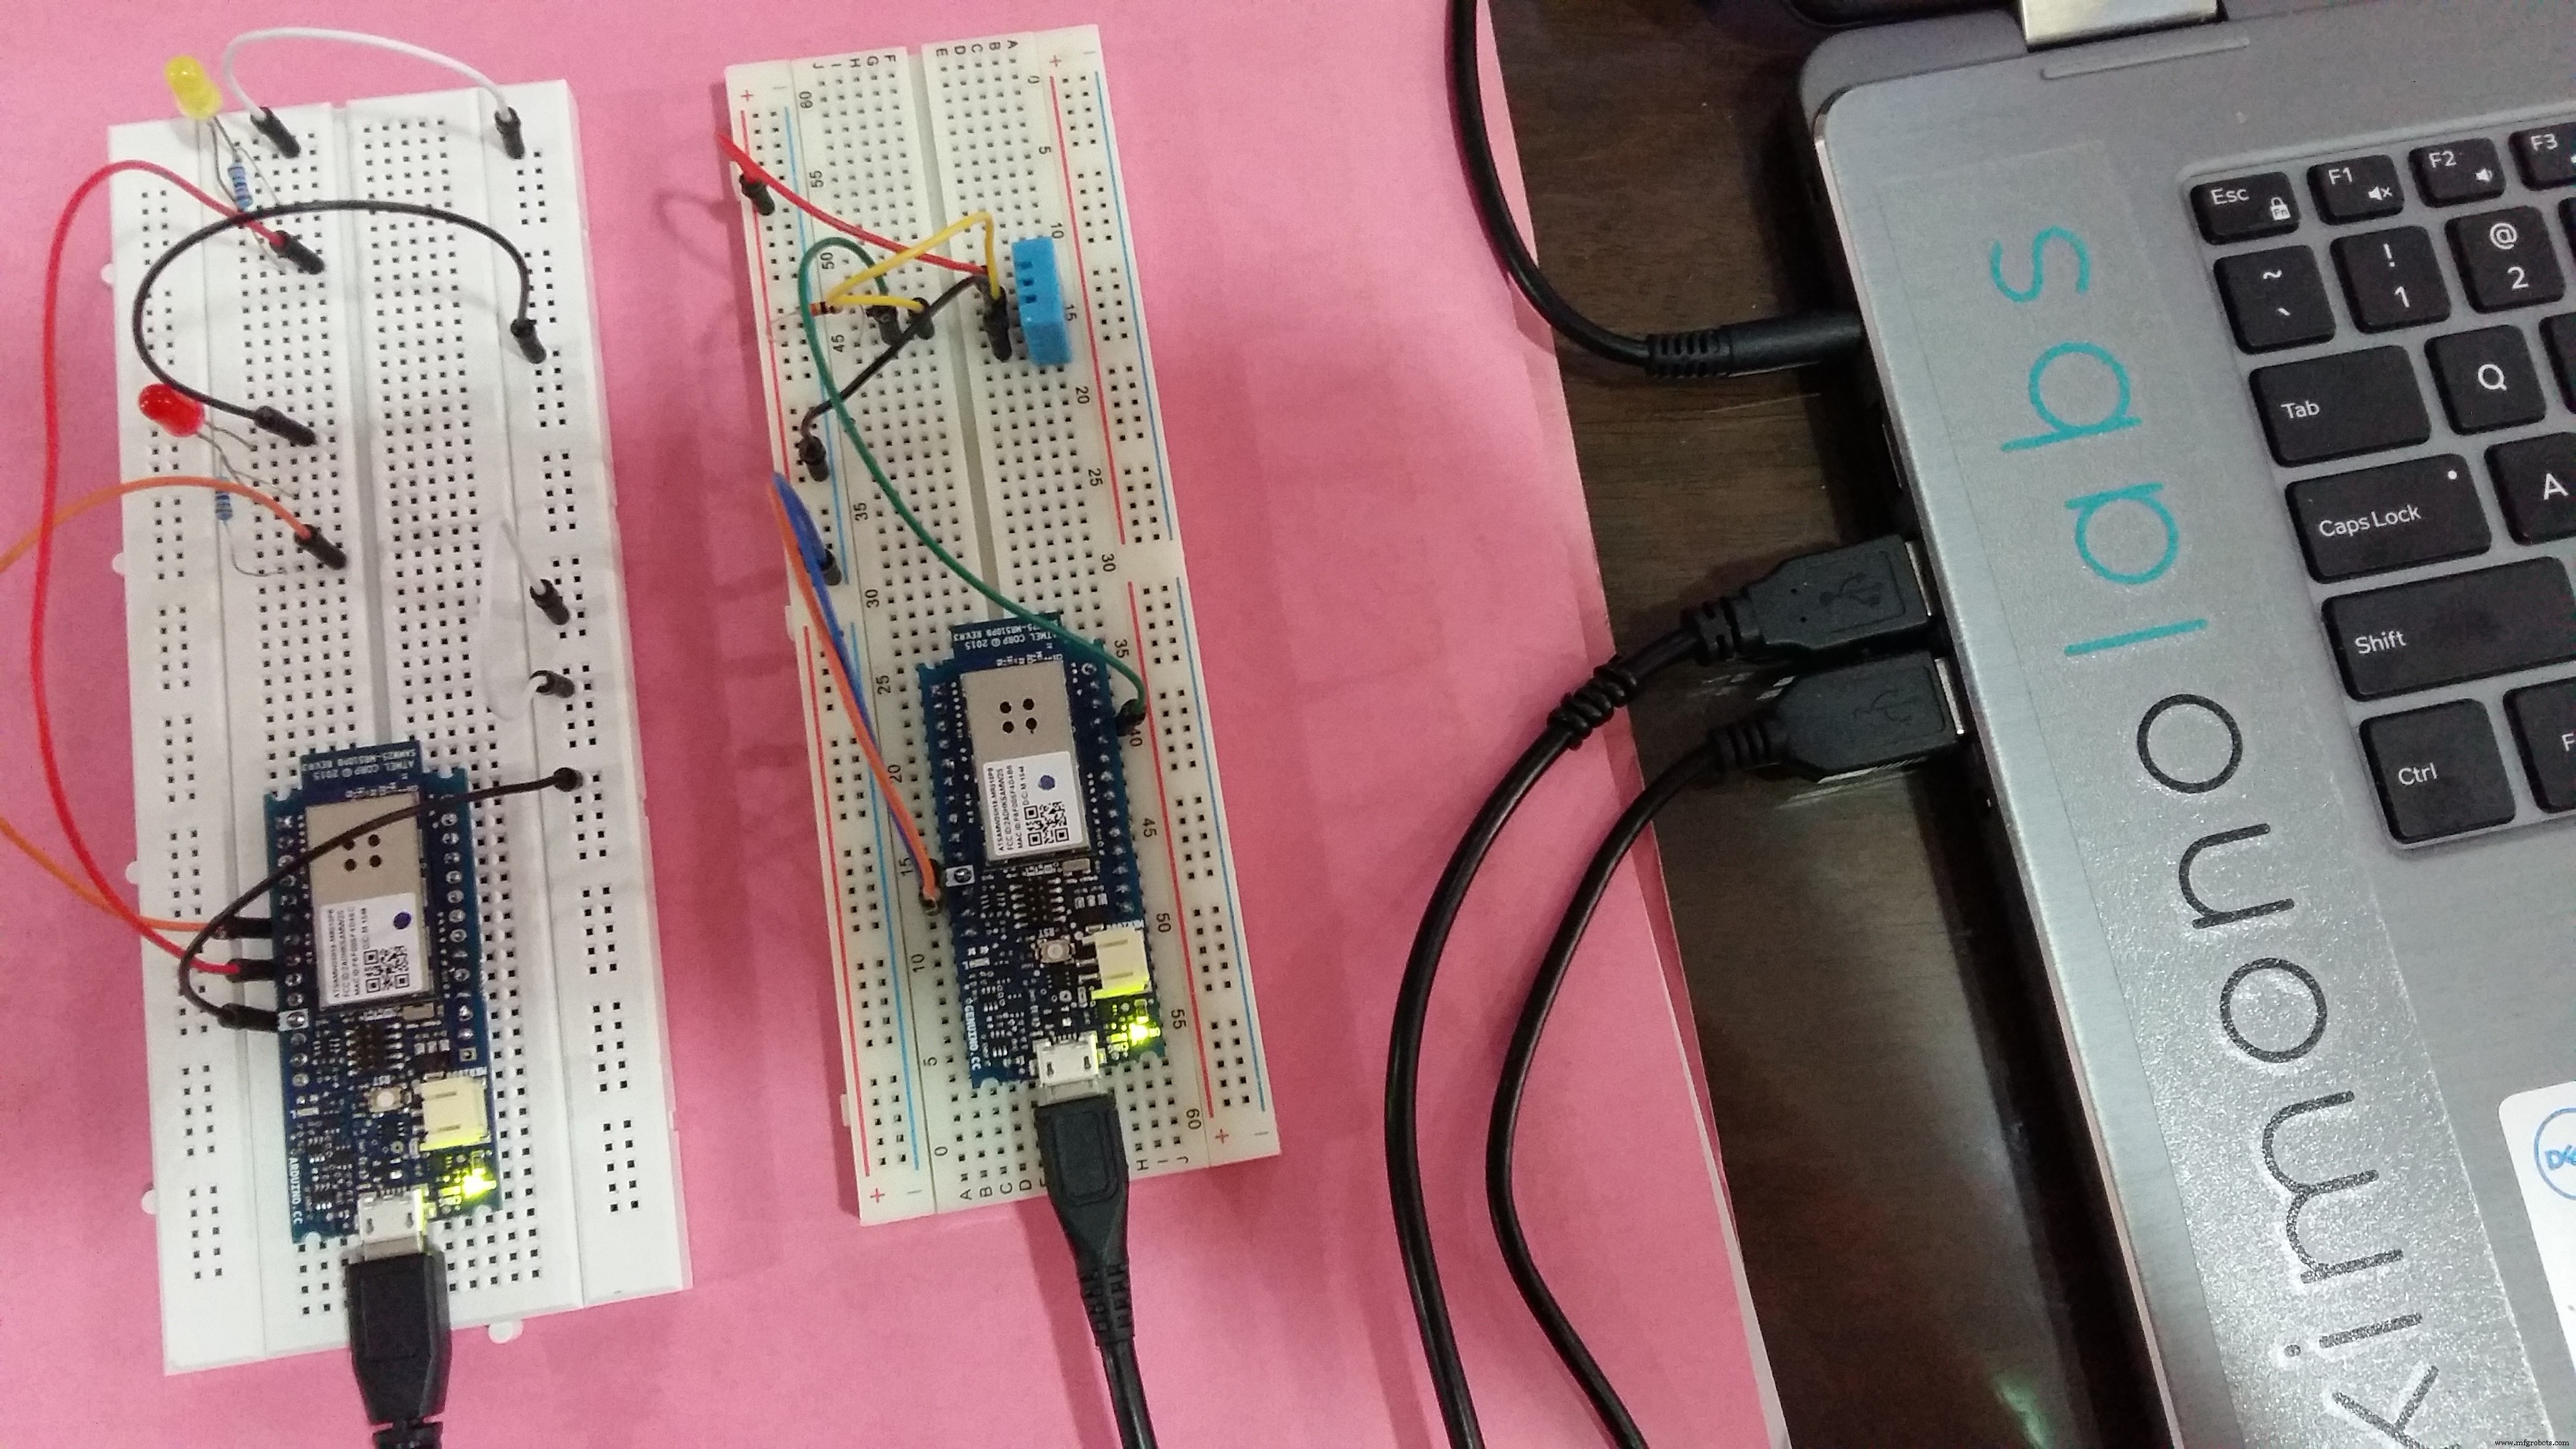
Ce projet utilise deux MKR1000 avec DHT11 comme capteur et des LED comme actionneurs de métaphore. Les vrais actionneurs pourraient être le climatiseur et le ventilateur de plafond. L'appareil de température et d'humidité DHT11 envoie des données au cloud ARTIK. Des règles ont été définies pour envoyer des commandes aux LED rouge et jaune.
Configurer l'IDE Arduino
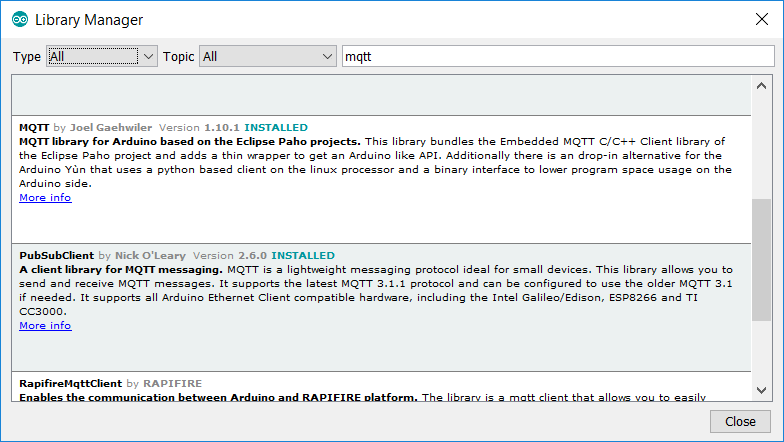
Avec le gestionnaire de bibliothèque d'Arduino IDE, installez les bibliothèques suivantes.
Installez WiFi101 (voir ce guide)

Installer MQTT par Joel Gaehwiler
Installer ArduinoJson

Remarque :reportez-vous à mon message précédent pour en savoir plus sur l'utilisation du cloud ARTIK.
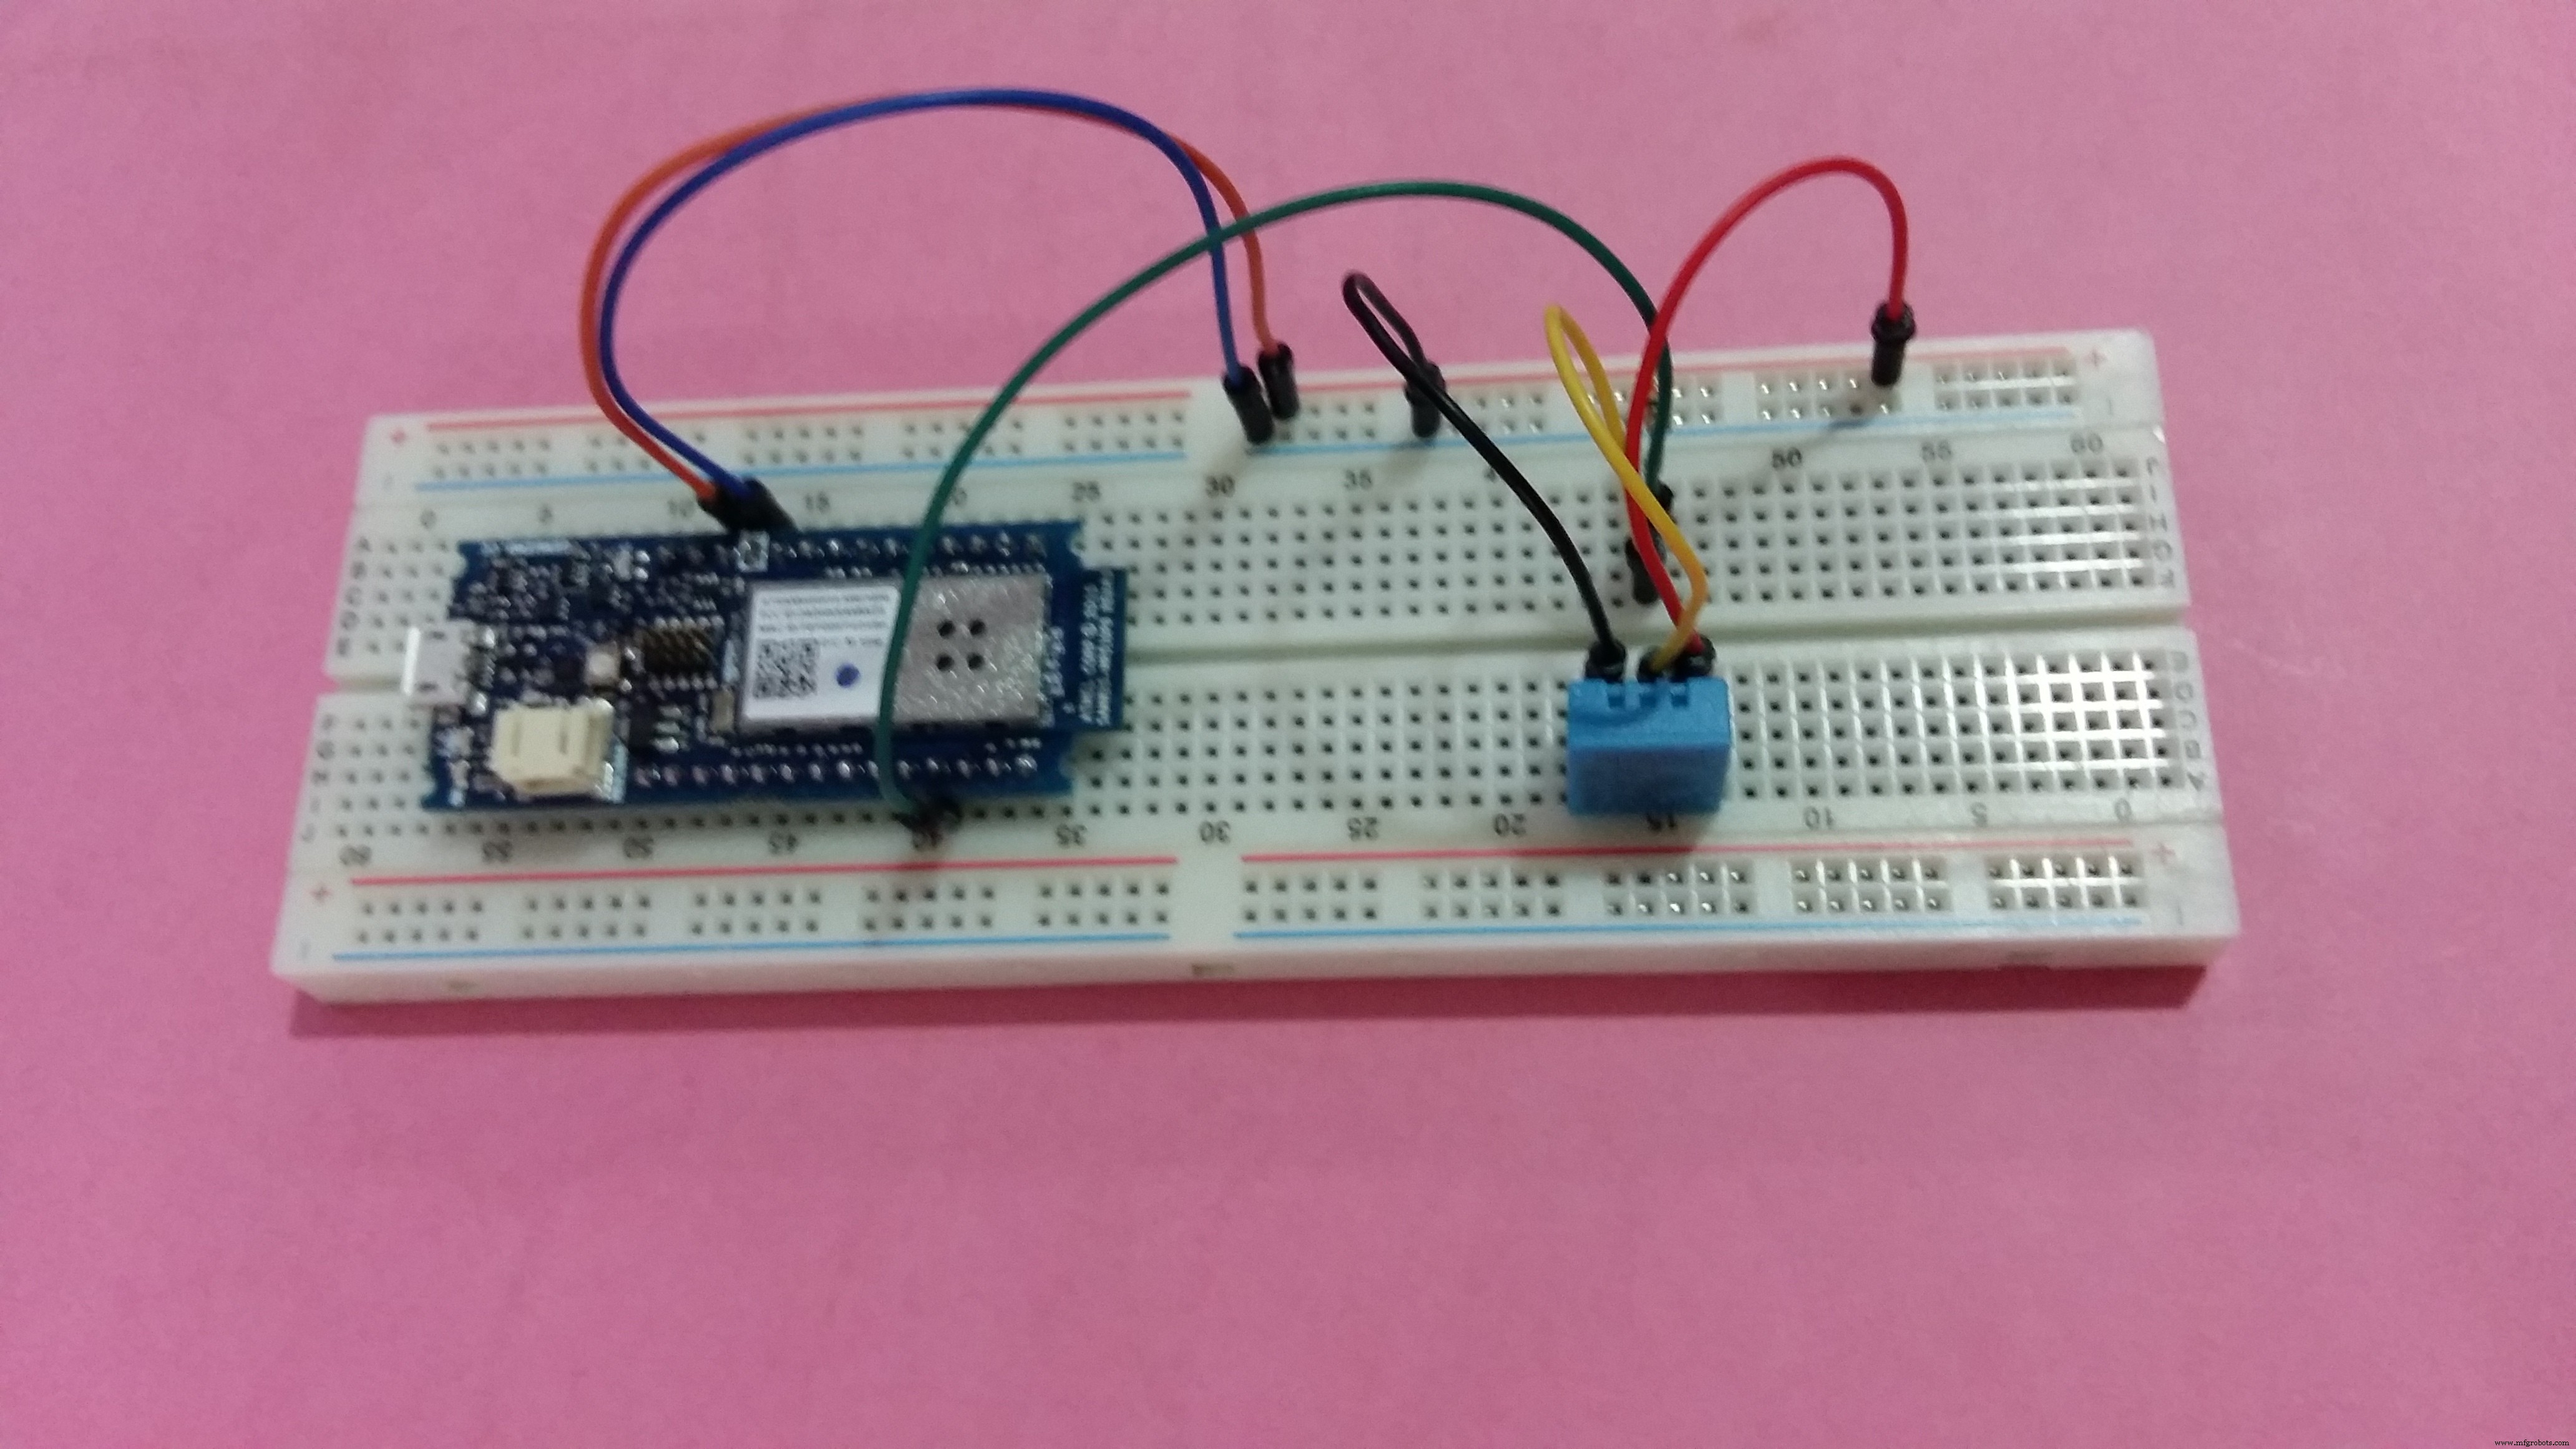
Configurer le capteur de température et d'humidité DHT11
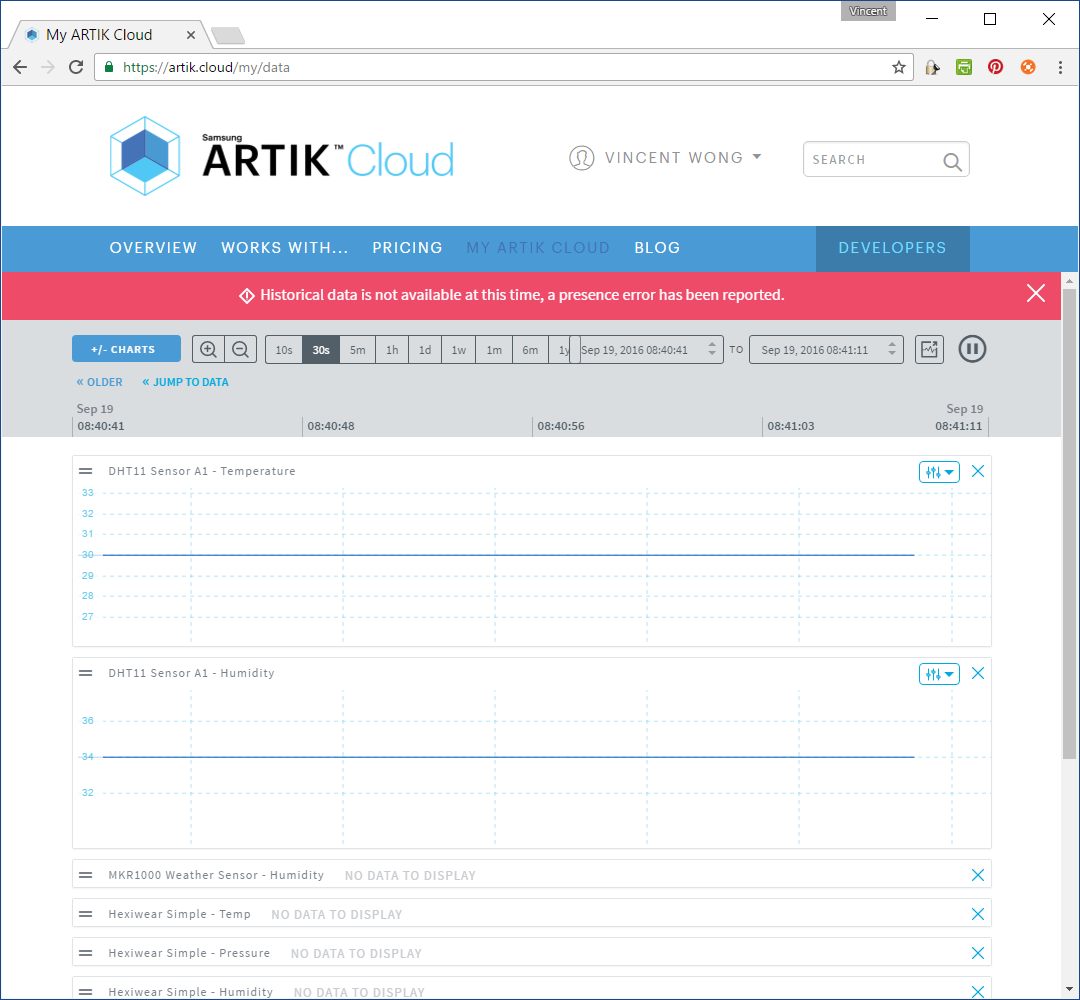
Créez un type d'appareil (Capteur DHT11 )
Connectez un appareil (DHT11 Sensor A1 )
Connectez les appareils physiques
.
Configurer les paramètres MQTT du cloud ARTIK
char mqttCloudServer[] ="api.artik.cloud" ; int mqttCloudPort =8883 ; char mqttCloudClientName[] ="ARTIK-Arduino" ; char mqttCloudUsername[] ="[device-id]" ; char mqttCloudPassword[] ="[device-token]" ; char mqttCloudDataOut[] ="/v1.1/messages/[device-id]" ; WiFiSSLClient ipCloudStack ; MQTTClient mqttCloudClient; Envoi de messages au cloud ARTIK.
void sendToArtikCloud(température flottante, humidité flottante) { loadBuffer(température, humidité); // charge les valeurs actuelles dans le tampon mqttCloudClient.publish(mqttCloudDataOut, buf); } void loadBuffer (température flottante, humidité flottante) { StaticJsonBuffer<200> jsonBuffer; JsonObject&dataPair =jsonBuffer.createObject(); dataPair["température"] =température ; dataPair["humidité"] =humidité ; dataPair.printTo(buf, sizeof(buf)); }

Configurer les actionneurs LED de température et d'humidité
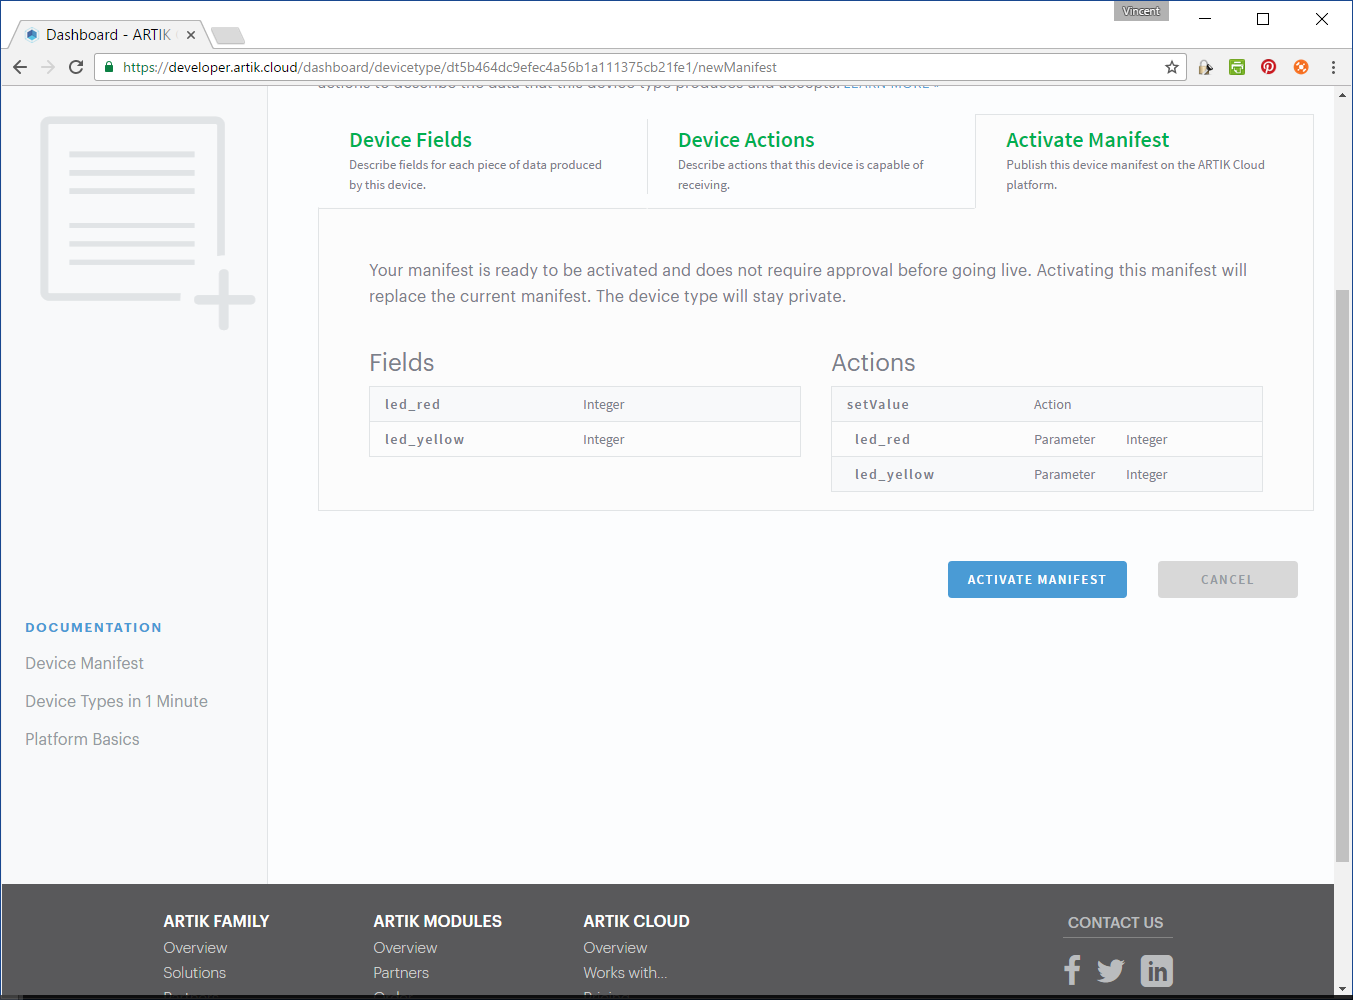
Créer un type d'appareil (DHT11 Acteur )
Connecter un appareil (DHT11 Actor A1 )
Connectez les appareils physiques
Configurer les paramètres MQTT du cloud ARTIK
// ARTIK Cloud MQTT params char mqttCloudServer[] ="api.artik.cloud"; int mqttCloudPort =1883 ; char mqttCloudClientName[] ="ARTIK-Arduino" ; char mqttCloudUsername[] ="[device-id]" ; char mqttCloudPassword[] ="[device-token]" ; char mqttCloudActionsIn[] ="/v1.1/actions/[device-id]" ; WiFiClient ipCloudStack ; MQTTClient mqttCloudClient; Réception des actions MQTT.
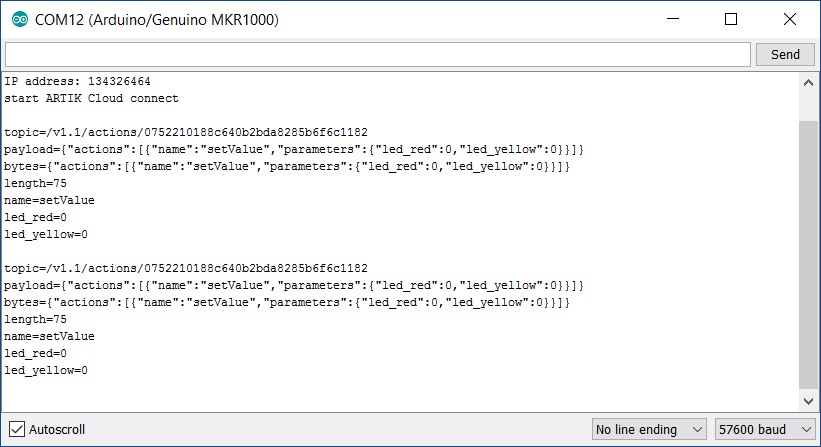
void messageReceived(String topic, String payload, char * bytes, unsigned int length) { Serial.print("topic="); Serial.println(sujet); Serial.print("payload="); Serial.println (charge utile); Serial.print("octets="); Serial.println(octets); Serial.print("length="); Serial.println(longueur); parseBuffer (charge utile); } Analyser et traiter les actions du cloud ARTIK.
void parseBuffer(String payload) { StaticJsonBuffer<200> jsonBuffer; Chaîne json =charge utile ; JsonObject&root =jsonBuffer.parseObject(json); const char* nameparam =root["actions"][0]["nom"]; const int actionLEDRed =root["actions"][0]["paramètres"]["led_red"] ; const int actionLEDYellow =root["actions"][0]["parameters"]["led_yellow"] ; Serial.print("nom="); Serial.println(nameparam); Serial.print("led_red="); Serial.println(actionLEDRed); Serial.print("led_yellow="); Serial.println(actionLEDJaune); Serial.println(); if (actionLEDRed ==1) { if (savedRedValue !=actionLEDRed) { digitalWrite(LED_RED_PIN, HIGH); saveRedValue =actionLEDRed; } saveRedTime =millis(); } else { if (savedRedValue !=actionLEDRed) { if (millis() - SavedRedTime> RED_DELAY) { digitalWrite(LED_RED_PIN, LOW); saveRedValue =actionLEDRed; } } } if (actionLEDYellow ==1) { if (savedYellowValue !=actionLEDYellow) { digitalWrite(LED_YELLOW_PIN, HIGH); saveYellowValue =actionLEDYellow; } saveYellowTime =millis(); } else { if (savedYellowValue !=actionLEDYellow) { if (millis() - savedYellowTime> YELLOW_DELAY) { digitalWrite(LED_YELLOW_PIN, LOW); saveYellowValue =actionLEDYellow; } } } }
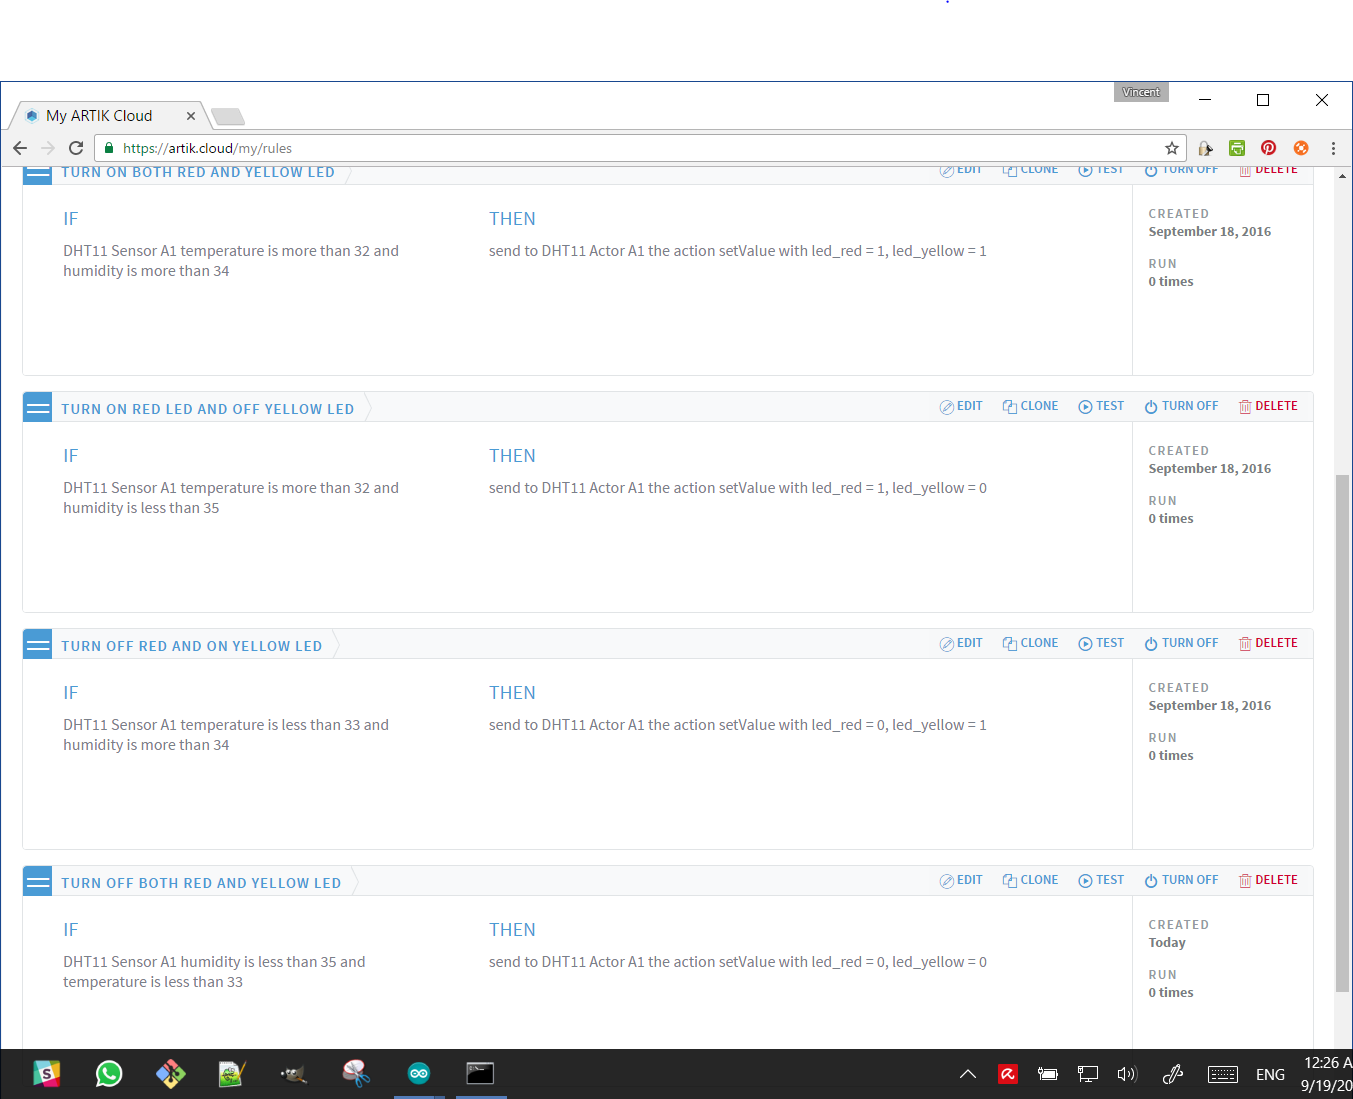
Créer des règles
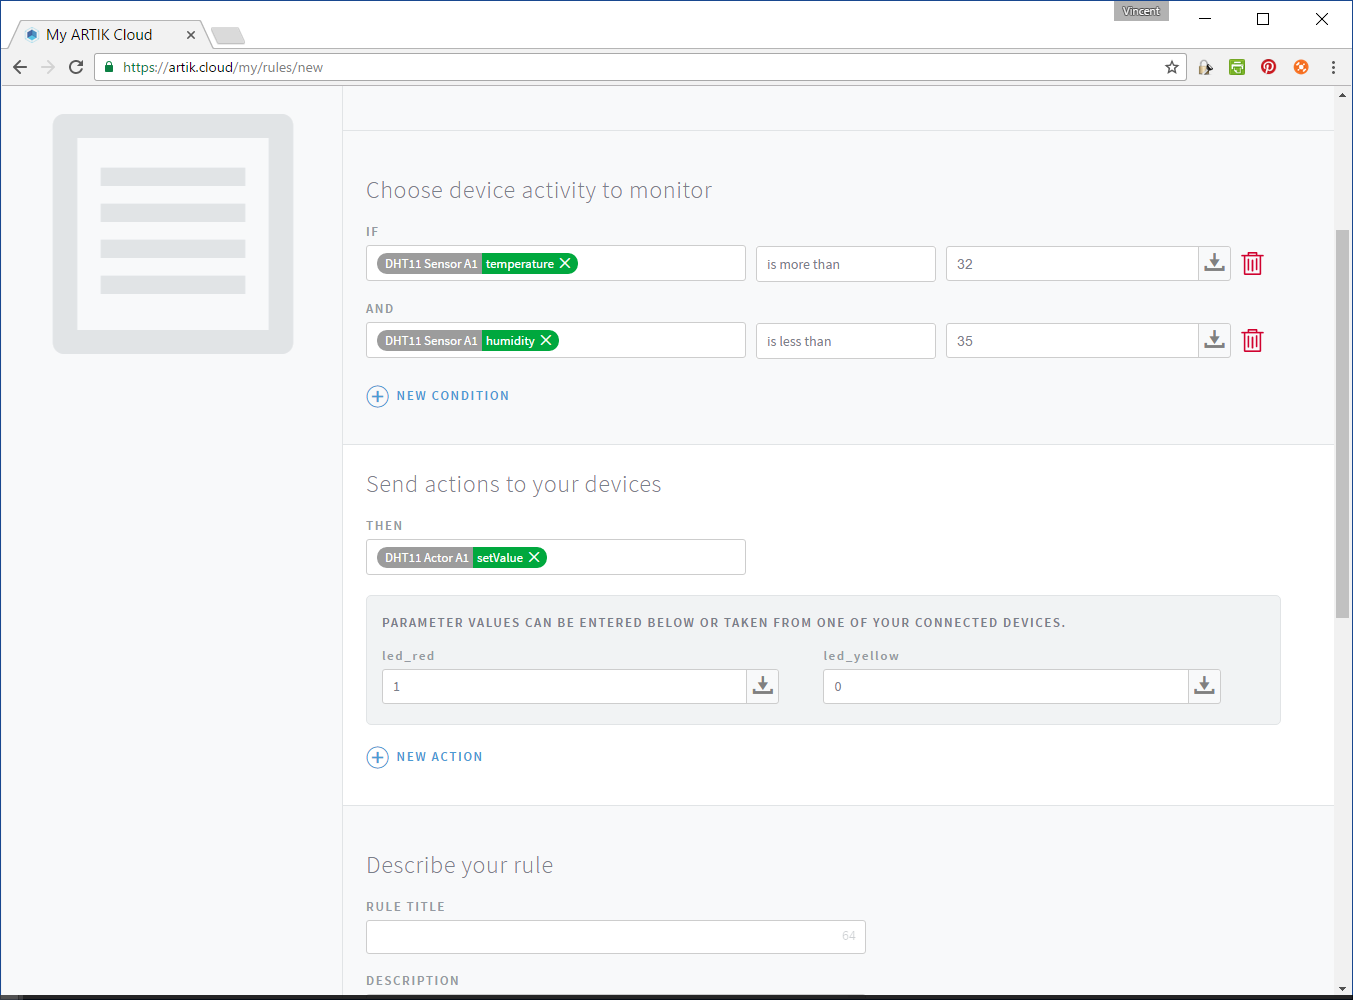
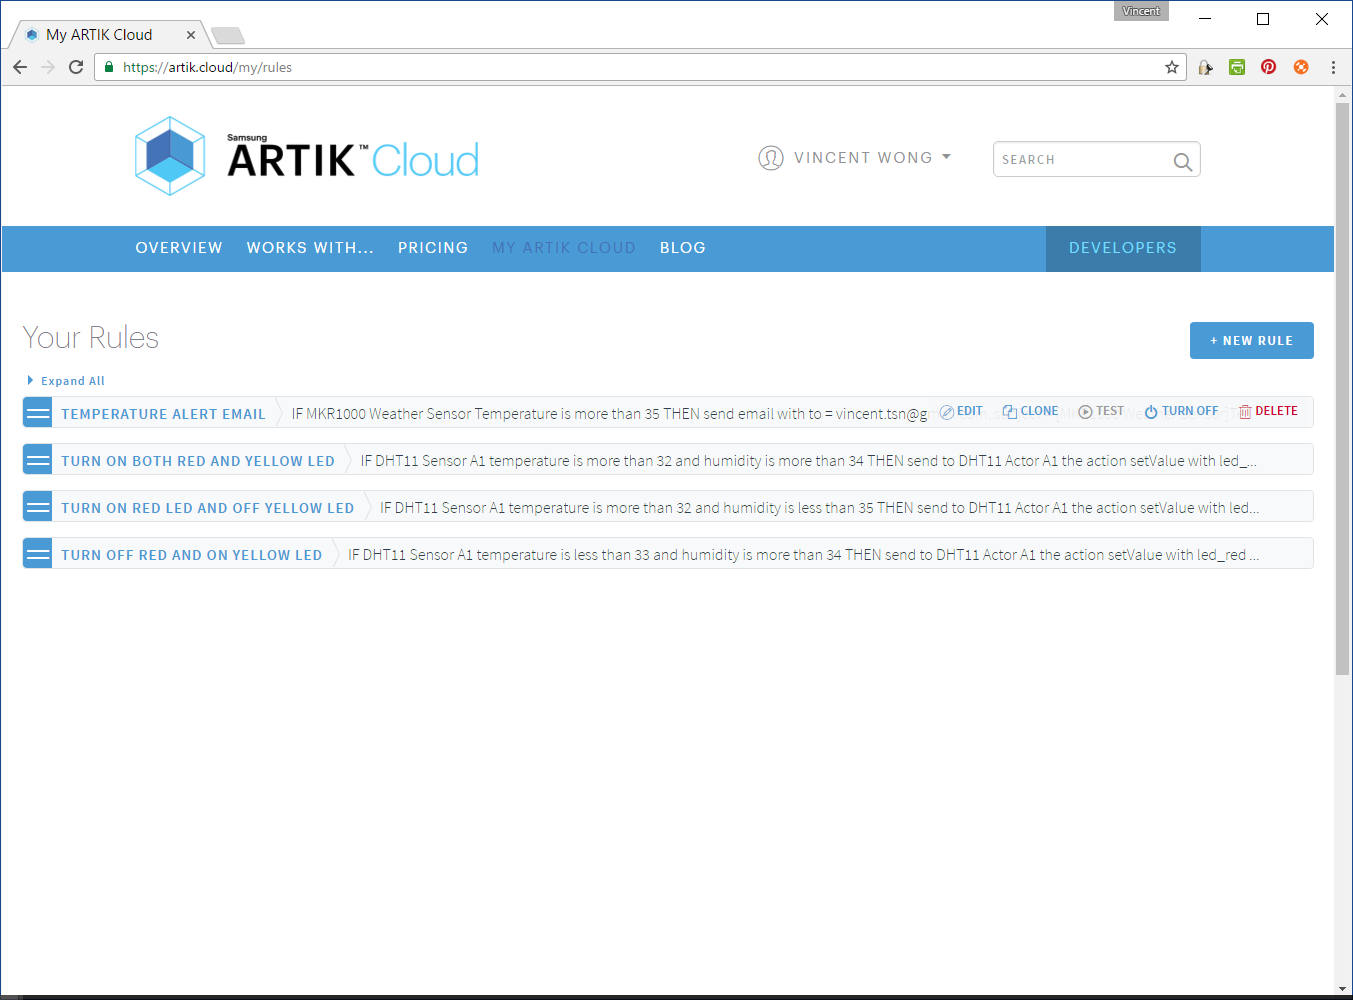
Il y a 4 règles :
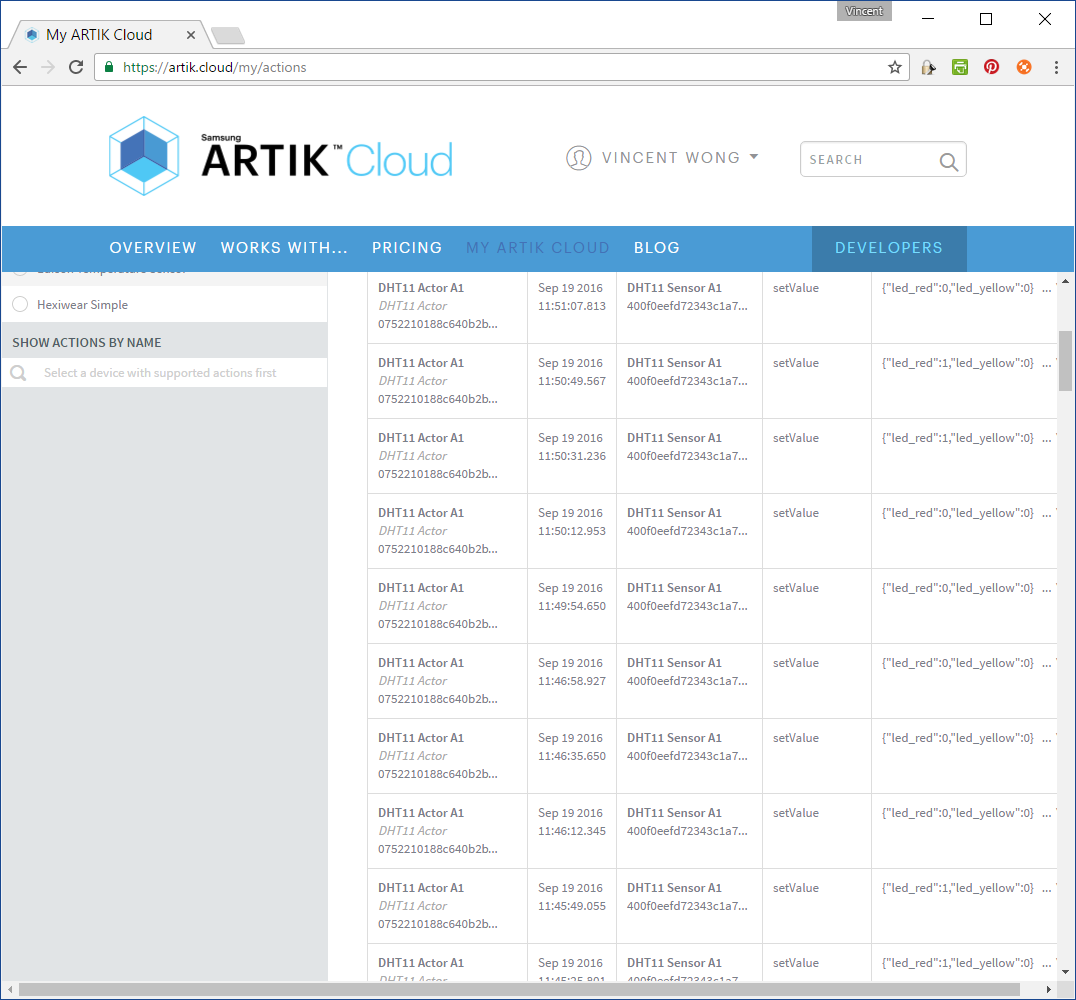
- SI la température du capteur DHT11 A1 est supérieure à 32 et l'humidité est supérieure à 34 PUIS envoyer à DHT11 Actor A1 l'action setValue avec led_red =1, led_yellow =1
- SI la température du capteur DHT11 A1 est supérieure à 32 et l'humidité est inférieure à 35 PUIS envoyer à DHT11 Actor A1 l'action setValue avec led_red =1, led_yellow =0
- SI la température du capteur DHT11 A1 est inférieure à 33 et l'humidité est supérieure à 34 PUIS envoyer à DHT11 Actor A1 l'action setValue avec led_red =0, led_yellow =1
- SI L'humidité du capteur DHT11 A1 est inférieure à 35 et la température est inférieure à 33 PUIS envoyer à DHT11 Actor A1 l'action setValue avec led_red =0, led_yellow =0
Vidéo de démonstration
Veuillez noter que vous devrez attendre que la température monte (LED allumée) et se refroidisse (LED éteinte). La LED rouge s'allume à 37 secondes et s'éteint à 1:13 secondes. La vidéo de démonstration ne montre que les changements de température. J'ai utilisé un sèche-cheveux pour changer la température autour du capteur DHT11.
.
Code
- artik_dht11_sensor.ino
- artik_led_actor.ino
artik_dht11_sensor.inoC/C++
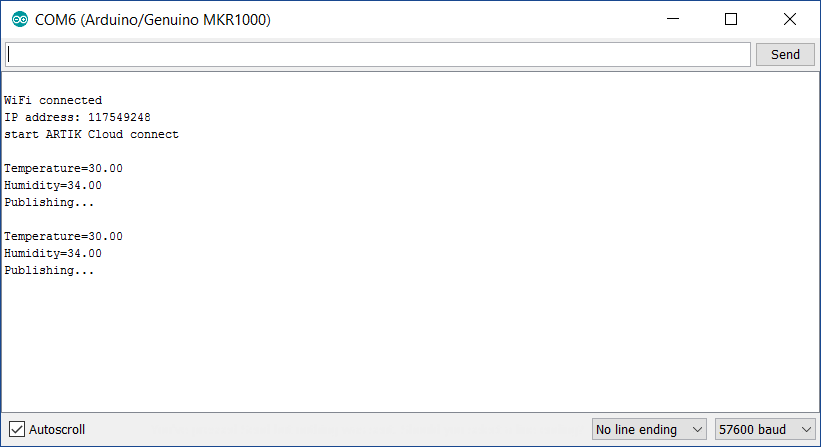
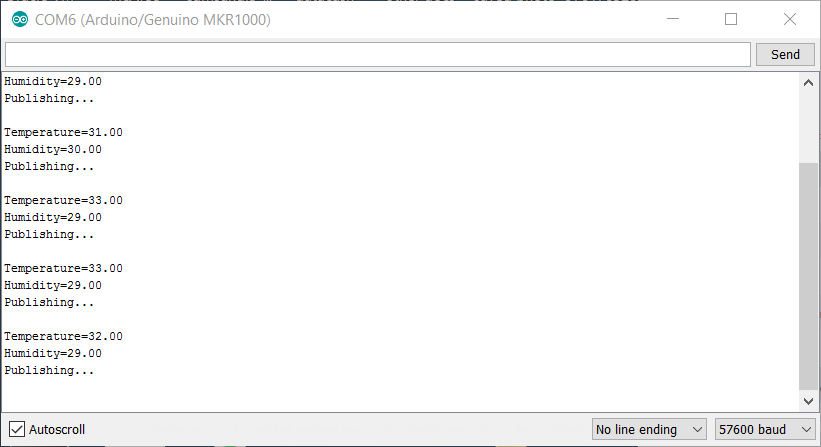
#include#include #include #include "DHT.h"#define DHTPIN 2 // à quelle broche numérique nous sommes connectés#define DHTTYPE DHT11 / / DHT 11DHT dht(DHTPIN, DHTTYPE);const char* _SSID ="[Wi-Fi SSID]";const char* _PASSWORD ="[Wi-Fi Password]"; // ARTIK Cloud MQTT paramschar mqttCloudServer[] ="api.artik.cloud";int mqttCloudPort =8883;char mqttCloudClientName[] ="ARTIK-Arduino";char mqttCloudUsername[] ="[device-id]"; char mqttCloudPassword[] ="[device-token]" ; char mqttCloudDataOut[] ="/v1.1/messages/[device-id]" ; WiFiSSLClient ipCloudStack;MQTTClient mqttCloudClient;char buf[128];float temperature, humidité;int n =0;void getNextSample(float* Temperature, float* Humidity){ // Attendre quelques secondes entre les mesures. retard (2000); // La lecture de la température ou de l'humidité prend environ 250 millisecondes ! // Les lectures du capteur peuvent également avoir jusqu'à 2 secondes d'ancienneté (c'est un capteur très lent) *Humidity =dht.readHumidity(); // Lecture de la température en Celsius (valeur par défaut) *Temperature =dht.readTemperature(); // Lire la température en degrés Fahrenheit (isFahrenheit =true) // float f =dht.readTemperature(true); //printf("Temp=%.2f, Pres=%.2f, Humi=%.2f\n", Temp_c__f, Pres_hPa__f, Humi_pct__f); Serial.print("Température="); Serial.println(*Température); Serial.print("Humidité="); Serial.println(*Humidity);}void setup() { Serial.begin(57600); dht.begin(); // Paramètre Wifi WiFi.begin(_SSID, _PASSWORD); while (WiFi.status() !=WL_CONNECTED) { delay(500); Serial.print("."); } Serial.println(); Serial.println("Wi-Fi connecté"); Serial.print("Adresse IP :"); Serial.println(WiFi.localIP()); mqttCloudClient.begin(mqttCloudServer, mqttCloudPort, ipCloudStack); Serial.println("démarrer ARTIK Cloud connect"); Serial.println(); while (!mqttCloudClient.connect(mqttCloudClientName, mqttCloudUsername, mqttCloudPassword)) { Serial.print("*"); retard (500); }}void messageReceived(String topic, String payload, char * bytes, unsigned int length) {}void sendToArtikCloud(float temperature, float humidité) { loadBuffer(temperature, humidité); // charge les valeurs actuelles dans le tampon mqttCloudClient.publish(mqttCloudDataOut, buf);}void loadBuffer(float temperature, float humidité) { StaticJsonBuffer<200> jsonBuffer; JsonObject&dataPair =jsonBuffer.createObject(); dataPair["température"] =température ; dataPair["humidité"] =humidité ; dataPair.printTo(buf, sizeof(buf));}void loop() { if (++n> 10) { Serial.println("Stopped."); sortie(0); } mqttCloudClient.loop(); retard(1000); getNextSample(&temperature, &humidity); Serial.println("Publication..."); Serial.println(); sendToArtikCloud(température, humidité); retard (15000);}
artik_led_actor.inoC/C++
#include#include #include #define LED_RED_PIN 11#define LED_YELLOW_PIN 13#define RED_DELAY 5000#define YELLOW_DELAY 10000const char* _SSID ="[Wi-Fi SSID ]";const char* _PASSWORD ="[Mot de passe Wi-Fi]"; // ARTIK Cloud MQTT paramschar mqttCloudServer[] ="api.artik.cloud";int mqttCloudPort =1883;char mqttCloudClientName[] ="ARTIK-Arduino";char mqttCloudUsername[] ="[device-id]"; char mqttCloudPassword[] ="[device-token]" ; char mqttCloudActionsIn[] ="/v1.1/actions/[device-id]" ; WiFiClient ipCloudStack;MQTTClient mqttCloudClient;char buf[128];int saveRedValue, saveYellowValue;non signé long saveRedTime, saveYellowTime;void setup() { Serial.begin(57600); pinMode(LED_RED_PIN, SORTIE); pinMode (LED_YELLOW_PIN, SORTIE); saveRedValue =saveYellowValue =0 ; // Paramètre Wifi WiFi.begin(_SSID, _PASSWORD); while (WiFi.status() !=WL_CONNECTED) { delay(500); Serial.print("."); } Serial.println(); Serial.println("Wi-Fi connecté"); Serial.print("Adresse IP :"); Serial.println(WiFi.localIP()); mqttCloudClient.begin(mqttCloudServer, mqttCloudPort, ipCloudStack); Serial.println("démarrer ARTIK Cloud connect"); Serial.println(); while (!mqttCloudClient.connect(mqttCloudClientName, mqttCloudUsername, mqttCloudPassword)) { Serial.print("*"); retard (500); } mqttCloudClient.subscribe(mqttCloudActionsIn);}void messageReceived(String topic, String payload, char * bytes, unsigned int length) { Serial.print("topic="); Serial.println(sujet); Serial.print("payload="); Serial.println (charge utile); Serial.print("octets="); Serial.println(octets); Serial.print("length="); Serial.println(longueur); parseBuffer(payload);}void parseBuffer(String payload) { StaticJsonBuffer<200> jsonBuffer; Chaîne json =charge utile ; JsonObject&root =jsonBuffer.parseObject(json); const char* nameparam =root["actions"][0]["nom"]; const int actionLEDRed =root["actions"][0]["paramètres"]["led_red"] ; const int actionLEDYellow =root["actions"][0]["parameters"]["led_yellow"] ; Serial.print("nom="); Serial.println(nameparam); Serial.print("led_red="); Serial.println(actionLEDRed); Serial.print("led_yellow="); Serial.println(actionLEDJaune); Serial.println(); if (actionLEDRed ==1) { if (savedRedValue !=actionLEDRed) { digitalWrite(LED_RED_PIN, HIGH); saveRedValue =actionLEDRed; } saveRedTime =millis(); } else { if (savedRedValue !=actionLEDRed) { if (millis() - SavedRedTime> RED_DELAY) { digitalWrite(LED_RED_PIN, LOW); saveRedValue =actionLEDRed; } } } if (actionLEDYellow ==1) { if (savedYellowValue !=actionLEDYellow) { digitalWrite(LED_YELLOW_PIN, HIGH); saveYellowValue =actionLEDYellow; } saveYellowTime =millis(); } else { if (savedYellowValue !=actionLEDYellow) { if (millis() - savedYellowTime> YELLOW_DELAY) { digitalWrite(LED_YELLOW_PIN, LOW); saveYellowValue =actionLEDYellow; } } } }boucle vide() { mqttCloudClient.loop(); retard (500); }
Processus de fabrication