Photos et vidéo RVB sur écran TFT SPI
Composants et fournitures
 |
| × | 1 | |||
| × | 1 | ||||
| × | 1 | ||||
| × | 1 |
À propos de ce projet
Présentation
Bonjour !
Dans l'article d'aujourd'hui, je voudrais parler de la façon dont vous pouvez afficher des images ou des photos (format *.jpg), ainsi que des vidéos (format RGB565) sur l'écran de l'écran TFT SPI (320x240, 2.8").
Tout d'abord, une petite vidéo de démonstration :
Matériel
Composants nécessaires :
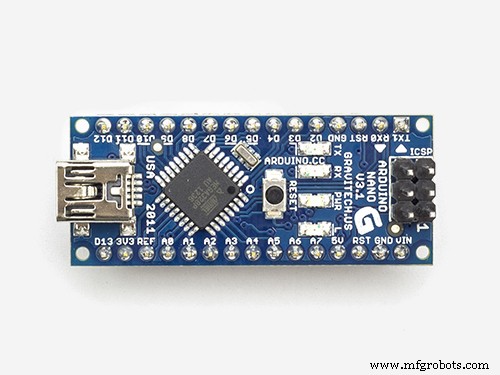
- Arduino Nano R3,
- Écran SPI TFT (320 x 240) avec écran tactile
- carte uSD>1 Go,
- Shield TFT pour Arduino Nano.
Mettre toutes les pièces dans l'ordre indiqué dans la vidéo (ou vous pouvez lire l'article précédent :https://create.arduino.cc/projecthub/alf81010/tft-shield-for-arduino-nano-start-f4391e .
Logiciel
Préparation carte Micro SD.
Une carte micro SD doit être formatée en FAT32. Les images peuvent être enregistrées directement sur la carte (sans aucun traitement). Il est souhaitable que la taille des images ne dépasse pas 2560x1920.
Pour lire une vidéo au format rgb565, les fichiers doivent être préparés à l'avance. Pour convertir une vidéo, utilisez ffmpeg (http://ffmpeg.org). Téléchargez et installez sur votre ordinateur. Utilisez ensuite l'exemple de ligne de commande ffmpeg, qui affiche une vidéo compatible avec cette démo :
ffmpeg -i video.avi -s 320x240 -pix_fmt rgb565 vidéo.rgb
Téléchargez et installez la bibliothèque nécessaire pour travailler avec le bouclier TFT pour Arduino Nano :https://github.com/YATFT/YATFT.
Téléchargez le croquis suivant dans Arduino Nano :
/************************************************ ************************************ LE LOGICIEL ET LA DOCUMENTATION SONT FOURNIS "EN L'ÉTAT" SANS GARANTIE D'AUCUNE* GENRE, EXPLICITE OU IMPLICITE, Y COMPRIS, SANS LIMITATION, TOUTE GARANTIE* DE QUALITÉ MARCHANDE, DE TITRE, D'ABSENCE DE CONTREFAÇON ET D'ADAPTATION À UN USAGE PARTICULIER*. EN AUCUN CAS L'AUTEUR OU SES CONCÉDANTS DE LICENCE NE SERONT RESPONSABLES OU* OBLIGÉS EN VERTU D'UN CONTRAT, D'UNE NÉGLIGENCE, D'UNE RESPONSABILITÉ STRICTE, D'UNE CONTRIBUTION*, D'UNE RUPTURE DE GARANTIE OU D'UNE AUTRE THÉORIE LÉGALE ÉQUITABLE DE TOUT DOMMAGE OU DÉPENSE DIRECT OU INDIRECT*, Y COMPRIS, MAIS SANS S'Y LIMITER, TOUT INCIDENT SPÉCIAL ,* DOMMAGES INDIRECTS, PUNITIFS OU CONSÉCUTIFS, PERTE DE PROFITS OU PERTE DE DONNÉES,* COT D'ACHAT DE BIENS DE REMPLACEMENT, DE TECHNOLOGIE, DE SERVICES OU DE TOUTE* RÉCLAMATION PAR DES TIERS (Y COMPRIS, MAIS SANS S'Y LIMITER, TOUTE DEFENSE DE CEUX-CI)* OU AUTRES COUTS SIMILAIRES .****************************************************** ******************************/#include // Bibliothèque spécifique au matériel#include #include #include YATFT tft(0);SDC sdc;#define CS_PIN A0// MOSI=11, MISO=12, SCK=13XPT2046_Touchscreen ts(CS_PIN);/* Si vous utilisez le shield, toutes les lignes de contrôle et de données sont fixes, et une déclaration plus simple peut éventuellement être utilisée :*/uint16_t frame =0;uint32_t total_time =0;bool f_first =true;uint8_ t mode =0;/************************************************ ******************************************************** ***/void setup(void){ Serial.begin(115200); // initialise le port série Serial.println(F("Exemple de lecture photo et vidéo !")); tft.begin(0x4391,-8); // initialise l'affichage tft.SetColor(BLACK); tft.ClearDevice(); // Effacer l'écran ts.begin(); // Initialiser l'écran tactile SPI.end(); Serial.print(F("FS Init... ")); uint8_t état =sdc.FSInit(); if (état ==0) Serial.println(F("unsuccess.")); else Serial.println(F("succès.")); sdc.currentFileType =DEMO_FILE_TYPE_RGB ; total_time =millis() + 500;}void loop(void){ if (total_time 100 &&y<140) { // Mode d'arrêt =1; Serial.println(F("mode =1")); } else if (x>140 &&x<180 &&y>100 &&y<140) { // Mode pause =2; // Dessiner des boutons tft.SetColor(BRIGHTRED); tft.DrawFillCirc(GetMaxX()/4,GetMaxY()/2,50); tft.SetColor(BRIGHTYELLOW); tft.DrawFillRect(GetMaxX()/4-30,GetMaxY()/2-30, GetMaxX()/4+30,GetMaxY()/2+30); tft.SetColor(LUMINEUX); tft.DrawFillCirc(GetMaxX()/4*3,GetMaxY()/2,50); tft.SetColor(BRIGHTYELLOW); for(uint8_t i=0; i<60; i++) { tft.DrawLine(210+i, 90+i/2, 210+i, 150-i/2); } Serial.println(F("mode =2")); } else if (x>190 &&y>100 &&y<140) { // Mode de lecture =0; Serial.println(F("mode =0")); } mode de retour ; } SPI.end(); mode de retour ;} J'ai essayé de faire un court article et d'en décrire les principaux points. De plus, il n'y a rien de difficile dans ce projet. Mais si vous avez des questions - posez-les, n'hésitez pas.;-) Je vais essayer d'ajouter un article.
Merci de votre attention !
A suivre.
Articles précédents :
1) Bouclier TFT unique pour Arduino Uno - Démarrer,
2) Blindage TFT unique pour Arduino Uno - OV7670 Cam Live View,
3) Bouclier TFT unique pour Arduino Uno - Caméra Bluetooth Arduino (ABC),
4) TFT Shield pour Arduino Nano - Démarrer.
Mise à jour 01.04.2021 :
Rebonjour! Il existe une bibliothèque mise à jour pour une série d'écrans, qui se compose actuellement de deux boucliers et de deux tableaux de répartition. Le croquis est compilé en fonction de la version choisie (de 1 à 4) et du type de microcontrôleur (MegaAVR ou ESP-32). Ajout de photos, exemples. Vous trouverez plus d'informations sur https://github.com/Ekaburg/EkaTFT.
Code
- PhotoAndVideoPlay.ino
PhotoAndVideoPlay.inoC/C++
Schémas
Bibliothèque TFT shield pour Arduino Nano
https://github.com/YATFT/YATFTProcessus de fabrication
- Mobilité de fabrication :données, voix, vidéo et localisation
- Le nouveau convertisseur vidéo teste les écrans d'infodivertissement automobile APIX3
- MODULE DE DONNÉES : écran TFT ultra-étiré de 23,1 pouces avec contrôle intelligent
- Lecture de capteurs analogiques avec Raspberry Pi et Zabbix Supervisor
- Kuman TFT 3.5 RetroPie 2018
- Vidéo K 2019 :Innovations dans le recyclage des machines et des matériaux
- Que signifient DN et PN sur les brides ? (Vidéo)
- Affichage 3D pratique généré par holographie et technologie de champ lumineux
- Finitions de surface de moulage par injection :SPI et VDI


