



Système de surveillance de plantes connecté par AWS IoT
Composants et fournitures
| Composant | Quantité |
|---|---|
| Arduino Yun | 1 |
| Kit Grove Starter Kit Plus (shield + capteur température + capteur lumière) | 1 |
| Capteur d'humidité du sol Grove | 1 |
| LED rouge 5 mm | 1 |
| Résistance 330 Ω (pour LED) | 1 |
Outils
- Imprimante 3D (boîtier)
Services cloud AWS
- AWS IoT Core (MQTT, device shadows, règles)
- AWS IAM (rôles/policies)
- Amazon DynamoDB (stockage données capteurs)
- Amazon SNS (notifications email)
- dweet.io (alternative simple pour test)
- Arduino IDE
À propos du projet
Surveillez vos plantes pendant vos vacances : température, luminosité, humidité du sol. Deux modes :
- Simple : envoi vers dweet.io (visualisation web immédiate).
- Avancé : envoi vers AWS IoT → DynamoDB + alertes email via SNS si sol trop sec.
Boîtier 3D imprimé pour intégrer Yun, shield Grove et capteurs.
Suivi exemple : dweet.io/follow/PlantMonitorTorontoON
Étape 1 – Câblage (shield Grove)
- Capteur température → A0
- Capteur humidité sol → A1
- Capteur lumière → A2
- LED + résistance 330 Ω → Pin D2
Étape 2 – Impression 3D du boîtier
3 fichiers STL (base, couvercle, pique sol). Paramètres : hauteur couche 0,3 mm, remplissage ≥ 25 %. Durée ~2 h.

Étape 3 – Déterminer le seuil « sol trop sec »
Téléverser sketch SoilMoistureValue (fourni). Noter la valeur lue dans le sol sec vs humide. Définir tooDryValue (ex: 250). La LED s'allume si valeur < seuil.
Étape 4 – Envoi vers dweet.io
Sketch ArduinoYunDweetio.ino. Remplacer « PlantMonitorTorontoON » par votre identifiant unique. Test : dweet.io/follow/VOTRE_ID.
Étape 5 – Configuration AWS CLI (macOS/Linux/Windows)
Créer compte AWS Free Tier. Installer AWS CLI :
$ curl "https://s3.amazonaws.com/aws-cli/awscli-bundle.zip" -o "awscli-bundle.zip"
$ unzip awscli-bundle.zip
$ sudo ./awscli-bundle/install -i /usr/local/aws -b /usr/local/bin/aws
Étape 6 – Créer un « Thing » AWS IoT
aws iot create-thing --thing-name "plantSystem"
Étape 7 – Générer certificats X.509
aws iot create-keys-and-certificate --set-as-active \
  --certificate-pem-outfile cert.pem \
  --public-key-outfile publicKey.pem \
  --private-key-outfile privateKey.pem
Étape 8 – Politique IoT (Pub/Sub)
Fichier policy.json :
{ "Version": "2012-10-17", "Statement": [{ "Effect": "Allow", "Action":["iot:*"], "Resource": ["*"] }] }
aws iot create-policy --policy-name "PubSub" --policy-document file://./policy.json
Étape 9 – Attacher politique + certificat au Thing
aws iot attach-principal-policy --principal "arn:aws:iot:...:cert/xxx" --policy-name "PubSub"
aws iot attach-thing-principal --thing-name "PlantSystem" --principal "arn:aws:iot:...:cert/xxx"
Étape 10 – Test local avec MQTT.fx
Télécharger MQTT.fx, configurer profil avec certificats, tester pub/sub sur AWS IoT.
Étape 11 – Configurer Arduino Yun pour AWS IoT
- Installer SDK Arduino Yun : GitHub aws-iot-device-sdk-arduino-yun dans dossier
Libraries. - Configurer Yun sur Wi-Fi local (guide officiel).
- Tester connectivité : Fichier → Exemples → Bridge → Process.
- Placer
rootCA.pem,cert.pem,privateKey.pemdans dossiercerts/sur la carte SD du Yun. - Modifier
codebase_upload.shetenvironment_setup.sh(IP + mot de passe Yun). - Exécuter sur Yun :
$ chmod 755 codebase_upload.sh && ./codebase_upload.sh
$ chmod 755 environment_setup.sh && ./environment_setup.sh
(Installe python-openssl, pip, paho-mqtt, etc. ~5-10 min)
Étape 12 – Créer table DynamoDB + Règle IoT → DynamoDB
Table : plantSensor | Clé de partition : key | Clé de tri : timestamp | RCU/WCU = 1.
Règle IoT (SQL) :
{ "sql": "SELECT * FROM 'topic/plantdata'", "ruleDisabled": false,
  "actions": [{ "dynamoDB": {
    "tableName": "plantSensor",
    "hashKeyField": "key", "hashKeyValue": "${topic(2)}",
    "rangeKeyField": "timestamp", "rangeKeyValue": "${timestamp()}",
    "roleArn": "arn:aws:iam::XXXXXXXXXXXX:role/iot-actions-role"
  }}] }
aws iot create-topic-rule --rule-name plantDataToDynamoDB --topic-rule-payload file://./plantdatarule.json
Tester avec MQTT.fx → vérifier entrées dans DynamoDB.
Étape 13 – Téléverser sketch AWS IoT → DynamoDB
Installer bibliothèque ArduinoJson. Téléverser ArduinoYunAWSIoTDynamodb.ino + onglet aws_iot_config.h (voir code). Moniteur série : confirme envoi JSON {"temp":..., "lightval":..., "moistval":...} sur topic/plantdata.

Note : Augmenter postingInterval (délai fin de loop) pour production (coûts AWS).
Étape 14 – Alerte email par SNS (seuil humidité)
- Rôle IAM
iot-actions-role: ajouter policiesAmazonSNSRole+AmazonSNSFullAccess. - Console SNS : créer Topic
sendMail+ abonnement email (votre adresse). - Console IoT : créer règle
EmailSend:- Attribut :
moistval(correspond au JSON Arduino) - Filtre topic :
topic/plantdata - Condition :
moistval < 250(votre seuil) - Action : SNS → Target
sendMail+ Rôleiot-actions-role
- Attribut :


Étape 15 – Assemblage final


Fixer pique sol (vis M4×40) sur base. Emboîter couvercle. Orienter ouverture vers lumière. Alimenter Yun via micro-USB secteur.
Codes sources
1. SoilMoistureValue – Calibration seuil humidité
// @CarmelitoA - House Plant Monitoring - calibration humidité sol
const int moisturePin = A1;
const int ledPin = 2;
int moisturValue = 0;
int tooDryValue = 250;  // AJUSTER selon vos tests

void setup() {
    Serial.begin(9600);
    pinMode(ledPin, OUTPUT);
    digitalWrite(ledPin, LOW);
}

void loop() {
    moisturValue = analogRead(moisturePin);
    Serial.print("Moisture sensor = "); Serial.println(moisturValue);
    if (moisturValue < tooDryValue) digitalWrite(ledPin, HIGH);
    else digitalWrite(ledPin, LOW);
    delay(3000);
}
2. ArduinoYunDweetio – Envoi vers dweet.io
// @CarmelitoA - CC BY-SA 4.0
#include
#include
#define SITE_URL "www.dweet.io"
#include

const int moisturePin = A1;
const int ledPin = 2;
int moisturValue = 0;
const int tooDryValue = 500;      // AJUSTER
float tooLowTemp = 20.0;          // AJUSTER (°C)

const int B = 4275;               // Thermistor B value
const int R0 = 100000;
const int pinTempSensor = A0;
const int lightPin = A2;

unsigned long lastConnectionTime = 0;
const unsigned long postingInterval = 10L * 1000L;

void setup() {
    Bridge.begin();
    Serial.begin(9600);
    pinMode(ledPin, OUTPUT);
    digitalWrite(ledPin, LOW);
    while (!Serial);  // attendre connexion série (désactiver en prod)
}

void loop() {
    if (millis() - lastConnectionTime > postingInterval) {
        YunClient c;
        moisturValue = analogRead(moisturePin);
        Serial.print("sensor = "); Serial.println(moisturValue);

        // Température (°C) via thermistor Grove
        int a = analogRead(pinTempSensor);
        float R = 1023.0/((float)a) - 1.0;
        R = 100000.0 * R;
        float temperature = 1.0/(log(R/100000.0)/B + 1/298.15) - 273.15;
        Serial.print("temperature = "); Serial.println(temperature);

        int lightValue = analogRead(lightPin);
        Serial.print("light value = "); Serial.println(lightValue);

        if (moisturValue < tooDryValue || temperature < tooLowTemp) digitalWrite(ledPin, HIGH);
        else digitalWrite(ledPin, LOW);

        if (c.connect(SITE_URL, 80)) {
            Serial.println("connected");
            String s = "POST /dweet/for/PlantMonitorTorontoON?Temperature="; // CHANGER ID
            s.concat(temperature);
            s.concat("&LightValue="); s.concat(lightValue);
            s.concat("&SoilMoisture="); s.concat(moisturValue);
            Serial.println(s);
            c.println(s);
            c.println("Host: www.dweet.io");
            c.println("Connection: close");
            c.println();
            lastConnectionTime = millis();
        } else Serial.println("disconnected from server");
    }
}
3. ArduinoYunAWSIoTDynamodb – Envoi vers AWS IoT / DynamoDB
// @CarmelitoA 01-16-2016 - House Plant Monitoring → AWS IoT → DynamoDB
#include
#include
#include "aws_iot_config.h"
#include
#include

char data[80];
StaticJsonBuffer<200> jsonBuffer;

const int moisturePin = A1;
const int ledPin = 2;
int moisturValue = 0;
const int tooDryValue = 250;
float tooLowTemp = 20.0;

const int B = 4275;
const int R0 = 100000;
const int pinTempSensor = A0;
const int lightPin = A2;

unsigned long lastConnectionTime = 0;
const unsigned long postingInterval = 10L * 1000L;  // AUGMENTER en prod

aws_iot_mqtt_client myClient;
char msg[32];
int cnt = 0, rc = -100;
bool success_connect = false;

void msg_callback(char* src, int len) {
    Serial.println("CALLBACK:");
    for (int i=0; i
4. aws_iot_config.h – Configuration certificats (nouvel onglet dans l'IDE)
/* AWS IoT SDK Arduino Yun - Configuration utilisateur */
#ifndef config_usr_h
#define config_usr_h

// REMPLACER PAR VOS VALEURS
#define AWS_IOT_MQTT_HOST "XXXXXXXXXXX.iot.us-west-2.amazonaws.com"
#define AWS_IOT_MQTT_PORT 8883
#define AWS_IOT_CLIENT_ID "clientYun2"
#define AWS_IOT_MY_THING_NAME "PlantSystem"
#define AWS_IOT_ROOT_CA_FILENAME "rootCA.pem"
#define AWS_IOT_CERTIFICATE_FILENAME "cert.pem"
#define AWS_IOT_PRIVATE_KEY_FILENAME "privateKey.pem"

// Ne pas modifier
#define AWS_IOT_PATH_PREFIX "./certs/"
#define AWS_IOT_ROOT_CA_PATH AWS_IOT_PATH_PREFIX AWS_IOT_ROOT_CA_FILENAME
#define AWS_IOT_CERTIFICATE_PATH AWS_IOT_PATH_PREFIX AWS_IOT_CERTIFICATE_FILENAME
#define AWS_IOT_PRIVATE_KEY_PATH AWS_IOT_PATH_PREFIX AWS_IOT_PRIVATE_KEY_FILENAME

#endif
Pièces 3D (boîtier)
Fichiers STL fournis dans la section « Custom parts » (base, couvercle, pique sol).
Schémas de câblage
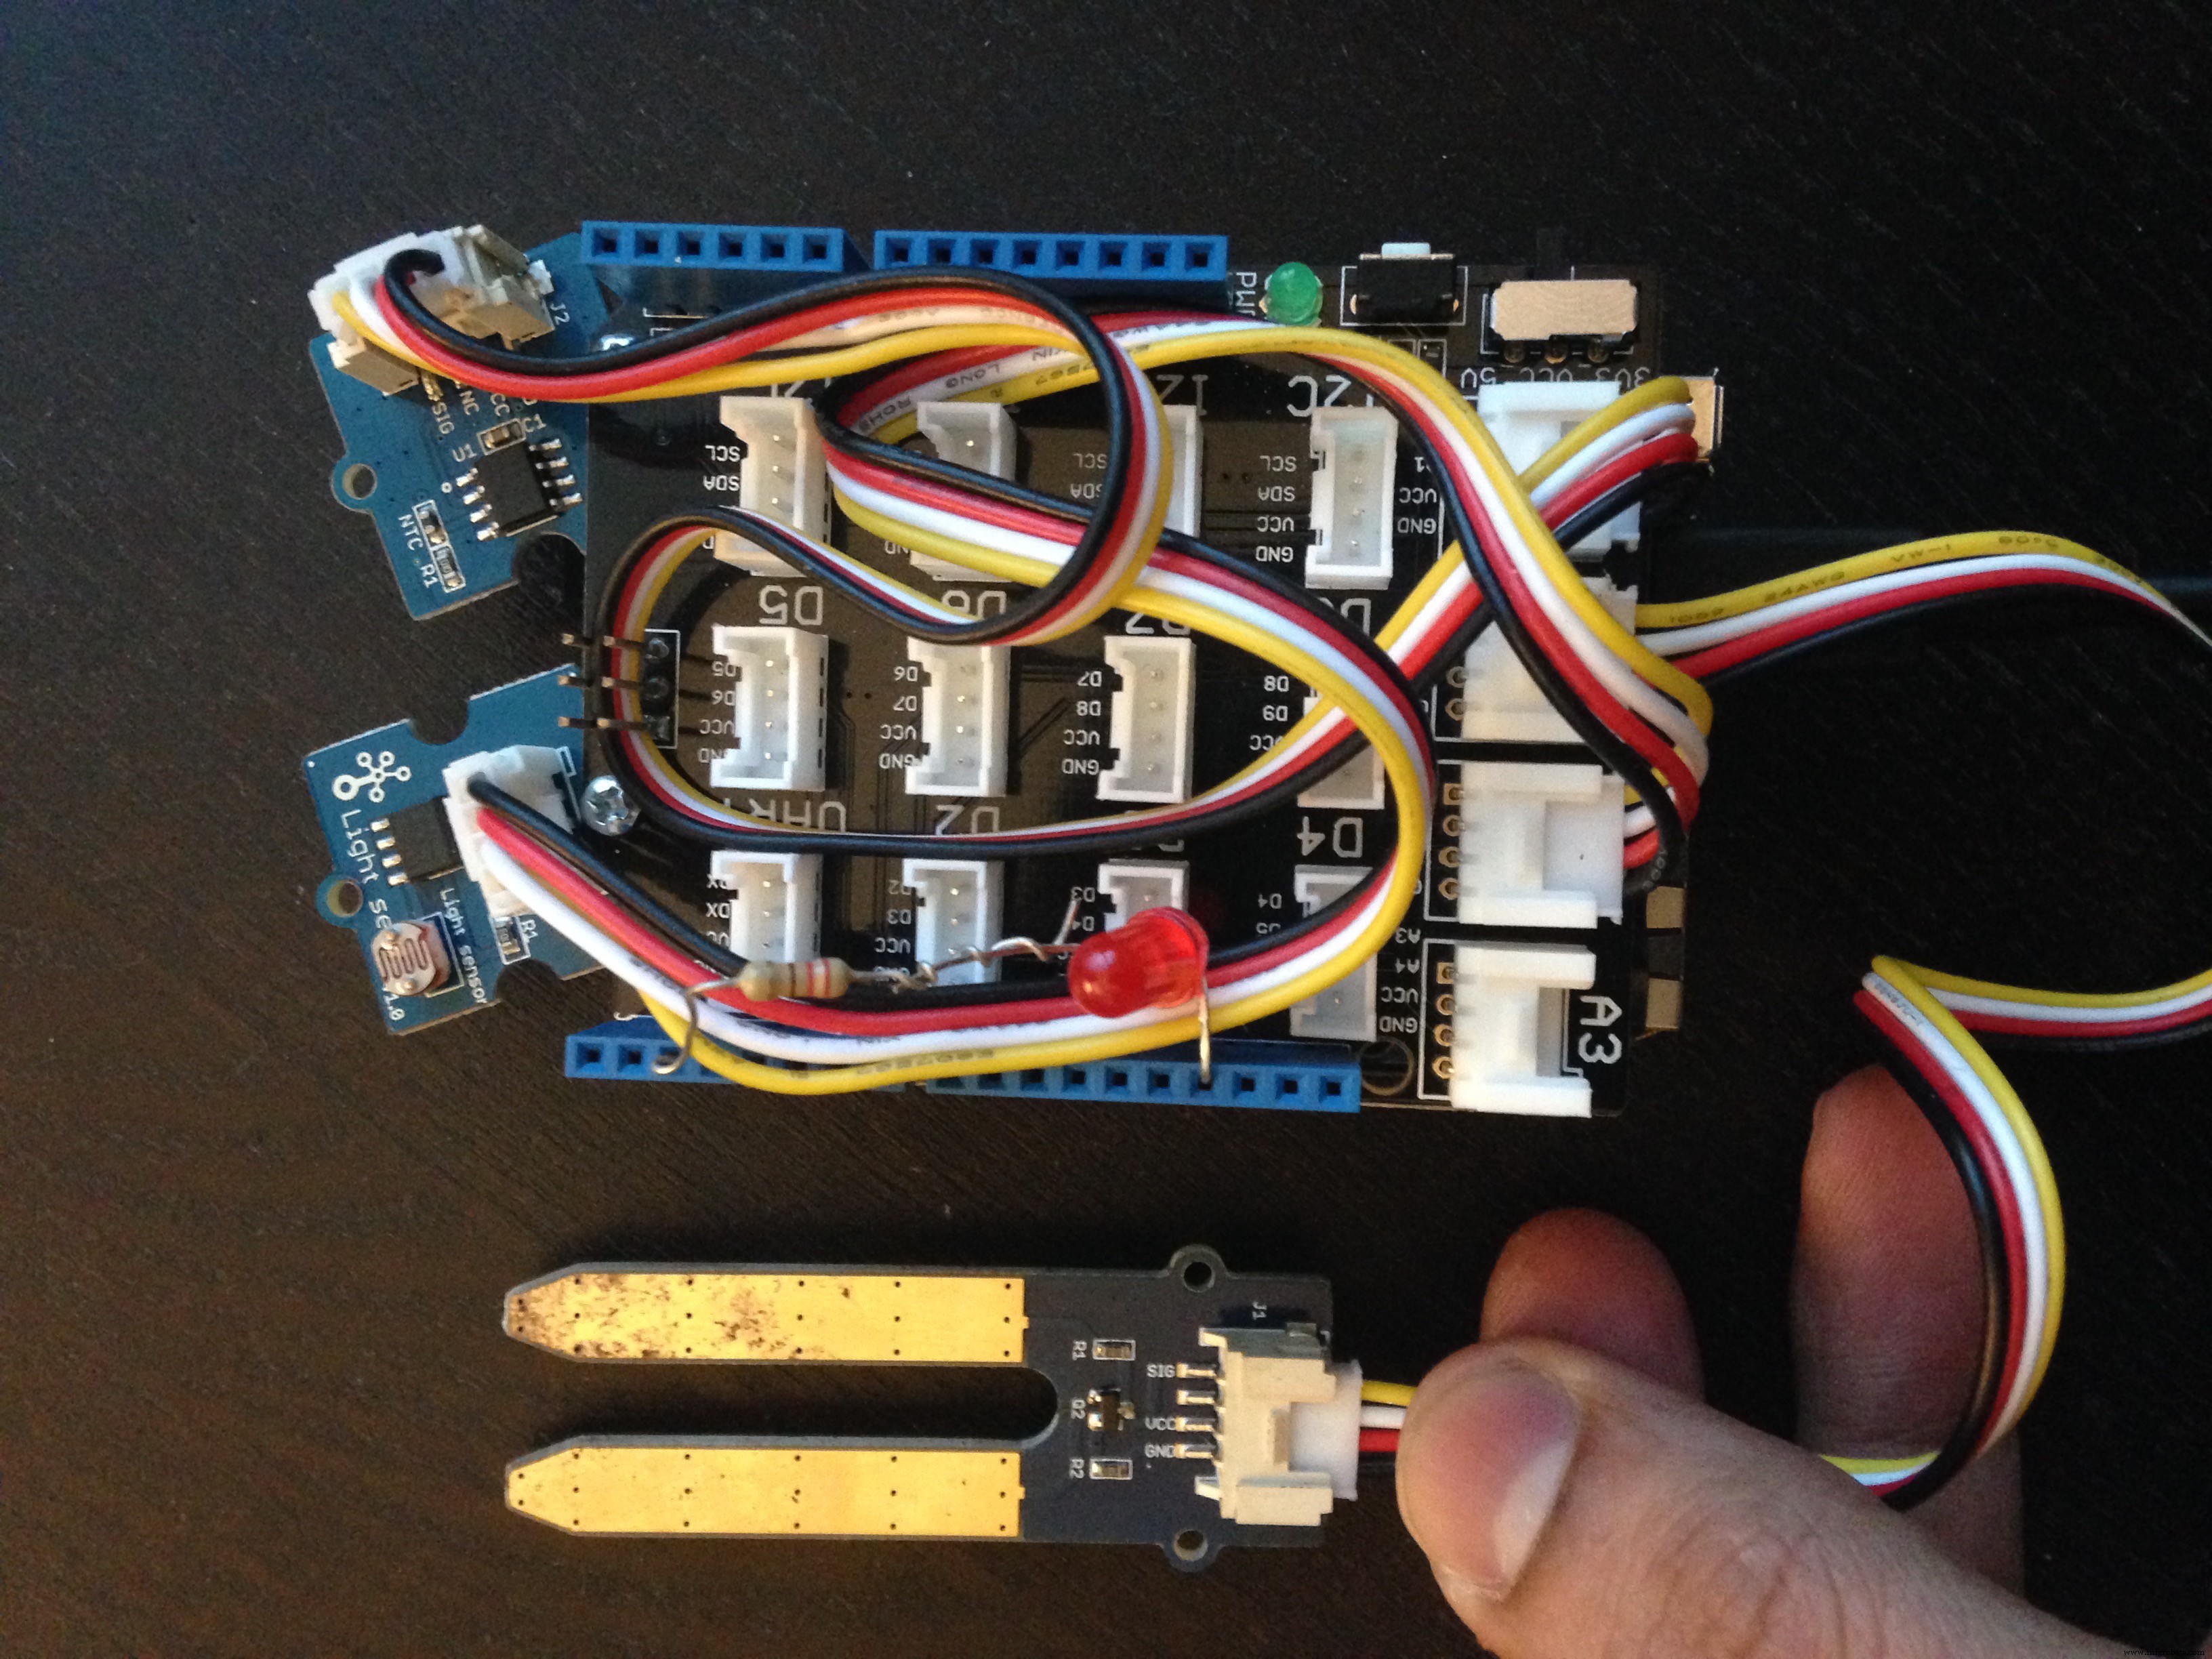
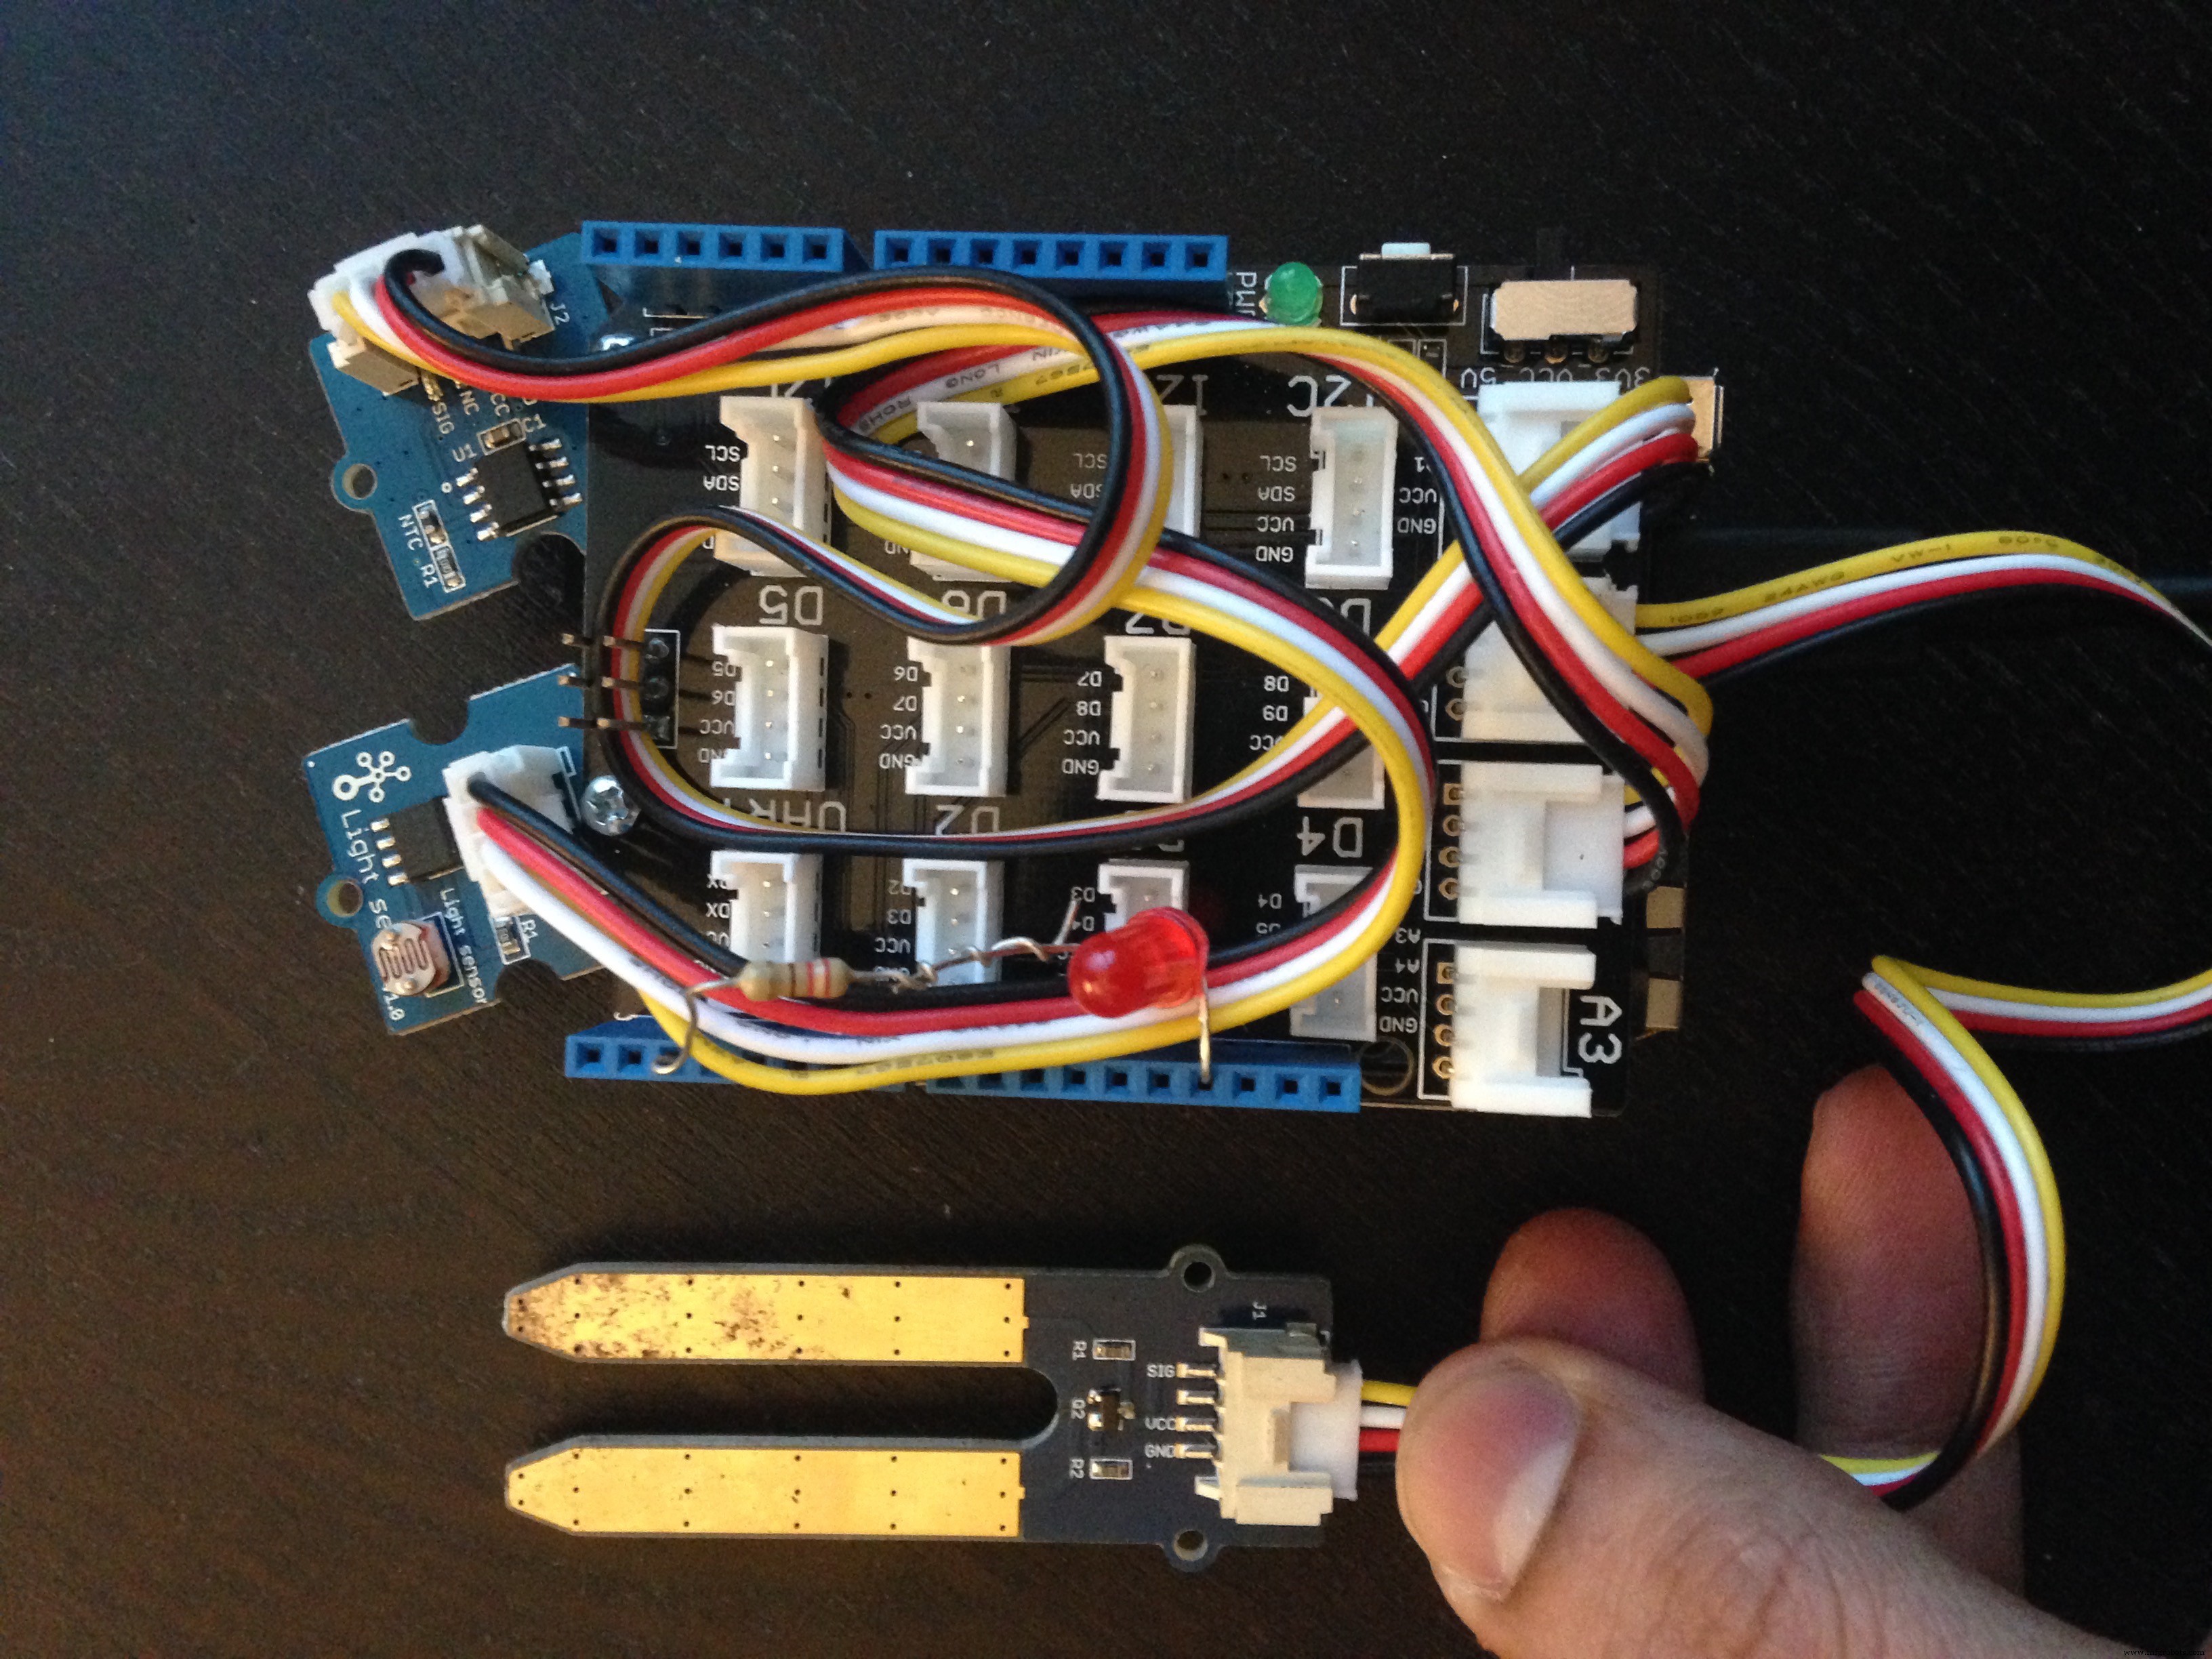
Connexions : Température→A0, Humidité sol→A1, Lumière→A2, LED+330Ω→D2.
Processus de fabrication
- Maîtriser les directives using C# : Imports, alias et directives static
- Surveillance météo à distance avec Raspberry Pi 3 et PubNub
- Construire un bouton IoT AWS contrôlé par mouvement avec Raspberry Pi, capteur PIR et MQTT
- Optimisez vos opérations : exploiter la surveillance de réservoirs IoT pour une gestion pétrolière plus sûre, intelligente et rentable
- Système IoT avancé piloté par IA pour détection ultra-précoce feux de forêt et surveillance santé arbres
- Système de surveillance à distance IoT pour réservoirs de pétrole et diesel
- Découvrez 8 avantages clés de la surveillance de poids de flotte pilotée par l'IoT
- Comment la surveillance d'actifs IoT booste la sécurité et l'efficacité dans le pétrole et gaz
- Révolutionnez la gestion laitière grâce à la surveillance du niveau de lait par IoT